This
post was originally published on
this siteToday, we’re announcing new capabilities in Amazon Bedrock AgentCore to further remove barriers holding AI agents back from production. Organizations across industries are already building on AgentCore, the most advanced platform to build, deploy, and operate highly capable agents securely at any scale. In just 5 months since preview, the AgentCore SDK has been downloaded over 2 million times. For example:
- PGA TOUR, a pioneer and innovation leader in sports has built a multi-agent content generation system to create articles for their digital platforms. The new solution, built on AgentCore, enables the PGA TOUR to provide comprehensive coverage for every player in the field, by increasing content writing speed by 1,000 percent while achieving a 95 percent reduction in costs.
- Independent software vendors (ISVs) like Workday are building the software of the future on AgentCore. AgentCore Code Interpreter provides Workday Planning Agent with secure data protection and essential features for financial data exploration. Users can analyze financial and operational data through natural language queries, making financial planning intuitive and self-driven. This capability reduces time spent on routine planning analysis by 30 percent, saving approximately 100 hours per month.
- Grupo Elfa, a Brazilian distributor and retailer, relies on AgentCore Observability for complete audit traceability and real-time metrics of their agents, transforming their reactive processes into proactive operations. Using this unified platform, their sales team can handle thousands of daily price quotes while the organization maintains full visibility of agent decisions, helping achieve 100 percent traceability of agent decisions and interactions, and reduced problem resolution time by 50 percent.
As organizations scale their agent deployments, they face challenges around implementing the right boundaries and quality checks to confidently deploy agents. The autonomy that makes agents powerful also makes them hard to confidently deploy at scale, as they might access sensitive data inappropriately, make unauthorized decisions, or take unexpected actions. Development teams must balance enabling agent autonomy while ensuring they operate within acceptable boundaries and with the quality you require to put them in front of customers and employees.
The new capabilities available today take the guesswork out of this process and help you build and deploy trusted AI agents with confidence:
- Policy in AgentCore (Preview) – Defines clear boundaries for agent actions by intercepting AgentCore Gateway tool calls before they run using policies with fine-grained permissions.
- AgentCore Evaluations (Preview) – Monitors the quality of your agents based on real-world behavior using built-in evaluators for dimensions such as correctness and helpfulness, plus custom evaluators for business-specific requirements.
We’re also introducing features that expand what agents can do:
- Episodic functionality in AgentCore Memory – A new long-term strategy that helps agents learn from experiences and adapt solutions across similar situations for improved consistency and performance in similar future tasks.
- Bidirectional streaming in AgentCore Runtime – Deploys voice agents where both users and agents can speak simultaneously following a natural conversation flow.
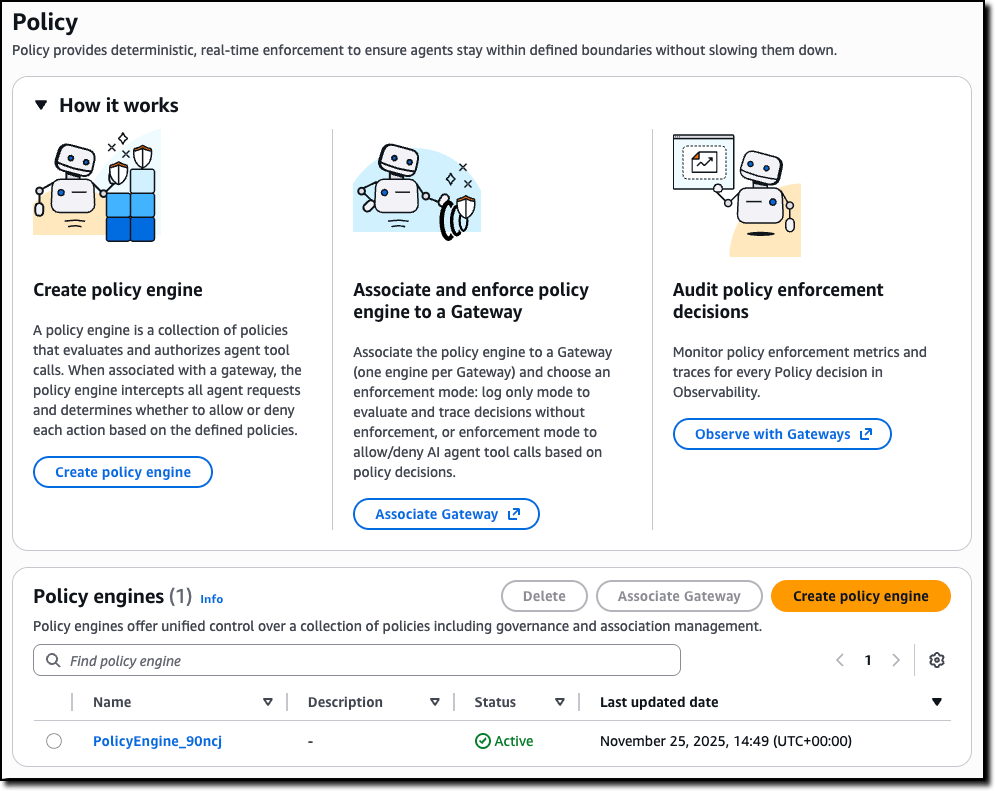
Policy in AgentCore for precise agent control
Policy gives you control over the actions agents can take and are applied outside of the agent’s reasoning loop, treating agents as autonomous actors whose decisions require verification before reaching tools, systems, or data. It integrates with AgentCore Gateway to intercept tool calls as they happen, processing requests while maintaining operational speed, so workflows remain fast and responsive.
You can create policies using natural language or directly use Cedar—an open source policy language for fine-grained permissions—simplifying the process to set up, understand, and audit rules without writing custom code. This approach makes policy creation accessible to development, security, and compliance teams who can create, understand, and audit rules without specialized coding knowledge.
The policies operate independently of how the agent was built or which model it uses. You can define which tools and data agents can access—whether they are APIs, AWS Lambda functions, Model Context Protocol (MCP) servers, or third-party services—what actions they can perform, and under what conditions.
Teams can define clear policies once and apply them consistently across their organization. With policies in place, developers gain the freedom to create innovative agentic experiences, and organizations can deploy their agents to act autonomously while knowing they’ll stay within defined boundaries and compliance requirements.
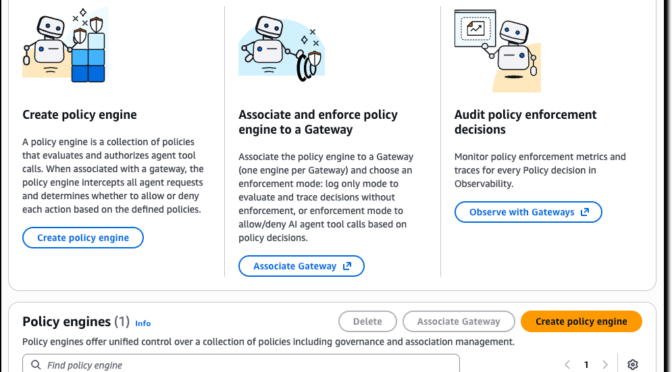
Using Policy in AgentCore
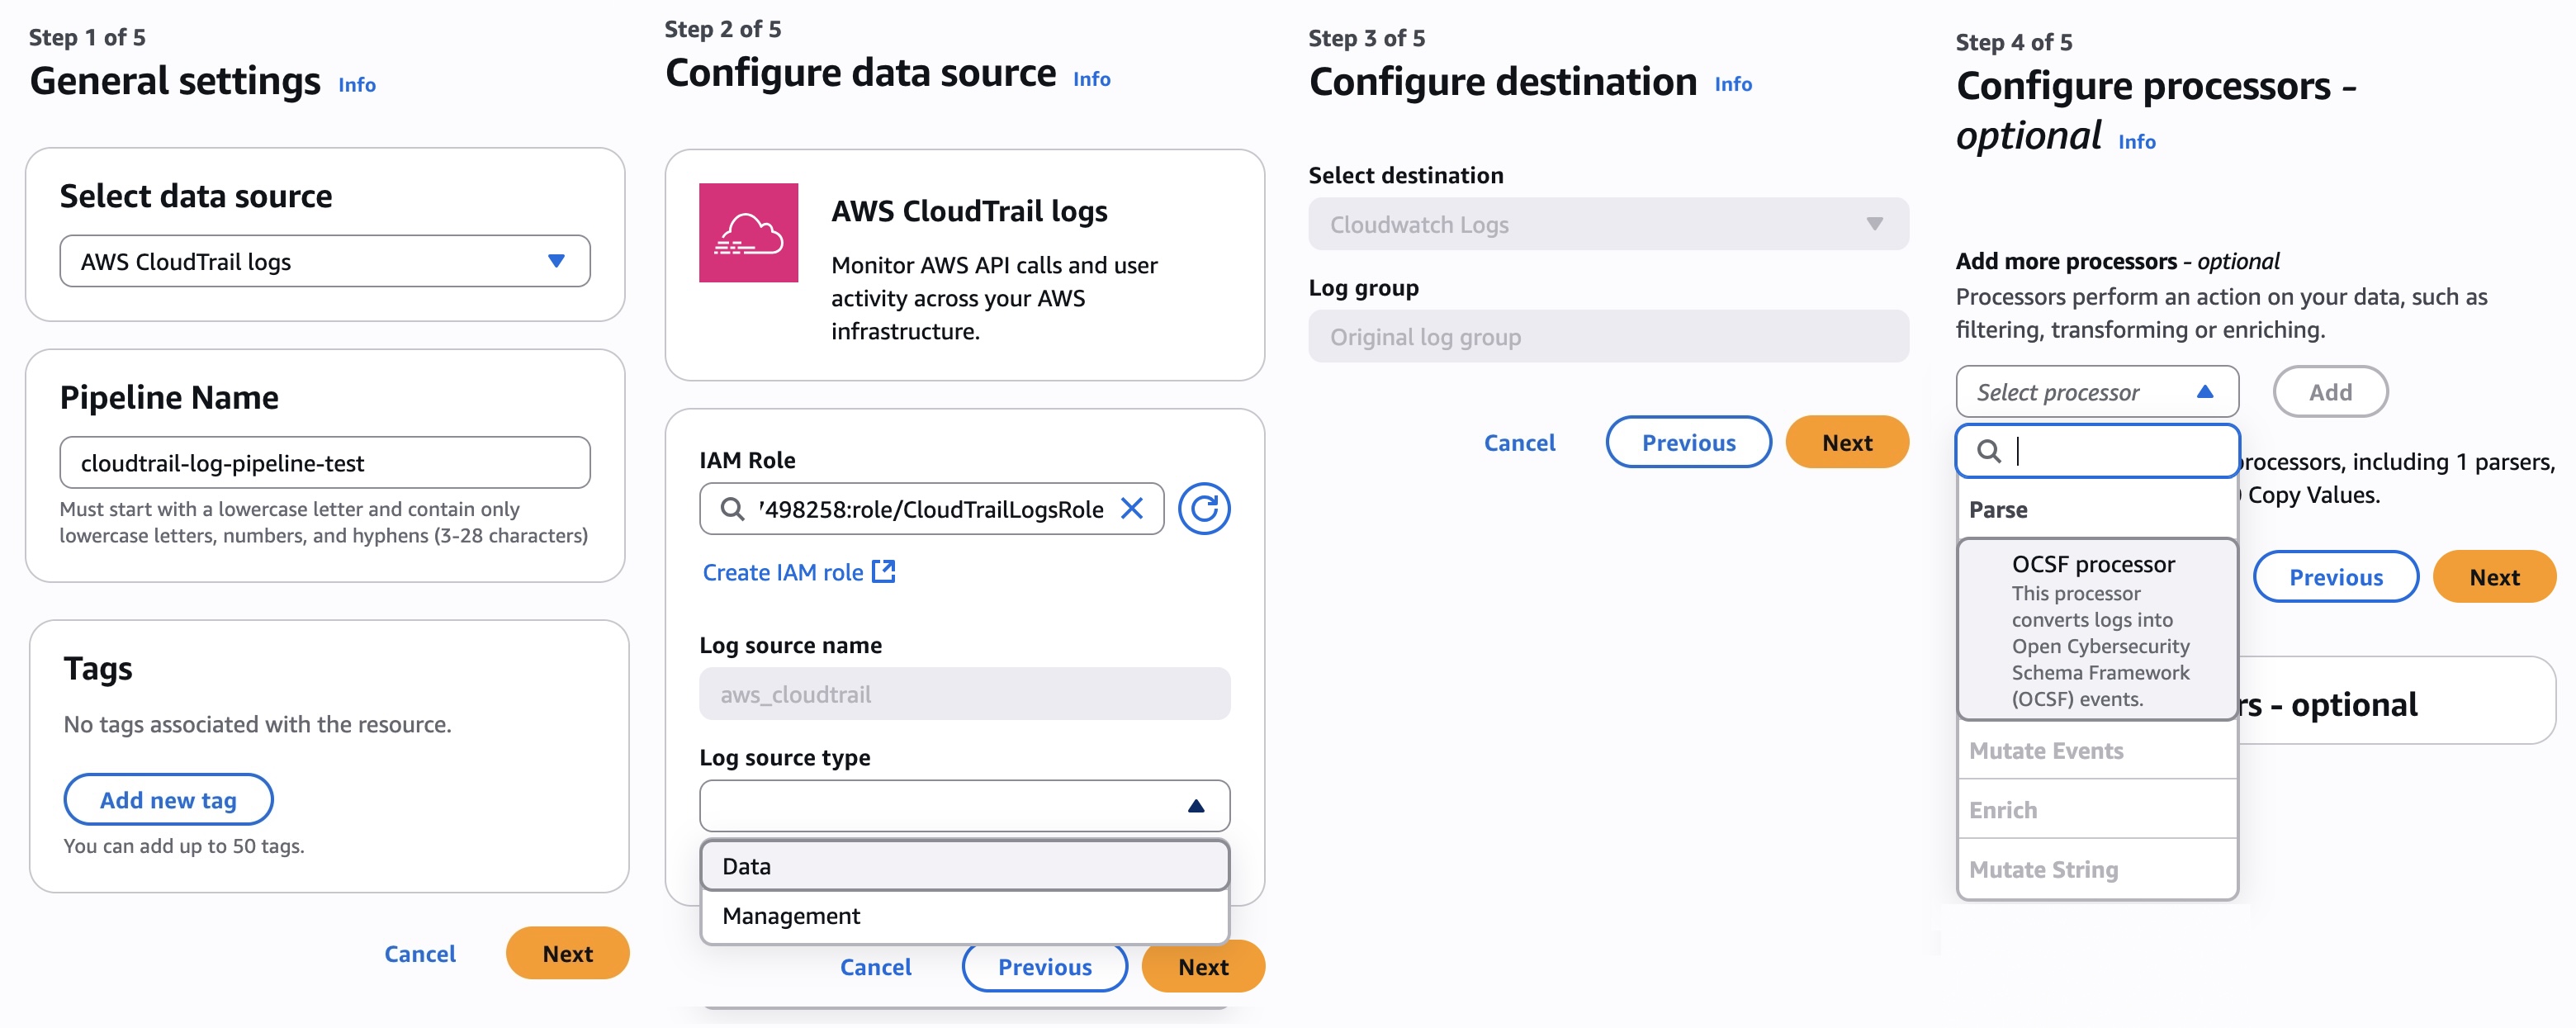
You can start by creating a policy engine in the new Policy section of the AgentCore console and associate it with one or more AgentCore gateways.
A policy engine is a collection of policies that are evaluated at the gateway endpoint. When associating a gateway with a policy engine, you can choose whether to enforce the result of the policy—effectively permitting or denying access to a tool call—or to only emit logs. Using logs helps you test and validate a policy before enabling it in production.
Then, you can define the policies to apply to have granular control over access to the tools offered by the associated AgentCore gateways.
To create a policy, you can start with a natural language description (that should include information of the authentication claims to use) or directly edit Cedar code.
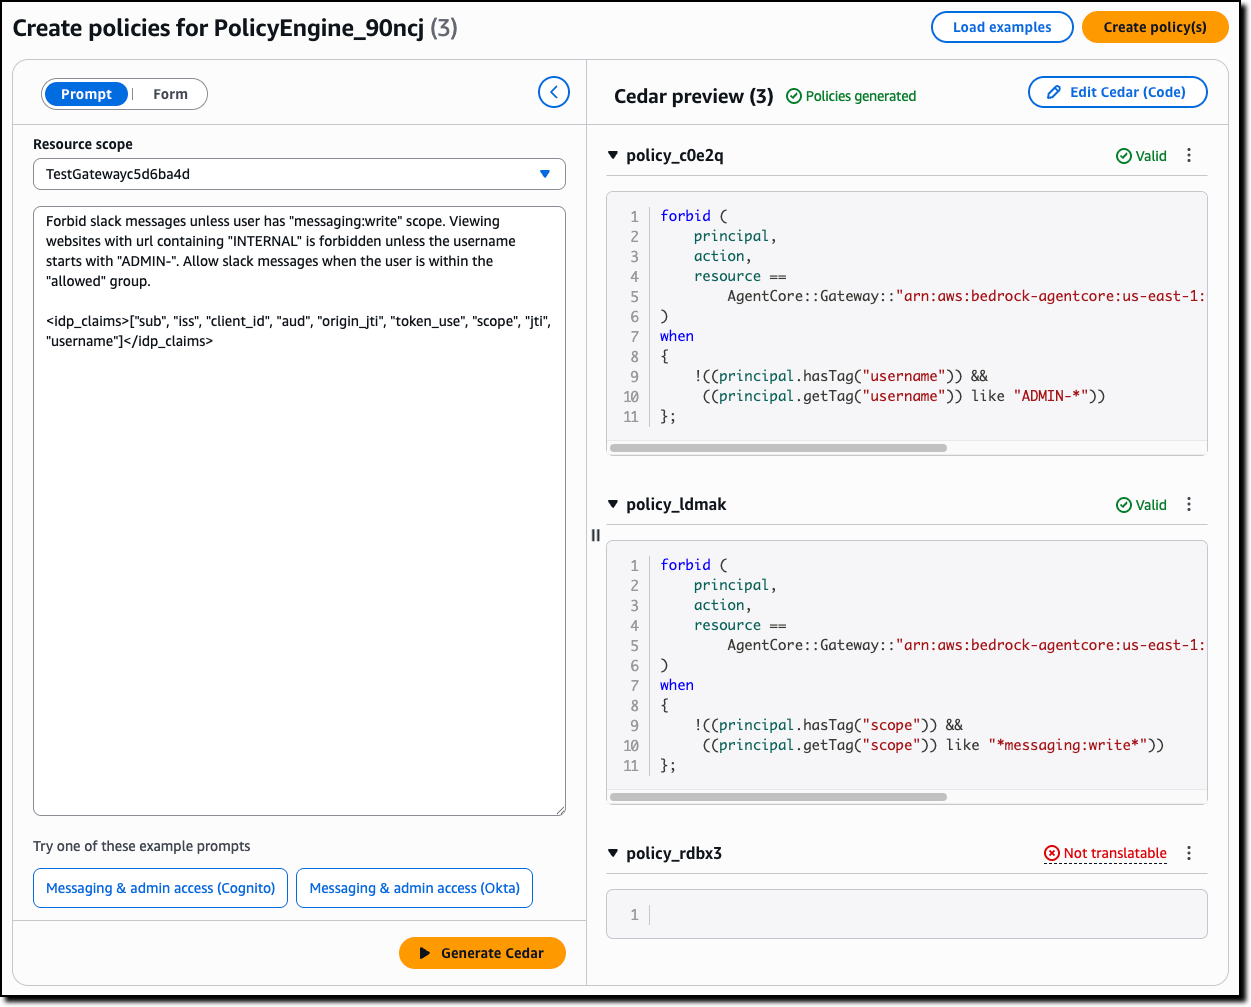
Natural language-based policy authoring provides a more accessible way for you to create fine-grained policies. Instead of writing formal policy code, you can describe rules in plain English. The system interprets your intent, generates candidate policies, validates them against the tool schema, and uses automated reasoning to check safety conditions—identifying prompts that are overly permissive, overly restrictive, or contain conditions that can never be satisfied.
Unlike generic large language model (LLM) translations, this feature understands the structure of your tools and generates policies that are both syntactically correct and semantically aligned with your intent, while flagging rules that cannot be enforced. It is also available as a Model Context Protocol (MCP) server, so you can author and validate policies directly in your preferred AI-assisted coding environment as part of your normal development workflow. This approach reduces onboarding time and helps you write high-quality authorization rules without needing Cedar expertise.
The following sample policy uses information from the OAuth claims in the JWT token used to authenticate to an AgentCore gateway (for the role) and the arguments passed to the tool call (context.input) to validate access to the tool processing a refund. Only an authenticated user with the refund-agent role can access the tool but for amounts (context.input.amount) lower than $200 USD.
permit(
  principal is AgentCore::OAuthUser,
  action == AgentCore::Action::"RefundTool__process_refund",
  resource == AgentCore::Gateway::"<GATEWAY_ARN>"
)
when {
  principal.hasTag("role") &&
  principal.getTag("role") == "refund-agent" &&
  context.input.amount < 200
};
AgentCore Evaluations for continuous, real-time quality intelligence
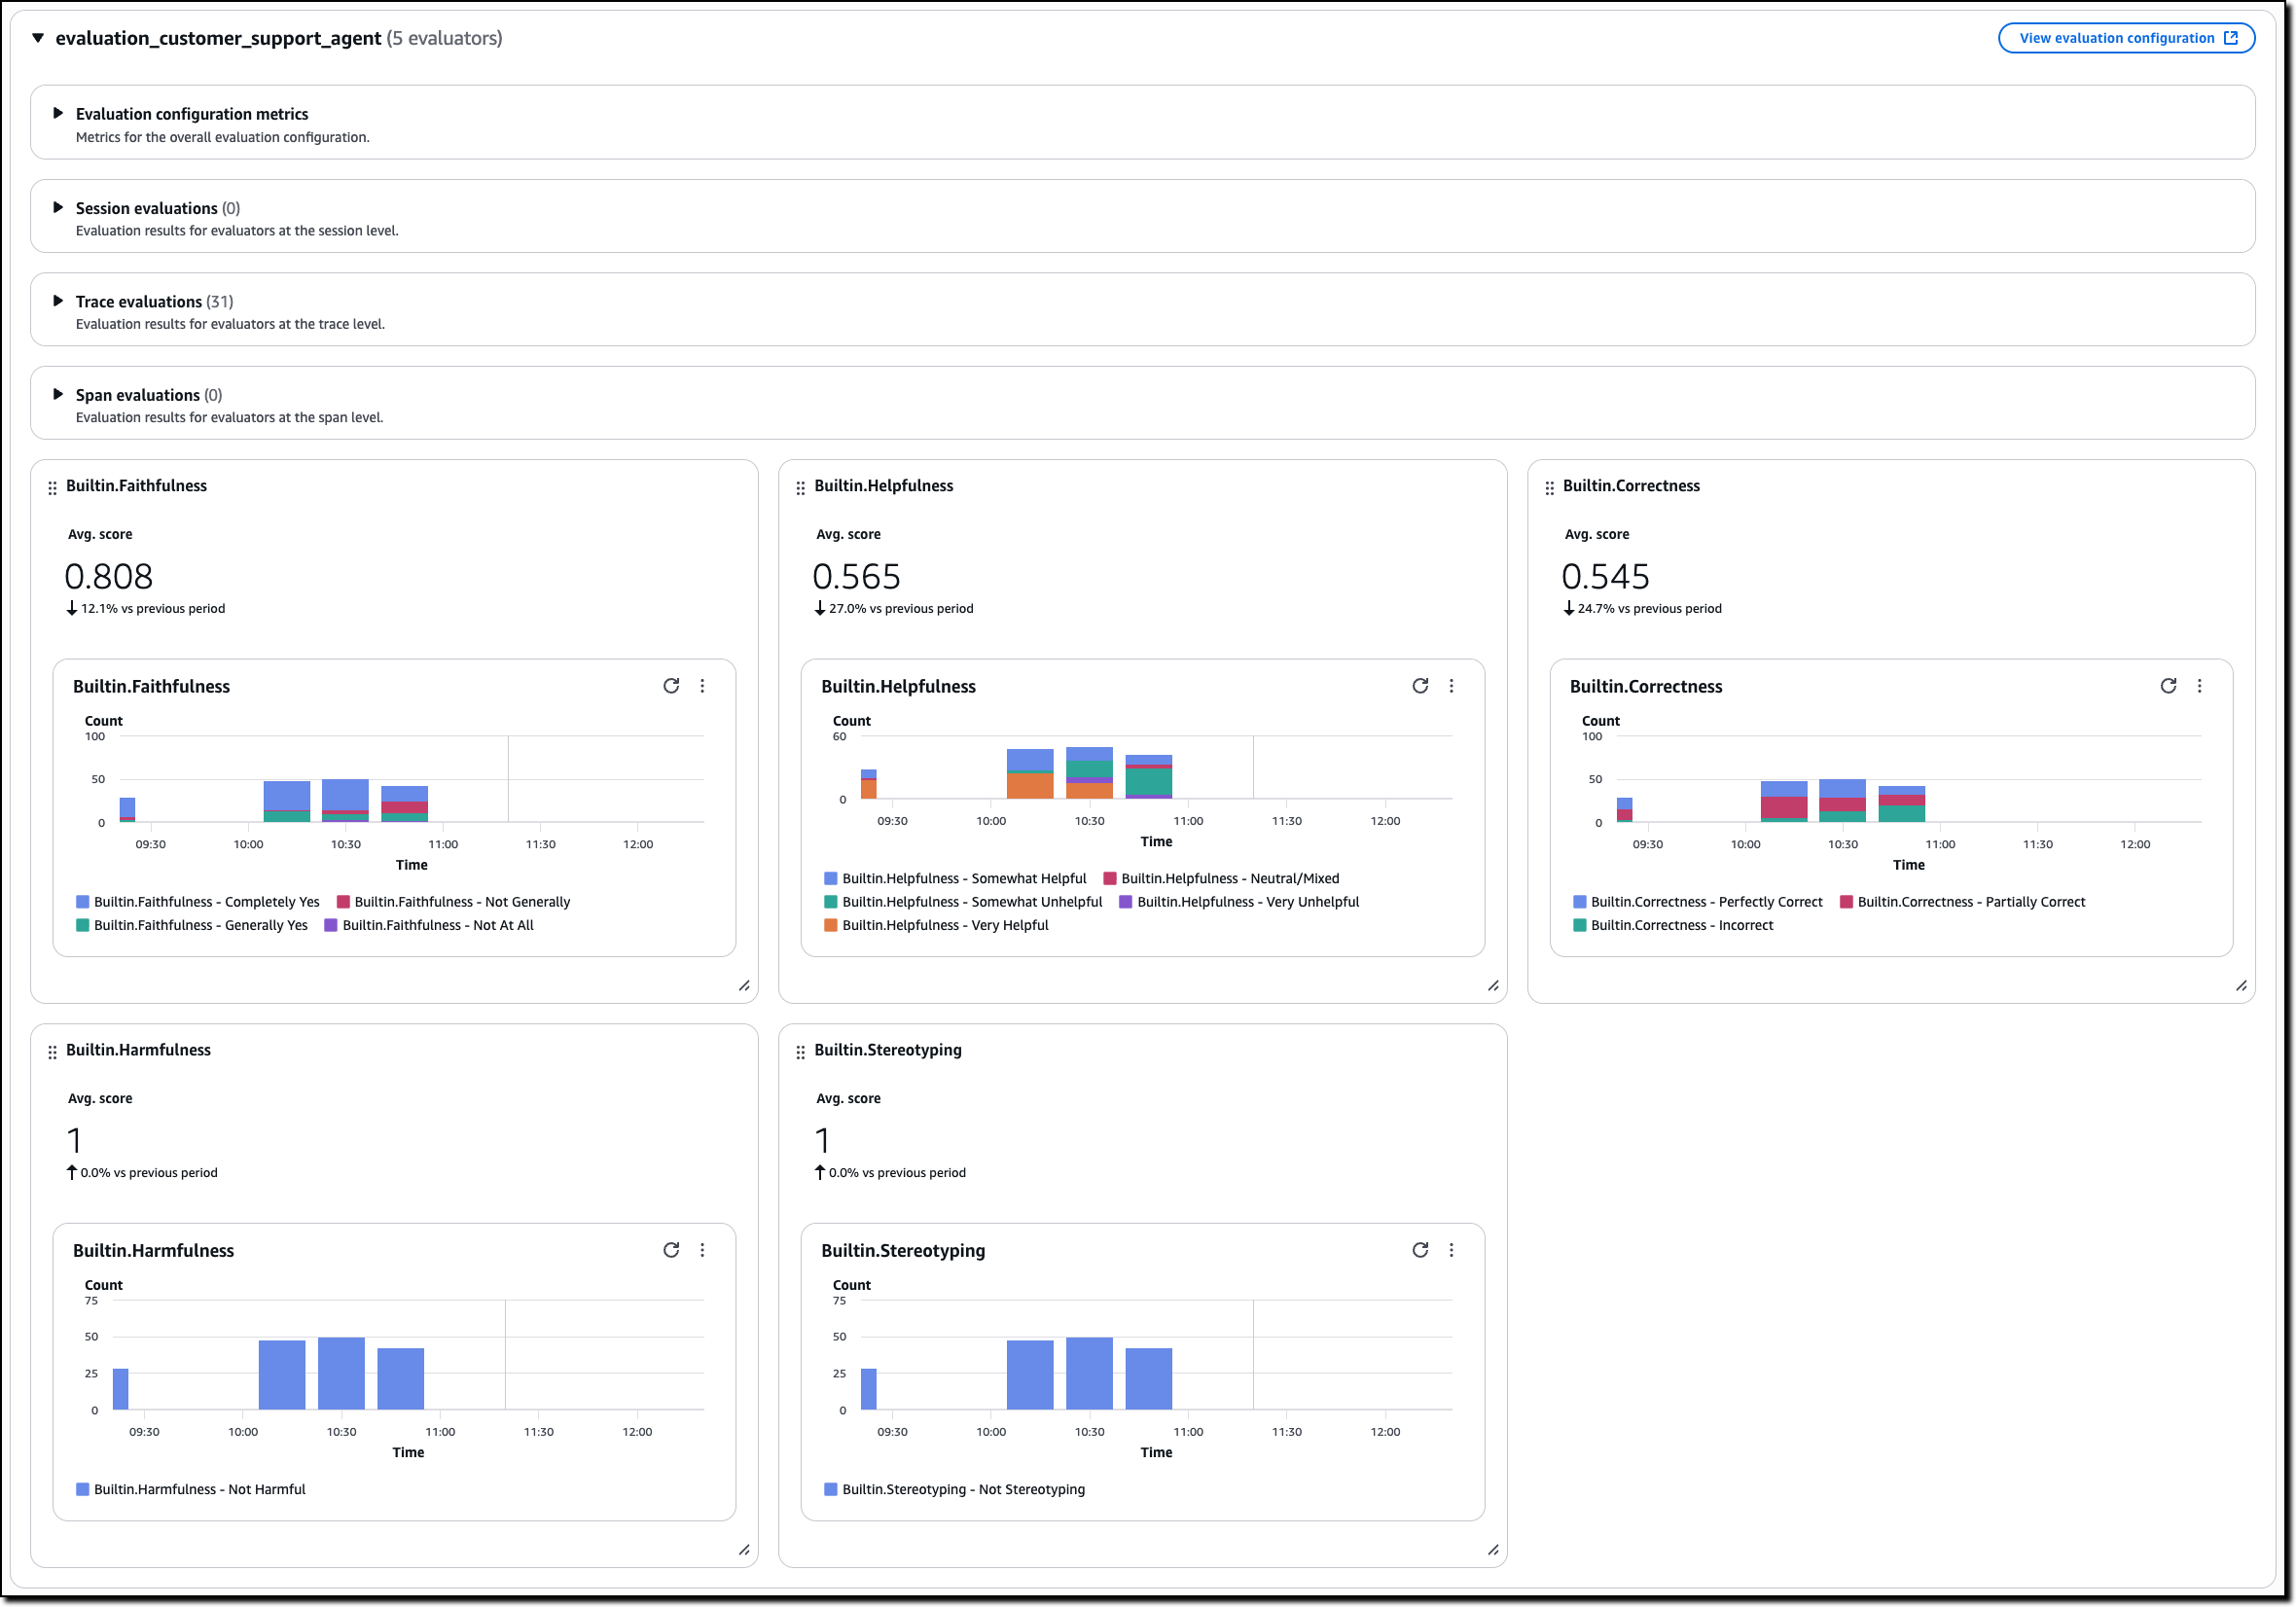
AgentCore Evaluations is a fully managed service that helps you continuously monitor and analyze agent performance based on real-world behavior. With AgentCore Evaluations, you can use built-in evaluators for common quality dimensions such as correctness, helpfulness, tool selection accuracy, safety, goal success rate, and context relevance. You can also create custom model-based scoring systems configured with your choice of prompt and model for business-tailored scoring while the service samples live agent interactions and scores them continuously.
All results from AgentCore Evaluations are visualized in Amazon CloudWatch alongside AgentCore Observability insights, providing one place for unified monitoring. You can also set up alerts and alarms on the evaluation scores to proactively monitor agent quality and respond when metrics fall outside acceptable thresholds.
You can use AgentCore Evaluations during the testing phase where you can check an agent against the baseline before deployment to stop faulty versions from reaching users, and in production for continuous improvement of your agents. When quality metrics drop below defined thresholds—such as a customer service agent satisfaction declining or politeness scores dropping by more than 10 percent over an 8-hour period—the system triggers immediate alerts, helping to detect and address quality issues faster.
Using AgentCore Evaluations
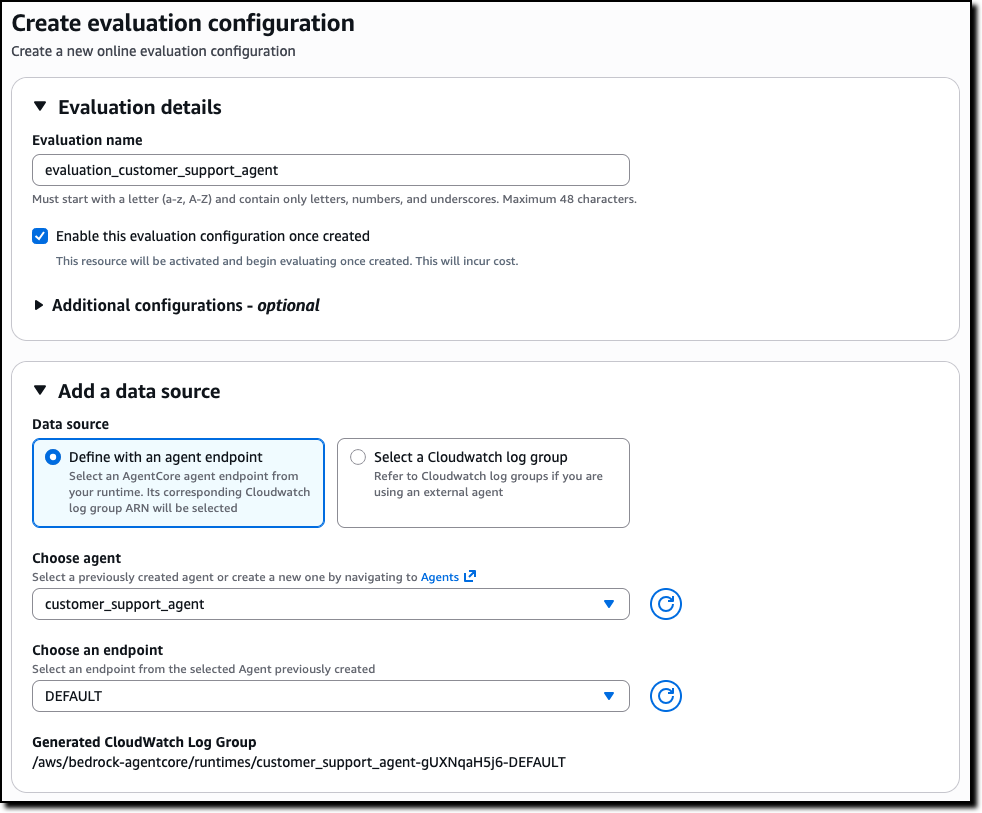
You can create an online evaluation in the new Evaluations section of the AgentCore console. You can use as data source an AgentCore agent endpoint or a CloudWatch log group used by an external agent. For example, I use here the same sample customer support agent I shared when we introduced AgentCore in preview.
Then, you can select the evaluators to use, including custom evaluators that you can define starting from the existing templates or build from scratch.
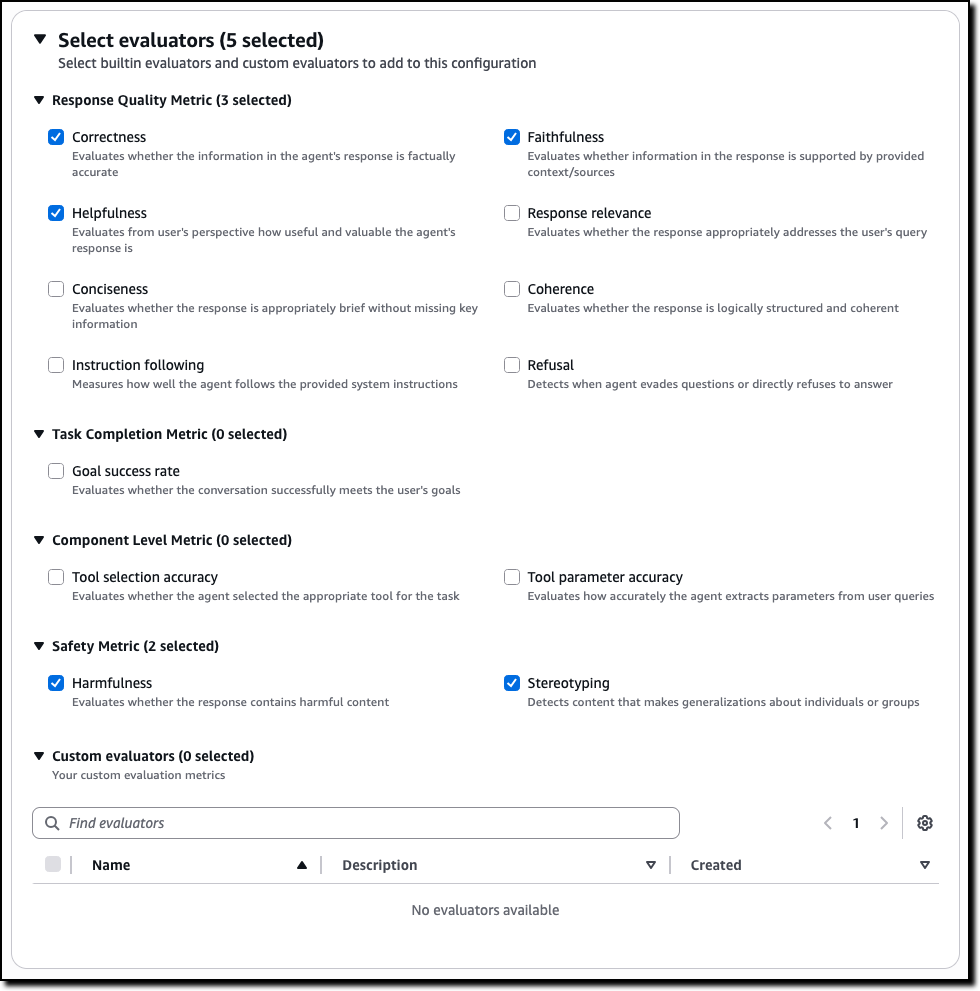
For example, for a customer support agent, you can select metrics such as:
- Correctness – Evaluates whether the information in the agent’s response is factually accurate
- Faithfulness – Evaluates whether information in the response is supported by provided context/sources
- Helpfulness – Evaluates from user’s perspective how useful and valuable the agent’s response is
- Harmfulness – Evaluates whether the response contains harmful content
- Stereotyping – Detects content that makes generalizations about individuals or groups
The evaluators for tool selection and tool parameter accuracy can help you understand if an agent is choosing the right tool for a task and extracting the correct parameters from the user queries.
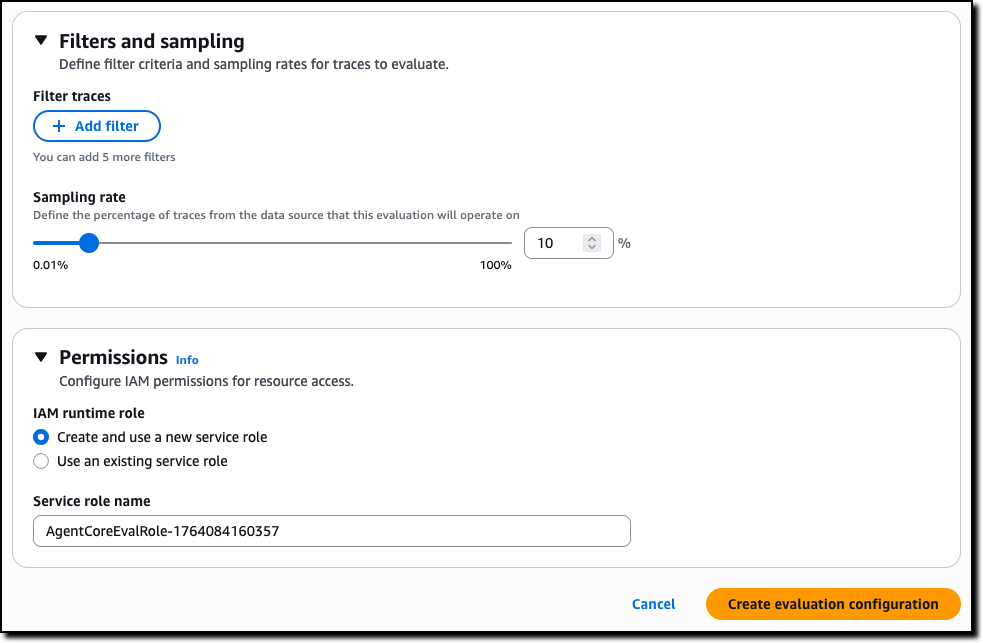
To complete the creation of the evaluation, you can choose the sampling rate and optional filters. For permissions, you can create a new AWS Identity and Access Management (IAM) service role or pass an existing one.
The results are published, as they are evaluated, on Amazon CloudWatch in the AgentCore Observability dashboard. You can choose any of the bar chart sections to see the corresponding traces and gain deeper insight into the requests and responses behind that specific evaluation.
Because the results are in CloudWatch, you can use all of its feature to create, for example, alarms and automations.
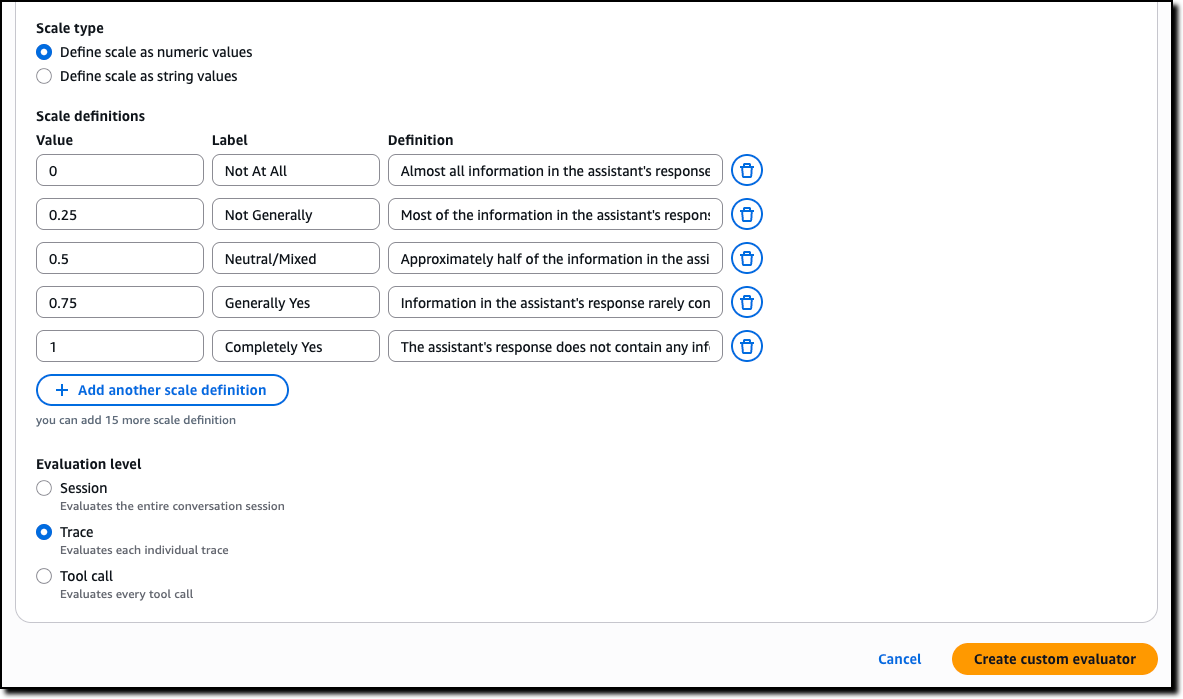
Creating custom evaluators in AgentCore Evaluations
Custom evaluators allow you to define business-specific quality metrics tailored to your agent’s unique requirements. To create a custom evaluator, you provide the model to use as a judge, including inference parameters such as temperature and max output tokens, and a tailored prompt with the judging instructions. You can start from the prompt used by one of the built-in evaluators or enter a new one.

Then, you define the scale to produce in output. It can be either numeric values or custom text labels that you define. Finally, you configure whether the evaluation is computed by the model on single traces, full sessions, or for each tool call.
AgentCore Memory episodic functionality for experience-based learning
AgentCore Memory, a fully managed service that gives AI agents the ability to remember past interactions, now includes a new long-term memory strategy that gives agents the ability to learn from past experiences and apply those lessons to provide more helpful assistance in future interactions.
Consider booking travel with an agent: over time, the agent learns from your booking patterns—such as the fact that you often need to move flights to later times when traveling for work due to client meetings. When you start your next booking involving client meetings, the agent proactively suggests flexible return options based on these learned patterns. Just like an experienced assistant who learns your specific travel habits, agents with episodic memory can now recognize and adapt to your individual needs.
When you enable the new episodic functionality, AgentCore Memory captures structured episodes that record the context, reasoning process, actions taken, and outcomes of agent interactions, while a reflection agent analyzes these episodes to extract broader insights and patterns. When facing similar tasks, agents can retrieve these learnings to improve decision-making consistency and reduce processing time. This reduces the need for custom instructions by including in the agent context only the specific learnings an agent needs to complete a task instead of a long list of all possible suggestions.
AgentCore Runtime bidirectional streaming for more natural conversations
With AgentCore Runtime, you can deploy agentic applications with few lines of code. To simplify deploying conversational experiences that feel natural and responsive, AgentCore Runtime now supports bidirectional streaming. This capability enables voice agents to listen and adapt while users speak, so that people can interrupt agents mid-response and have the agent immediately adjust to the new context—without waiting for the agent to finish its current output. Rather than traditional turn-based interaction where users must wait for complete responses, bidirectional streaming creates flowing, natural conversations where agents dynamically change their response based on what the user is saying.
Building these conversational experiences from the ground up requires significant engineering effort to handle the complex flow of simultaneous communication. Bidirectional streaming simplifies this by managing the infrastructure needed for agents to process input while generating output, handling interruptions gracefully, and maintaining context throughout dynamic conversation shifts. You can now deploy agents that naturally adapt to the fluid nature of human conversation—supporting mid-thought interruptions, context switches, and clarifications without losing the thread of the interaction.
Things to know
Amazon Bedrock AgentCore, including the preview of Policy, is available in the US East (Ohio, N. Virginia), US West (Oregon), Asia Pacific (Mumbai, Singapore, Sydney, Tokyo), and Europe (Frankfurt, Ireland) AWS Regions . The preview of AgentCore Evaluations is available in the US East (Ohio, N. Virginia), US West (Oregon), Asia Pacific (Sydney), and Europe (Frankfurt) Regions. For Regional availability and future roadmap, visit AWS Capabilities by Region.
With AgentCore, you pay for what you use with no upfront commitments. For detailed pricing information, visit the Amazon Bedrock pricing page. AgentCore is also a part of the AWS Free Tier that new AWS customers can use to get started at no cost and explore key AWS services.
These new features work with any open source framework such as CrewAI, LangGraph, LlamaIndex, and Strands Agents, and with any foundation model. AgentCore services can be used together or independently, and you can get started using your favorite AI-assisted development environment with the AgentCore open source MCP server.
To learn more and get started quickly, visit the AgentCore Developer Guide.
— Danilo


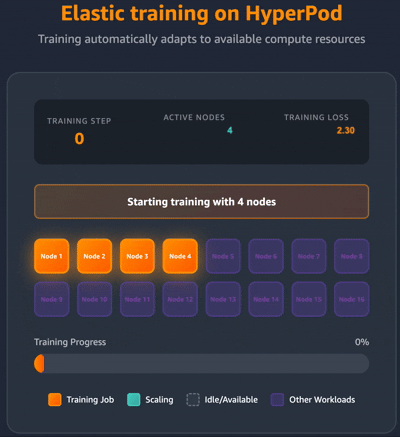 Elastic training transforms how training workloads interact with cluster resources. Training jobs can automatically scale up to utilize available accelerators and gracefully contract when resources are needed elsewhere, all while maintaining training quality.