This
post was originally published on
this siteThe vulnerability
In August 2024 SonicWall published advisory SNWLID-2024-0015 for CVE-2024-40766. It is an improper access control vulnerability in SonicOS. CVSS 9.3. It affects the management interface and the SSLVPN service on Gen 5, Gen 6 and Gen 7 firewalls. Each generation has its own affected firmware range: Gen 5 running SonicOS 5.9.2.14-12o and older, Gen 6 running 6.5.4.14-109n and older, and Gen 7 running SonicOS 7.0.1-5035 and older. Successful exploitation lets an attacker gain unauthorized access to the firewall. Under certain conditions it crashes the device entirely.
The scope of the affected install base is large. SonicWall reports serving approximately 500,000 businesses across 215 countries and territories. Many of them run SSLVPN as their sole remote access method. Many of them do not have a dedicated security team. That combination is exactly what ransomware operators look for.
Who is exploiting and how
Akira and Fog ransomware groups have been exploiting CVE-2024-40766 since at least September 2024 when Arctic Wolf first reported Akira affiliates compromising SSLVPN accounts on vulnerable devices. By December 2024 Macnica research confirmed that roughly half of organizations listed on Akira and Fog leak sites were running SonicWall and at least 48,933 devices were still publicly exposed and unpatched.
The exploitation has not slowed down. It has escalated in waves. In July-August 2025 Arctic Wolf, Huntress and Bitdefender reported a surge of Akira intrusions targeting Gen 7 firewalls. Rapid7 and Darktrace published corroborating analyses in September and October 2025 respectively. Fog ransomware operators were also observed exploiting the same vulnerability during this period accounting for roughly 25 percent of intrusions while Akira accounted for 75 percent. Researchers initially suspected a zero-day. SonicWall investigated and confirmed with high confidence that the activity still correlated with CVE-2024-40766. Many compromised organizations had migrated from Gen 6 to Gen 7 without resetting local user passwords. Dwell times across both groups were alarmingly short. Arctic Wolf documented encryption occurring in under four hours from initial access with some cases as fast as 55 minutes.
In September 2025 SonicWall confirmed a separate breach of its MySonicWall cloud platform where attackers accessed firewall configuration backup files containing encrypted credentials. SonicWall initially stated that fewer than 5 percent of its customer base was affected. The company later concluded that all backup files had been compromised. Any organization with a MySonicWall account should assume its configuration backup was accessed and its encrypted credentials exposed. In October 2025 Huntress reported over 100 SSLVPN accounts compromised across 16 customer environments in a single wave. The attackers were not brute-forcing. They authenticated rapidly using valid credentials obtained from another source.
The problem deepened in 2026. In February and March 2026 ReliaQuest documented what they assessed as the first in-the-wild exploitation of CVE-2024-12802, a separate authentication bypass vulnerability that allows attackers to bypass MFA on SonicWall SSLVPN appliances. On Gen 6 devices the firmware patch alone does not remediate the flaw. Six additional manual LDAP reconfiguration steps are required. In the environments ReliaQuest investigated the devices appeared patched based on firmware version. They were still fully exploitable. Attackers brute-forced credentials with automated tooling, bypassed MFA without triggering any failed-login alerts, and in one case reached a file server and deployed pre-ransomware staging tools within 30 minutes of VPN access. The session type sess="CLI" in the SonicWall authentication logs was the most consistent early indicator that automated tooling was driving the authentication.
On April 16, 2026 SonicWall Gen 6 devices reached end-of-life. No further firmware updates or security patches will be issued for that hardware generation. Gen 6 devices remain common in production environments especially at small businesses and in networks assembled through mergers and acquisitions. Any Gen 6 device still running SSLVPN is now operating without vendor support on a platform with two actively exploited vulnerabilities and no future remediation path.
The common thread across two years of exploitation is the same. The attackers are not breaking in through novel exploits. They are logging in with valid credentials to accounts that should not exist on devices that were patched but never cleaned up.
What we found on patched firewalls
Figure 1 summarizes the residual risk indicators we found across the audited devices. All identifiers are anonymized.
 ???????
The most common finding was stale local accounts. 12 of 14 firewalls had SSLVPN accounts that did not exist in Active Directory. Some were legacy service accounts from the Gen 6 era. Some were accounts created during onboarding for employees who had left years ago. A few had usernames containing non-printable characters. That last one is a strong indicator of automated account creation by exploitation tooling. A human administrator does not create accounts with null bytes in the username.
The second finding was the most dangerous in practical terms. 11 of 14 firewalls had not rotated local account passwords after the firmware upgrade. The same credentials that may have been exposed through the vulnerability or through the MySonicWall backup incident are still valid. An attacker who collected them six months ago can use them today.
The third finding was the lack of any source-IP restriction on SSLVPN authentication. 10 of 14 firewalls accepted VPN connections from any IP on the planet. No geo-IP filtering. No ASN blocking. Legitimate remote workers connect from residential ISPs in the country where the company operates. Attackers connect from hosting providers and VPS infrastructure. A simple ASN filter would block most automated exploitation without affecting any real user.
The LDAP default user group problem
This finding deserves its own section because it is the most misunderstood and the most impactful. SonicWall firewalls that authenticate users via LDAP have a setting called the Default LDAP User Group. Every user who successfully authenticates through LDAP is automatically placed into this group in addition to whatever groups they belong to in Active Directory. The default group membership is additive. The risk is that it grants permissions the user should not have based on their actual role.
If this default group is mapped to a group that has SSLVPN access then every single Active Directory account with valid credentials can connect to the VPN. The receptionist. The warehouse operator. The service account with a weak password that nobody monitors. The contractor who left two years ago but whose AD account was never purged. If the credentials are valid and the account is active in AD the tunnel opens.
We found this misconfiguration in 9 of 14 firewalls. In one case the Default LDAP User Group was mapped to a group that had both SSLVPN Services and administrative access to the firewall management interface. That means any compromised AD credential from any source gives the attacker a VPN tunnel into the network and admin access to the perimeter device itself.
SonicWall published a knowledge base article on this specific risk in August 2025 after the Akira campaign drew attention to it. But it is guidance, not a patch. If an administrator does not read the article and manually reconfigure the setting then the overpermissive default stays exactly where it was. The fix is to create a dedicated local group with no service access and set that as the Default LDAP User Group. Then assign SSLVPN permissions explicitly and only to the groups that need them.
The virtual office portal bypass
Half of the firewalls we audited had the SonicWall Virtual Office Portal accessible from the internet without any authentication gate. The Virtual Office Portal is the web interface where SSLVPN users configure their MFA and TOTP tokens. If an attacker has valid credentials and the portal is reachable from the internet then they do not need to break MFA. They can enroll their own TOTP device for that account. They register their authenticator app. They complete the MFA challenge. They are in.
This is how multiple Akira intrusions bypassed MFA on organizations that believed they had it enforced. The attacker never broke the second factor. They set it up themselves on a device they controlled. The fix is a single access rule: restrict the Virtual Office Portal to internal network addresses or VPN-connected sources only. It takes minutes. But it requires knowing the portal exists in the first place and most firewall administrators we spoke with did not know it was publicly exposed.
What the sessions show you
On every audited firewall we exported the SSLVPN session data for the 30-day window after the patch was applied. Figure 2 shows the results from one representative device.
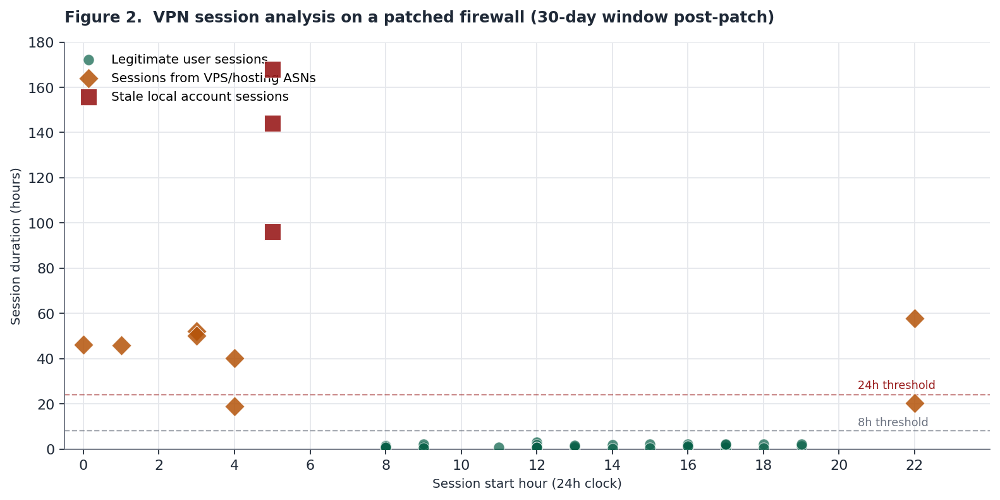
Legitimate user sessions are the green dots clustered at the bottom. Business hours. Duration under eight hours. Source IPs in residential or corporate ISP ranges. Normal.
The orange diamonds are sessions from VPS and hosting provider ASNs. They start during off-hours. Several ran for 40 to 60 hours. No legitimate employee connects to a corporate VPN from a cloud hosting provider for two and a half days straight.
The red squares are the worst. Those are sessions on stale local accounts. Accounts that had been disabled in Active Directory more than a year before the patch was applied. The accounts still existed as local firewall users. They authenticated successfully. They stayed connected for four to seven days. Those sessions were active on a patched firewall. The patch did not terminate them. The patch did not disable the accounts. The patch fixed the access control flaw and left everything else exactly as it was.
What actual remediation looks like
We walked each organization through a post-patch hardening audit. Figure 3 shows the before-and-after for one representative firewall.
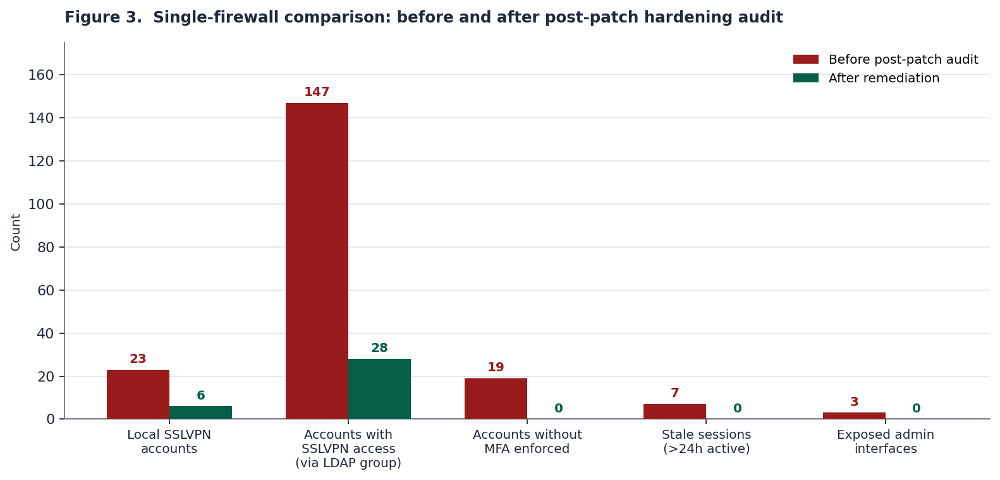
That firewall had 23 local SSLVPN accounts. Six were legitimate and stayed. The other 17 were stale, orphaned or unexplained. The LDAP Default User Group was granting implicit SSLVPN access to 147 AD accounts. After reconfiguring the group that number dropped to 28 who actually needed VPN access. All 19 accounts without MFA enforced were either removed or had MFA turned on. Seven active sessions longer than 24 hours were terminated. Three exposed admin interfaces were restricted to management-VLAN-only access.
The patch took five minutes. This cleanup took an afternoon. That afternoon is the gap between a firewall that shows as patched in a vulnerability scanner and a firewall that is actually hardened against the threat actors who know exactly what post-patch misconfigurations to look for.
Post-patch hunting checklist
This is the checklist we used across every firewall we reviewed. It is designed to be run in one sitting by a single administrator with management access to the device.
|
What to Check
|
How to Check It
|
What Bad Looks Like
|
|
Local SSLVPN account inventory
|
Device > Users > Local Users & Groups (SonicOS 7.x). Compare against AD export. Flag any account not in AD.
|
Accounts with no AD counterpart. Accounts with non-printable or unusual characters in username.
|
|
LDAP Default User Group membership
|
Device > Users > Settings > Authentication. Select LDAP + Local Users then Configure LDAP. Check the Default LDAP User Group assignment.
|
Default group has SSLVPN Services or admin access. Any LDAP-authenticated user inherits VPN access regardless of AD group.
|
|
Password rotation post-upgrade
|
Confirm all local account passwords and LDAP-synchronized AD account passwords were changed after firmware update.
|
Passwords carried over from Gen 6 migration. Same credentials active pre- and post-patch. AD service accounts used for LDAP bind not rotated.
|
|
Virtual Office Portal exposure
|
Attempt external access to the Virtual Office Portal URL on the firewall. Check if MFA/TOTP enrollment is publicly accessible.
|
Portal reachable without auth from external IPs. Attacker can enroll TOTP for any account with known credentials.
|
|
Active session review
|
Network > SSL VPN > Status (SonicOS 7.x). Export and sort by duration and source ASN.
|
Sessions lasting >24 hours. Source IPs in hosting/VPS ASNs. Sessions from accounts not in current employee roster.
|
|
Packet capture and debug artifacts
|
Device > Diagnostics (SonicOS 7.x). Check for saved packet captures, debug logs, config exports created during compromise window.
|
Captures or exports created outside maintenance windows. Captures targeting LDAP bind traffic or internal subnets.
|
|
Account lockout and botnet filtering
|
Device > Users > Settings > Account Lockout. Policy > Security Services > Botnet Filter.
|
Lockout disabled or set to unreasonable thresholds (>20 attempts). Botnet filtering not enabled on SSLVPN zone.
|
|
Firmware version target
|
Device > Settings > Firmware & Backups. Verify running SonicOS 7.3.0 or later. Gen 6 devices: verify all six LDAP steps from SNWLID-2025-0001 are completed.
|
Running any version below 7.3.0. Gen 6 devices showing as patched by version alone without completed LDAP remediation steps.
|
Specific indicators of prior exploitation
Beyond the configuration items there are forensic artifacts that indicate the device was accessed by an attacker before the patch was applied:
- Usernames with non-printable characters. Export the local user list and inspect it in a hex editor or run it through a script that flags any byte outside the ASCII printable range (0x20-0x7E). Automated exploitation tooling sometimes creates accounts with null bytes or control characters that look normal in the web interface but show up in raw exports.
- Packet captures created during the compromise window. If an attacker gained admin access to the firewall they may have used the built-in packet capture to sniff LDAP bind credentials or internal traffic. Check Device > Diagnostics for saved captures and cross-reference creation timestamps against the incident timeline.
- TOTP enrollments outside normal onboarding. Review the audit log for MFA/TOTP configuration changes. An attacker who enrolled their own TOTP device will appear as a configuration change against an existing account at an unusual time.
- Configuration backups exported to unknown destinations. SonicWall config backups contain encrypted credentials. If a backup was exported during the compromise window the attacker can work on cracking the AES-256-encrypted passwords offline. Check system logs for configuration export events.
- LDAP bind credential exposure. If a local admin account was compromised the attacker could have viewed the LDAP configuration page and obtained the bind password. Rotate the LDAP bind credential as part of the post-patch cleanup. The cost of rotation is low. The cost of a wrong assumption is not.
Detection rules worth implementing now
Here are some alerting rules derived from the patterns observed across the audited firewalls:
- SSLVPN auth from hosting and VPS ASNs. Build a list of the top 20 hosting provider ASNs and alert on any SSLVPN authentication from them. Legitimate remote workers connect from residential ISPs. Attackers connect from hosting infrastructure. This single rule would have flagged the suspicious sessions in Figure 2 on day one.
- Session duration exceeding 24 hours. No legitimate VPN session runs for days. Alert on any session over 24 hours. Terminate it. Investigate it.
- Auth to accounts not in the current HR roster. Join the SSLVPN authentication log against an HR system or AD extract daily. Any successful authentication to a disabled, deleted or unknown account is an incident. Full stop.
- Rapid multi-account authentication from a single source. Huntress documented attackers authenticating across dozens of accounts in minutes using valid credentials. That is not brute force. That is credential replay. Alert on more than five successful SSLVPN auths from a single source IP within 10 minutes.
- External access to the Virtual Office Portal. If the portal is restricted to internal addresses then this rule catches bypass attempts. If the portal is still public then this rule shows you how often it is being probed.
- sess="CLI" session type in VPN authentication logs. ReliaQuest documented in May 2026 that every brute-force attempt they observed against CVE-2024-12802 used this session type in the SonicWall logs. It indicates scripted or automated VPN authentication rather than an interactive user session. After successful access the session type changed to sess="GMS". That transition from CLI to GMS is a strong signal that automated credential testing just turned into hands-on-keyboard activity. Determine first whether any legitimate CLI-based VPN authentication exists in your environment. If none is authorized then any appearance of sess="CLI" is a high-confidence alert. Correlate with Event ID 238 for failed VPN logins and Event ID 1080 for successful SSL VPN zone logins.
Conclusion
CVE-2024-40766 has been public since August 2024. A patch has been available from day one. CVE-2024-12802 adds a second layer of risk for Gen 6 devices where the firmware update alone does not remediate the MFA bypass. And Gen 6 reached end-of-life on April 16, 2026. No more patches are coming for that hardware.
The problem is not that organizations are not patching. Most of them are. The problem is that patching is the only thing they do. They apply the firmware update. They mark the CVE as remediated. They move on. And everything around the vulnerability stays the same. The accounts stay. The LDAP group stays. The passwords stay. The Virtual Office Portal stays open. The sessions stay connected. On Gen 6 devices the LDAP configuration that enables MFA bypass stays in place even after the firmware update because the patch does not remove it.
Akira and Fog operators know all of this. They are not scanning for unpatched firewalls anymore. They are scanning for patched firewalls where nobody completed the post-patch steps. A patched SonicWall with 17 stale local accounts and an overpermissive LDAP default group is not a remediated device. It is a device with newer firmware and the same attack surface.
If you run SonicWall with SSLVPN enabled and you applied the patch for CVE-2024-40766 then you did Step 1. Do Step 2. Run the checklist. Reconcile the accounts. Fix the LDAP group. Rotate the passwords for both local firewall accounts and LDAP-synchronized Active Directory accounts including the LDAP bind credential. Restrict the portal. Terminate the stale sessions. Upgrade to SonicOS 7.3.0 or later which includes enhanced brute-force detection and improved MFA controls that older patched versions do not have.
If you are on Gen 6 verify that all six LDAP remediation steps from SNWLID-2025-0001 have been completed. Firmware version alone does not confirm remediation on Gen 6. The six steps are: delete the existing LDAP configuration that uses userPrincipalName, remove locally cached LDAP users, remove the configured SSL VPN User Domain, reboot the firewall, recreate the LDAP configuration without userPrincipalName, and create a fresh configuration backup to prevent the vulnerable state from being restored. SonicWall has published an automation script that executes these steps via SonicOS API or SSH. Gen 6 reached end-of-life in April 2026. Start planning your migration to supported hardware. The patch closed the bug. Now close the configuration gaps that the bug left behind.
Manuel Humberto Santander Peláez
SANS Internet Storm Center – Handler
Twitter: @manuelsantander
Mastodon:manuelsantander@infosec.exchange
email:msantand@isc.sans.org
(c) SANS Internet Storm Center. https://isc.sans.edu Creative Commons Attribution-Noncommercial 3.0 United States License.