
The last update to the DShield SIEM [4] was in Sep 2025 which contained some minor tweaks. This update currently is using ELK stack version 8.19.15, contains some additional dashboards and new logs.
All posts by David

Microsoft Patch Tuesday July 2026 – The AI Acopolypse is Here , (Tue, Jul 14th)
This post was originally published on this site
This patch Tuesday includes a staggering 622 vulnerabilities, not including another 427 vulnerabilities in Chromium, affecting Microsoft's Edge browser. 62 of the vulnerabilities are rated critical. One was disclosed before today, and two have already been exploited.
Amazon SQS turns 20: Two decades of reliable messaging at scale
This post was originally published on this site
On July 13, 2006, we launched Amazon Simple Queue Service (Amazon SQS) as one of the first three services available to customers, alongside Amazon EC2 and Amazon S3. We had learned firsthand that distributed systems need a reliable way to pass messages between components without creating tight dependencies. If one service called another directly and that service was slow or unavailable, failures cascaded through the entire system. Message queuing solved this by letting services communicate asynchronously: a producer could drop a message into a queue and move on, while a consumer picked it up when ready. This approach kept individual service failures from affecting the rest of the system.
When Amazon SQS launched publicly in July 2006, it made this pattern available to every AWS customer. Twenty years later, that core function, decoupling producers from consumers, remains the reason customers use SQS. The scale, performance, and operational controls around it look very different now though.
Jeff Barr covered the first 15 years of SQS milestones in his 15th anniversary post, from the original 8 KB message limit in 2006 through FIFO queues, server-side encryption, and Lambda integration. Over the last five years, we have continued to scale SQS, added stronger security defaults, and introduced new capabilities that address increasingly complex workload patterns.
Key milestones between 2021 and 2026
High throughput mode for FIFO queues (2021): In May 2021, we launched general availability of high throughput mode for FIFO queues, supporting up to 3,000 transactions per second (TPS) per API action, a tenfold increase over the previous limit. We continued raising this ceiling over the following two years: to 6,000 TPS in October 2022, to 9,000 TPS in August 2023, and to 18,000 TPS in October 2023, before reaching 70,000 TPS per API action in select Regions by November 2023.
Server-side encryption with SSE-SQS (2021): In November 2021, we introduced server-side encryption with Amazon SQS-managed encryption keys (SSE-SQS), giving customers an encryption option that required no key management. In October 2022, we made SSE-SQS the default for all newly created queues, so customers no longer needed to explicitly enable it.
Dead-letter queue redrive enhancements (2021): We progressively expanded how customers recover unconsumed messages from dead-letter queues. In December 2021, we added DLQ redrive to source queue directly in the SQS console. In June 2023, we extended this capability to the AWS SDK and CLI through new APIs, including StartMessageMoveTask, CancelMessageMoveTask, and ListMessageMoveTasks. In November 2023, we added redrive support for FIFO queues.
Attribute-based access control, ABAC (2022): In November 2022, we introduced ABAC, giving customers the ability to configure access permissions based on queue tags rather than maintaining static policies as resources scaled.
JSON protocol support (2023): In November 2023, we added support for the JSON protocol in the AWS SDK, reducing end-to-end message processing latency by up to 23% for a 5 KB payload and lowering client-side CPU and memory usage.
Amazon EventBridge Pipes console integration (2023): We added the ability to connect a queue directly to EventBridge Pipes from the SQS console, routing messages to a broad range of AWS service targets without writing custom integration code.
Extended Client Library for Python (2024): We brought the Extended Client Library, previously available for Java, to Python developers, allowing messages up to 2 GB to be sent through SQS by storing the payload in Amazon S3 and passing a reference through the queue.
FIFO in-flight message limit increase (2024): We increased the in-flight message limit for FIFO queues from 20,000 to 120,000 messages, so consumers can process significantly more messages concurrently without being constrained by the previous ceiling.
Fair queues for multi-tenant workloads (2025): We introduced fair queues to mitigate the noisy neighbor problem in multi-tenant standard queues. By including a message group ID when sending messages, customers can prevent a single tenant from delaying message delivery for others, without any changes required on the consumer side.
1 MiB maximum message payload size (2025): We increased the maximum message payload from 256 KiB to 1 MiB for both standard and FIFO queues, helping customers send larger messages without offloading data to external storage. AWS Lambda event source mapping for SQS was updated in parallel to support the new payload size.
The constant underneath the change
Despite two decades of feature additions, the fundamental use case for SQS has not shifted. Customers use it to decouple services, buffer bursts of traffic, and build systems that stay resilient when individual components fail. That same pattern now extends to AI workloads. Customers use SQS queues to buffer requests to large language models, manage inference throughput, and coordinate communication between autonomous AI agents operating as independent services. For an example of this architecture in practice, read Creating asynchronous AI agents with Amazon Bedrock.
To learn more about Amazon SQS, visit the Amazon SQS product page, review the developer guide, or explore recent updates on the AWS Blogs.

Someone Is Scanning for Your MCP Servers and AI Assistant Credentials, (Mon, Jul 13th)

"Comment stuffing" in an HTML phishing attachment as a mechanism for evading AI-based detection?, (Fri, Jul 10th)
This post was originally published on this site
Anyone who deals with phishing messages caught by basic security filters knows that most phishing samples tend to blend into one another, since only a small set of techniques and approaches keeps reappearing in them. That is precisely why it is worth pausing on the occasional message that does something a little out of the ordinary.
_HELP_ME_ESCAPE_FROM_BELARUS_PLEASE_ [Guest Diary], (Tue, Jul 7th)
This post was originally published on this site
[This is a Guest Diary by Jason Callahan, an ISC intern as part of the SANS.edu BACS program]
Every so often a honeypot hit comes along that is less about the exploit and more about the intent behind it. While reviewing DShield logs I ran into a scanning bot that caught my eye: a URI string that appeared to be a plea for help.
On 2026-06-06 my DShield honeypot logged back-to-back HTTP requests from the same source IP hitting two different ports with both carrying an identical, oddly formatted request path:
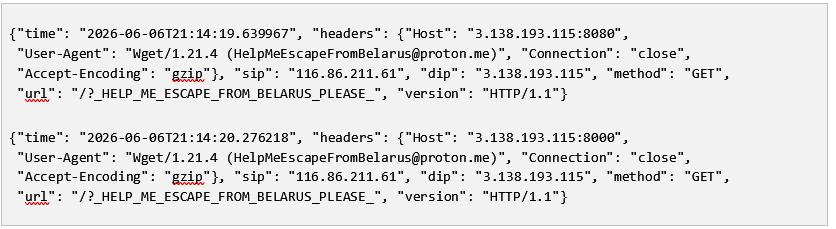
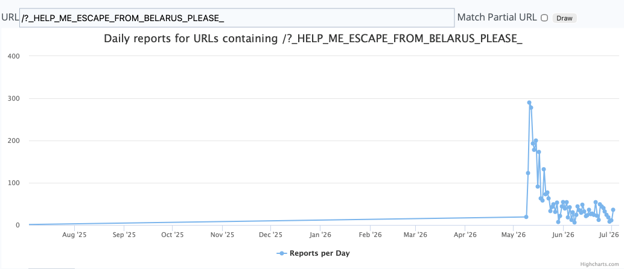
The request path itself /?_HELP_ME_ESCAPE_FROM_BELARUS_PLEASE_ is not a known exploit path, it appeared to be a plain-text message in the URL. Searching my logs for that particular string returned around a dozen similar HTTP requests over a 2 months period. These came from various IPs from around the globe with no discernible pattern which pointed to a self-propagating bot rather than a single attacker.
Further research showed that this bot was first reported to ISC in May 2026. The number of reports peaked shortly after the first report before a sharp drop and has remained steady since. [1]
I was unable to locate much more information about this bot other than a reddit thread on r/selfhosted describing the same requests hitting a Traefik reverse proxy. According to that thread, the user emailed the address embedded in the User-Agent and received a reply pointing to a page on a free web-hosting service. The page is a static HTML document with no scripts and it lays out what the bot is & why it exists.
The author, who identifies himself only as “Alex,” claims to be based in Belarus and writes that the bot is intentionally limited: no exploits, no command-and-control, no persistence. In his words, paraphrased and summarized from the page:
• The bot scans random IP addresses for open HTTP ports (80, 8000, 8080) and SSH ports (22, 2222).
• If it finds an open HTTP port it sends a single request (GET, CONNECT, or HEAD)
• If it finds an open SSH port it attempts a brute force with a small, fixed list of default credential pairs (admin:admin, root:root, etc.)
• It runs fully autonomously with no C2 channel; discovered IP/credential pairs are reported back to a loader only.
• It does not establish persistence, typically running from /tmp, and it is designed to self-terminate roughly six months after release.
• The stated purpose is to draw attention to conditions in Belarus. They describe it as a “performance piece,” saying they are not seeking funding and only asking for non-financial help leaving the country (job leads, advice, connections).
Disregarding the origin and supposed intent of the bot, this is a straightforward scan-and-brute-force bot and it should be treated like any other hitting a honeypot. The HTTP request is reconnaissance/fingerprinting that tells the operator a host is alive and reachable on that port. The risk is on the SSH side: any host reachable on TCP 22/2222 that still uses a default or weak credential pair is exposed, regardless of the creator’s stated intentions.
I want to give some healthy skepticism here rather than take the linked page at face value. I have no way to verify the age, location, or motive claimed on that page, whether the page itself is the full extent of the bot's behavior, or whether the “self-terminate after six months” and “no persistence” claims hold up under closer reverse engineering. Sob stories and appeals to sympathy are also a known social-engineering lever, and a URI designed to make analysts pause and read a web page rather than immediately blocklist an IP is an effective way to buy a scanner some goodwill. None of that changes the defensive posture: treat it as an untrusted, credential-guessing scanner.
[1] https://isc.sans.edu/weblogs/urlhistory.html?url=Lz9fSEVMUF9NRV9FU0NBUEVfRlJPTV9CRUxBUlVTX1BMRUFTRV8=
[2] https://isc.sans.edu/honeypot.html
[3] https://www.sans.edu/cyber-security-programs/bachelors-degree/
Disclosure: Claude was used for grammar and polish checks. No further use of generative A.I. was used in the creation of this post.
———–
Guy Bruneau IPSS Inc.
My GitHub Page
Twitter: GuyBruneau
gbruneau at isc dot sans dot edu
(c) SANS Internet Storm Center. https://isc.sans.edu Creative Commons Attribution-Noncommercial 3.0 United States License.

My Stack Simulator, (Wed, Jul 8th)
This post was originally published on this site
The stack is a memory region where a program stores temporary data – like local variables and return addresses. Think of the stack as a pile of plates in your kitchen: you can only add a new plate to the top, and you can only take one away from the top too. Programs use this same "last in, first out" principle to keep track of what they're doing. Every time a function is called, the program pushes a new plate onto the stack containing things like local variables and the address to return to once the function finishes. When the function is done, that plate is popped off the top, and execution resumes exactly where it left off. This simple mechanism is what allows programs to call functions within functions within functions, and always find their way back – but it's also precisely why a stack that grows too large, or gets overwritten with unexpected data, becomes a favorite target for attackers looking to hijack a program's execution flow.

More Odd DNS Records: NIMLOC, (Tue, Jul 7th)
This post was originally published on this site
Yesterday, I talked about NAPTR records and how they are related to RCS. But there is another "odd" record that shows up in my DNS logs. This one isn't new, but I don't think I ever covered it: NIMLOC. At least that is what Zeek calls it. But let's see what it is all about.

AWS Weekly Roundup: Claude Sonnet 5 on AWS, Amazon WorkSpaces for AI agents, AWS service availability updates, and more (July 6, 2026)
This post was originally published on this site
A couple of editions ago I wrote about what I find so energizing about working with startups. Last week I got a fresh dose of it: I spent a few days with the AWS Startups team, listening to stories of founders talking about the problems they’re actually solving. One story that stayed with me came from Marco Negreiros, founder of EyeCare Health, a Brazilian healthtech expanding access to eye care. He shared a striking fact: more than 70% of Brazilian municipalities don’t have a single ophthalmologist. His answer was to put a vision test on the one device almost everyone already carries, the smartphone, so a basic eye screening no longer depends on living near a clinic. Watching a founder turn a gap that big into something that concrete is exactly why I love this space.
This week, I’ll take a closer look at some key launches, and then cover the quarterly AWS Service Availability updates.
Last week’s launches
Here are some of the launches covered from this past week in the AWS News Blog:
- Amazon EC2 C9g and C9gd instances powered by AWS Graviton5 processors: They deliver up to 25% better compute performance than Graviton4-based instances, 5x larger cache, fastest memory of any processor instances in the cloud, and local NVMe storage options (C9gd).
- A new AWS CloudFormation Express mode: You can speed up infrastructure deployment with AWS CloudFormation Express mode, enabling AI agents and developers to receive deployment confirmation in seconds and iterate faster. Available in all commercial Regions at no additional cost.
- Upgrade Amazon EKS clusters with confidence using Kubernetes version rollbacks: Learn how Kubernetes version rollbacks for Amazon EKS let you reverse cluster upgrades within seven days. This new feature provides a safety net for upgrade failures, no cluster rebuilds required, turning Kubernetes version upgrades into a reversible, low-risk operation.
- Automate public TLS certificate issuance with ACME support in AWS Certificate Manager: AWS Certificate Manager now supports the ACME protocol, so you can automate the issuance and renewal of public TLS certificates using standard, widely adopted tooling.
Here are some launches and updates that caught my attention:
- Claude Sonnet 5 is now available on AWS – Anthropic’s most capable Sonnet model brings top-tier intelligence at Sonnet pricing for coding, agents, and everyday professional work at scale. It navigates large codebases, calls tools precisely, and holds state across long agentic tasks. To learn more, visit the AI Blog post.
- Amazon WorkSpaces for AI agents is now generally available: AI agents can now securely access and operate desktop applications through managed WorkSpaces environments, without requiring application modernization or custom integrations. To learn more. visit the Desktop and Application Streaming Blog post.
- Amazon OpenSearch Service is now optimized for log analytics: This release introduces a new engine purpose-built for log analytics workloads that delivers up to 4x better price-performance on internal benchmarks, while keeping the full-text search capabilities OpenSearch is known for. Teams can now get aggregations and precise text search in one place. To learn more, visit the Big Data Blog post.
- Amazon SageMaker AI cuts generative AI inference scale-out time by up to half: SageMaker Inference now supports container image caching, enabling up to 2x faster end-to-end scaling for generative AI models during scale-out events. To learn more, visit the AI Blog post.
- Amazon CloudWatch supports creating alarms from log queries : You can now create alarms directly on log query results and set thresholds in a single workflow, eliminating the need to first create metric filters or custom metrics as intermediate steps.
For a full list of AWS announcements, be sure to keep an eye on the What’s New with AWS page.
AWS Service Availability Updates
When the availability of an AWS service or feature changes, we provide customers guidance in AWS Product Lifecycle Changes on available alternatives and support for migration so that disruptions to your operations are minimized. The following lifecycle changes were updated on June 30, 2026.
Services moving to Maintenance (no longer accessible to new customers starting July 30, 2026):
- Amazon Bedrock Agents (launched November 2023) is now Amazon Bedrock Agents Classic
- Amazon Cognito Sync
- Amazon Kendra
- Amazon Q Business
- AWS Directory Service – Simple AD
- AWS IoT Device Defender – Detect (feature will no longer be accessible to new customers starting August 31, 2026)
- AWS Mainframe Modernization – Self-Managed Experience
- AWS Management Console – myApplications
- AWS Resource Groups – Group Lifecycle Events
- AWS Service Catalog – Application Registry
- AWS Systems Manager – Application Manager
- Amazon SageMaker AI features: A2I, Clarify, Debugger, GeoSpatial, Ground Truth, Mechanical Turk, Model Monitor, Role Manager, and Studio Lab
Services entering Sunset:
- Amazon WorkSpaces – PCoIP
- Amazon WorkSpaces – Pool
- AWS Managed Services (AMS) Advanced
- AWS re:Post Private
- Amazon Sagemaker AI- Profiler
Services reaching End of Support (as of June 30, 2026):
- Amazon Chime SDK – Carrier Voice Focus
- Amazon SageMaker AI – Ground Truth Plus
We understand that changes in availability can impact your operations. For specific guidance, consult the relevant service documentation or contact AWS Support.
Upcoming AWS events
Check your calendar and sign up for upcoming AWS events:
- AWS Summits – AWS Summits are free events that bring the cloud and AI community together to connect, learn, and explore the latest technologies. Browse the full calendar to find a Summit near you in the second half of 2026.
- AWS Community Days – Community-led conferences where content is planned, sourced, and delivered by community leaders. If you’re in Latin America, don’t miss AWS Community Day Belo Horizonte on August 22. Registration is open at awscommunityday.com.br.
Join the AWS Builder Center to connect with builders, share solutions, and access content that supports your development. Browse here for upcoming AWS-led in-person and virtual events and developer-focused events.
That’s all for this week. Check back next Monday for another Weekly Roundup!
– Daniel Abib
This post is part of our Weekly Roundup series. Check back each week for a quick roundup of interesting news and announcements from AWS!

RCS and DNS: The NAPTR Record, (Mon, Jul 6th)
This post was originally published on this site
Over the last year, with recent updates to iOS and Android, RCS (Rich Communication Services) has become an increasingly used protocol [1]. RCS is supposed to eventually replace SMS, and in addition to richer formatting, provides added (but optional) security. RCS messages may be end-to-end encrypted and digitally signed. Unlike SMS, which was "bolted on" to existing voice-focused phone standards. The SMS standard was based on old-fashioned pagers and allowed for limited clear-text communications. RCS is built from the ground up around modern IP-based network infrastructure and behaves more like IP chat services (think iMessage, WhatsApp…). RCS defines the message format, while protocols like SIP are used to establish connections and transport messages.