This
post was originally published on
this site[This is a Guest Diary by L. Carty, an ISC intern as part of the SANS.edu Bachelor's Degree in Applied Cybersecurity (BACS) program [1].]
Introduction
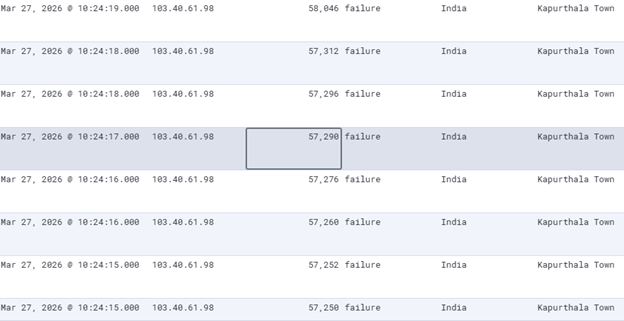
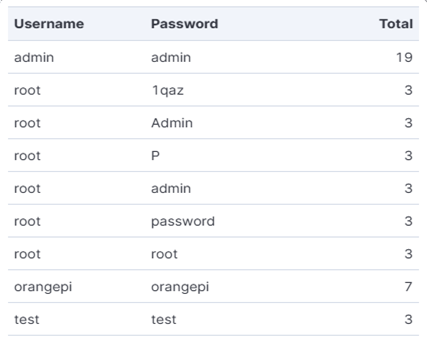
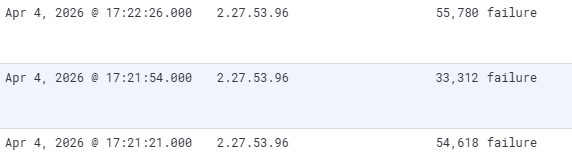
A few weeks ago, my honeypot logged an incident that changed how I think about modern attacks. A threat actor broke into my system using weak SSH credentials and immediately started running commands. What started as a routine resource-hijacking attempt was followed by credential harvesting targeting Telegram Desktop session data.
This incident isn't just another story about cryptocurrency mining malware. It's a window into how modern threat actors are evolving their tactics – chaining initial access with credential theft to enable persistent, multi-layered exploitation. The commands I observed tell a story of methodical reconnaissance, from checking for competing miners to hunting for Telegram's tdata directory.
In this post, I'll walk through what I found, explain why the tdata folder is so valuable to threat actors, and share practical ways to protect it and manage your sessions.
The Attack Chain: A Conceptual Overview
Before diving into the actual commands, let's establish what we're looking at. Modern attacks rarely consist of a single malicious action and instead follow a progression. Below is the attack chain and corresponding MITRE ATT&CK Techniques. [2]
- Initial Access – Weak SSH credentials, phishing, or vulnerabilities /T1110/001/
- Reconnaissance – System enumeration, identifying valuable targets /T1082/ /T1083/
- Credential Harvesting – Extracting session tokens, passwords, or authentication data /T1555/ /T1005/
- Account Takeover – Using stolen credentials for further access /T1078/
- Exploitation – Social engineering, lateral movement, or monetization /T1041/
What made this particular attack notable was the explicit targeting of Telegram's local session data. Threat actors aren't just after CPU cycles anymore—they're after persistent access through compromised accounts that can be leveraged for ongoing exploitation.
The Evidence: Live from the Honeypot
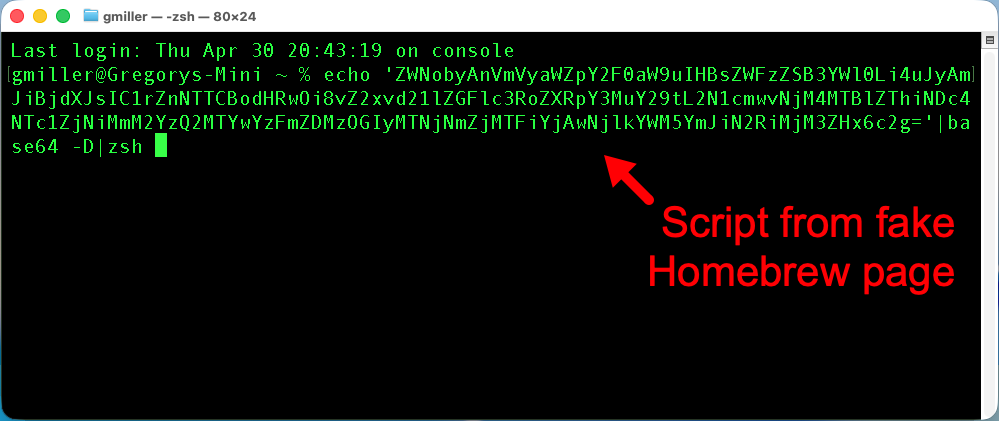
The following commands were captured in the honeypot's SSH logs immediately after the threat actor gained access. They show the threat actor’s intent to map the system, check for competition, and locate the tdata directory.
Commands Captured
/ip cloud printifconfiguname -a cat /proc/cpuinfo #looks to have an issue with cloudflareps | grep '[Mm]iner' ps -ef | grep '[Mm]iner'ls -la ~/.local/share/TelegramDesktop/tdata /home/*/.local/share/TelegramDesktop/tdata /dev/ttyGSM* /dev/ttyUSB-mod* /var/spool/sms/* /var/log/smsd.log /etc/smsd.conf* /usr/bin/qmuxd /var/qmux_connect_socket /etc/config/simman /dev/modem* /var/config/sms/*locate D877F783D5D3EF8Csecho Hi | cat -n
A Command Timeline Visualization
[Initial SSH Access]

         |

_________V_________________________________________________________

| RECONNAISSANCE PHASE                                            |

| • /ip cloud print → MikroTik RouterOS status,configuration      |

| • ifconfig → Network interface enumeration                      |

| • uname -a → OS/kernel identification                           |

| • cat /proc/cpuinfo → Hardware capability assessment            |

___________________________________________________________________

         |

_________V_________________________________________________________

| MINER DETECTION                                                 |

| • ps | grep '[Mm]iner' → Check for competing miners             |

| • ps -ef | grep... → Full process list scan                     |

__________________________________________________________________

         |

_________V_________________________________________________________

| CREDENTIAL HARVESTING                                           |

| • ls -la .../tdata → Locate Telegram session directory          |

| • /home/*/... → Wildcard search for user accounts               |

| • /dev/ttyGSM*, etc. → Modem/SMS 2FA bypass attempts            |

___________________________________________________________________

         |

_________V_________________________________________________________

| EXFILTRATION PREPARATION                                        |

| • locate D877F783... → Specific tdata folder lookup             |

| • echo Hi | cat -n → Shell verification                         |

| • [Compress & upload] → Likely next step (not captured)         |

__________________________________________________________________
Operational Context: Connecting the Dots
While the timeline shows what happened, understanding the why requires looking at the attack from a strategic view. Each command serves a specific purpose in a larger plan.
The initial reconnaissance (ifconfig, uname -a) was an attempt to confirm the system had the processing power to support a cryptominer and the network connectivity to send data out. Next came the miner detection phase (ps | grep). If the threat actor found an existing miner, they would need to remove those processes to free up resources and avoid conflicts before installing their own.
The next set of commands gets interesting as the threat actor shifts focus to Telegram Desktop tdata. This move reveals that stealing CPU cycles is a short-term gain, whereas stealing the Telegram session is a long-term asset. The threat actor searched for modem devices and SMS logs to get around the victim's two-factor authentication (2FA). This ensured that even if the stolen session stopped working, the threat actor could still reset the account password via SMS to take full control. This shows a clear shift from just using someone's computer for a quick profit to stealing their digital identity for long-term use.
Deep Dive: The Critical Risk of tdata Exposure
Understanding why the tdata folder is so valuable is essential for defense. This directory contains the session data that authenticates the user to Telegram's servers.
The Mechanics of Session Theft
According to an Imperva Threat Research report from 2025 regarding the sale of Telegram identities [3], copying the tdata folder to another machine grants a threat actor full access to the victim's Telegram account without needing the phone number or two-factor authentication code.
The session information stored in tdata acts as persistent login credentials. Because the authentication tokens are self-contained within the folder, the threat actor doesn't need to re-authenticate or bypass 2FA. They simply need to move the folder to a machine where they can run Telegram.
This flexibility is what makes the attack so dangerous. The threat actor does not need a specific version of the software, such as ‘Telegram Portable.’ Any standard Telegram Desktop client works because:
- Same Authentication Method: All Telegram Desktop clients (standard or portable) use the identical tdata folder structure, and
- No Installation Required: The session information is self-contained. A threat actor can copy the folder to a fresh installation of Telegram on their own machine, and it will log in immediately.
Below are scenarios on how a threat actor may use stolen tdata:
Scenario 1: Direct Import
- Threat actor copies the
tdata folder from the victim's system.
- Threat actor installs Telegram Desktop on their own computer.
- Threat actor replaces their own
tdata folder with the victim's copy.
- When Telegram launches, it reads the stolen session tokens and logs in as the victim.
Scenario 2: Cloud Exfiltration
- Threat actor compresses the
tdata folder on the victim's system.
- Threat actor uploads it to their own cloud storage or server.
- Later, threat actor downloads it to their machine.
- Threat actor places it in their Telegram Desktop directory.
- Telegram authenticates using the stolen session tokens.
Scenario 3: Portable Client
- Threat actor copies
tdata to a USB drive or portable installation.
- Threat actor can run Telegram Portable from anywhere without installation.
- All session data travels with the portable folder.
Because the session appears as a legitimate login from a new device, it is often indistinguishable from normal user activity, making detection difficult without specific monitoring of the tdata directory.
What You Can Do: Protecting tdata and Managing Sessions
Here are the most effective steps to protect your system and your Telegram account.
Protect the tdata Folder
Implement File Integrity Monitoring by setting up alerts for any access to the tdata directory. If a process other than Telegram itself tries to read or copy files in that folder, you want to know immediately.
Harden SSH Access since many of these attacks begin with weak SSH credentials. The most effective fix is to disable password authentication and use SSH keys instead. If you must use passwords, make them long and unique.
Monitor for Reconnaissance Commands such as grep, '[Mm]iner', ls -la …/tdata, or searches for modem devices /dev/ttyGSM*, and treat them as critical alerts. These aren't normal user activities and usually indicate a threat actor is mapping your system.
Manage Your Sessions
Conduct Regular Session Audits by navigating to Telegram Settings > Privacy and Security > Active Sessions. If you see a device or location you don't recognize, terminate it immediately. This is your first line of defense if tdata is stolen.
Log Out of Unused Devices because every device you're logged into is a potential entry point. If you're not actively using Telegram on a laptop or tablet, log out. Fewer active sessions mean fewer targets for threat actors.
Consider Mobile Usage as these devices offer better session controls. Telegram on iOS and Android supports biometric authentication and makes it harder to exfiltrate session data via file copying. If you're concerned about tdata theft, use Telegram primarily on mobile.
Enable Two-Factor Authentication (2FA) even though tdata theft bypasses it. 2FA protects against standard account takeovers where the threat actor doesn't have your session token, and it could make it harder for the threat actor to reset the password after the session expires.
Network-Level Detection
Monitor for Telegram Bot API Traffic since threat actors often use the Telegram Bot API to send stolen data or receive commands. Research by SonicWall [4] has documented campaigns where phishing emails deliver HTML attachments that exfiltrate credentials directly to Telegram bots, highlighting the need to monitor for this traffic.
Block Known Malicious IPs as many of these attacks come from known command-and-control servers. Subscribe to threat intelligence feeds that track Telegram-based attack infrastructure and block those IPs at your firewall.
The Bigger Picture: Why Telegram Remains a Target
Despite Telegram banning millions of accounts, threat actors continue to migrate to the platform due to its infrastructure simplicity, encryption, and massive scale. The platform's marketplace ecosystem and resilience against take-downs make it an attractive venue for criminal activity. According to Beeble.com's analysis ‘The Great Telegram Purge: Why 43 Million Bans Couldn’t Break the Cybercrime Grip’ [5], Telegram has evolved from a messaging app into a comprehensive criminal infrastructure platform.
Silobreaker's research [6] further indicates that ransomware groups like BlackCat use Telegram for both data exfiltration and selling stolen credentials on public marketplaces, while Kaspersky [7] notes that Telegram has become a hub for crypto scams, generating millions in fraudulent revenue through fake support bots and investment channels.
Conclusion
The multi-layered attack captured in my honeypot reflects current priorities in the threat landscape. The combination of cryptojacking reconnaissance with Telegram credential harvesting demonstrates that threat actors are thinking beyond simple resource theft. They are building persistent access through account takeover to enable ongoing exploitation.
The key insight is that Telegram's features, while legitimate for many users, have been repurposed by threat actors for credential theft, C2 communication, and data exfiltration. Defenders must monitor not just for malware installation, but for the specific indicators of credential harvesting that enable account takeover and lateral movement through social channels.
By understanding the attack chain, recognizing the indicators, and implementing robust protections for the tdata folder and session management, we can better protect ourselves against these evolving threats.
Key Takeaways
- Telegram tdata is a high-value target: Session tokens in this folder allow threat actors to bypass 2FA and take over accounts instantly.
- Attack chains are evolving: Modern threats combine cryptojacking reconnaissance with credential harvesting for multi-layered exploitation.
- Monitor for specific indicators: File access to tdata, modem device enumeration, and 'miner' process searches are critical warning signs.
- Telegram Portable enables persistence: Threat actors can copy tdata to portable installations for seamless account takeover without detection.
- Defense requires multiple layers: SSH hardening, file integrity monitoring, and session auditing are all necessary to protect against this attack pattern.
Acknowledgments: This analysis was assisted by Lumo AI (Proton) [8] for content organization and structuring.
[1] https://www.sans.edu/cyber-security-programs/bachelors-degree/
[2] https://attack.mitre.org/techniques/
[3] https://www.imperva.com/blog/telegram-identity-theft/
[4] https://www.sonicwall.com/blog/threat-actors-caught-using-telegram-bot-to-harvest-credentials
[5] https://beeble.com/en/blog/the-great-telegram-purge-why-43-million-bans-couldn-t-break-the-cybercrime-grip
[6] https://www.silobreaker.com/blog/cyber-threats/mapping-threat-actor-abuse-of-telegram-from-c2-to-hacktivism/
[7] https://www.kaspersky.com/blog/phishing-and-scam-in-telegram-2025/54090/
[8] https://lumo.proton.me
—
Jesse La Grew
Senior Handler
(c) SANS Internet Storm Center. https://isc.sans.edu Creative Commons Attribution-Noncommercial 3.0 United States License.

.png)