Since Amazon Web Services (AWS) introduced Savings Plans, customers have been able to lower the cost of running sustained workloads while maintaining the flexibility to manage usage across accounts, resource types, and AWS Regions. Today, we’re extending this flexible pricing model to AWS managed database services with the launch of Database Savings Plans, which help customers reduce database costs by up to 35% when they commit to a consistent amount of usage ($/hour) over a 1-year term. Savings automatically apply each hour to eligible usage across supported database services, and any additional usage beyond the commitment is billed at on-demand rates.
As organizations build and manage data-driven and AI applications, they often use different database services, engines and deployment types, including instance-based and serverless options, to meet evolving business needs. Database Savings Plans provide the flexibility to choose how workloads run while maintaining cost efficiency. If customers are in the middle of a migration or modernization effort, they can switch database engines and adjust deployment types, such as from provisioned to serverless as part of ongoing cost optimization, while continuing to receive discounted rates. If a customer’s business expands globally, they can also shift usage across AWS Regions and continue to benefit from the same commitment. By applying a consistent hourly commitment, customers can maintain predictable spend even as usage patterns evolve and analyze coverage and utilization using familiar cost management tools.
New Savings Plans
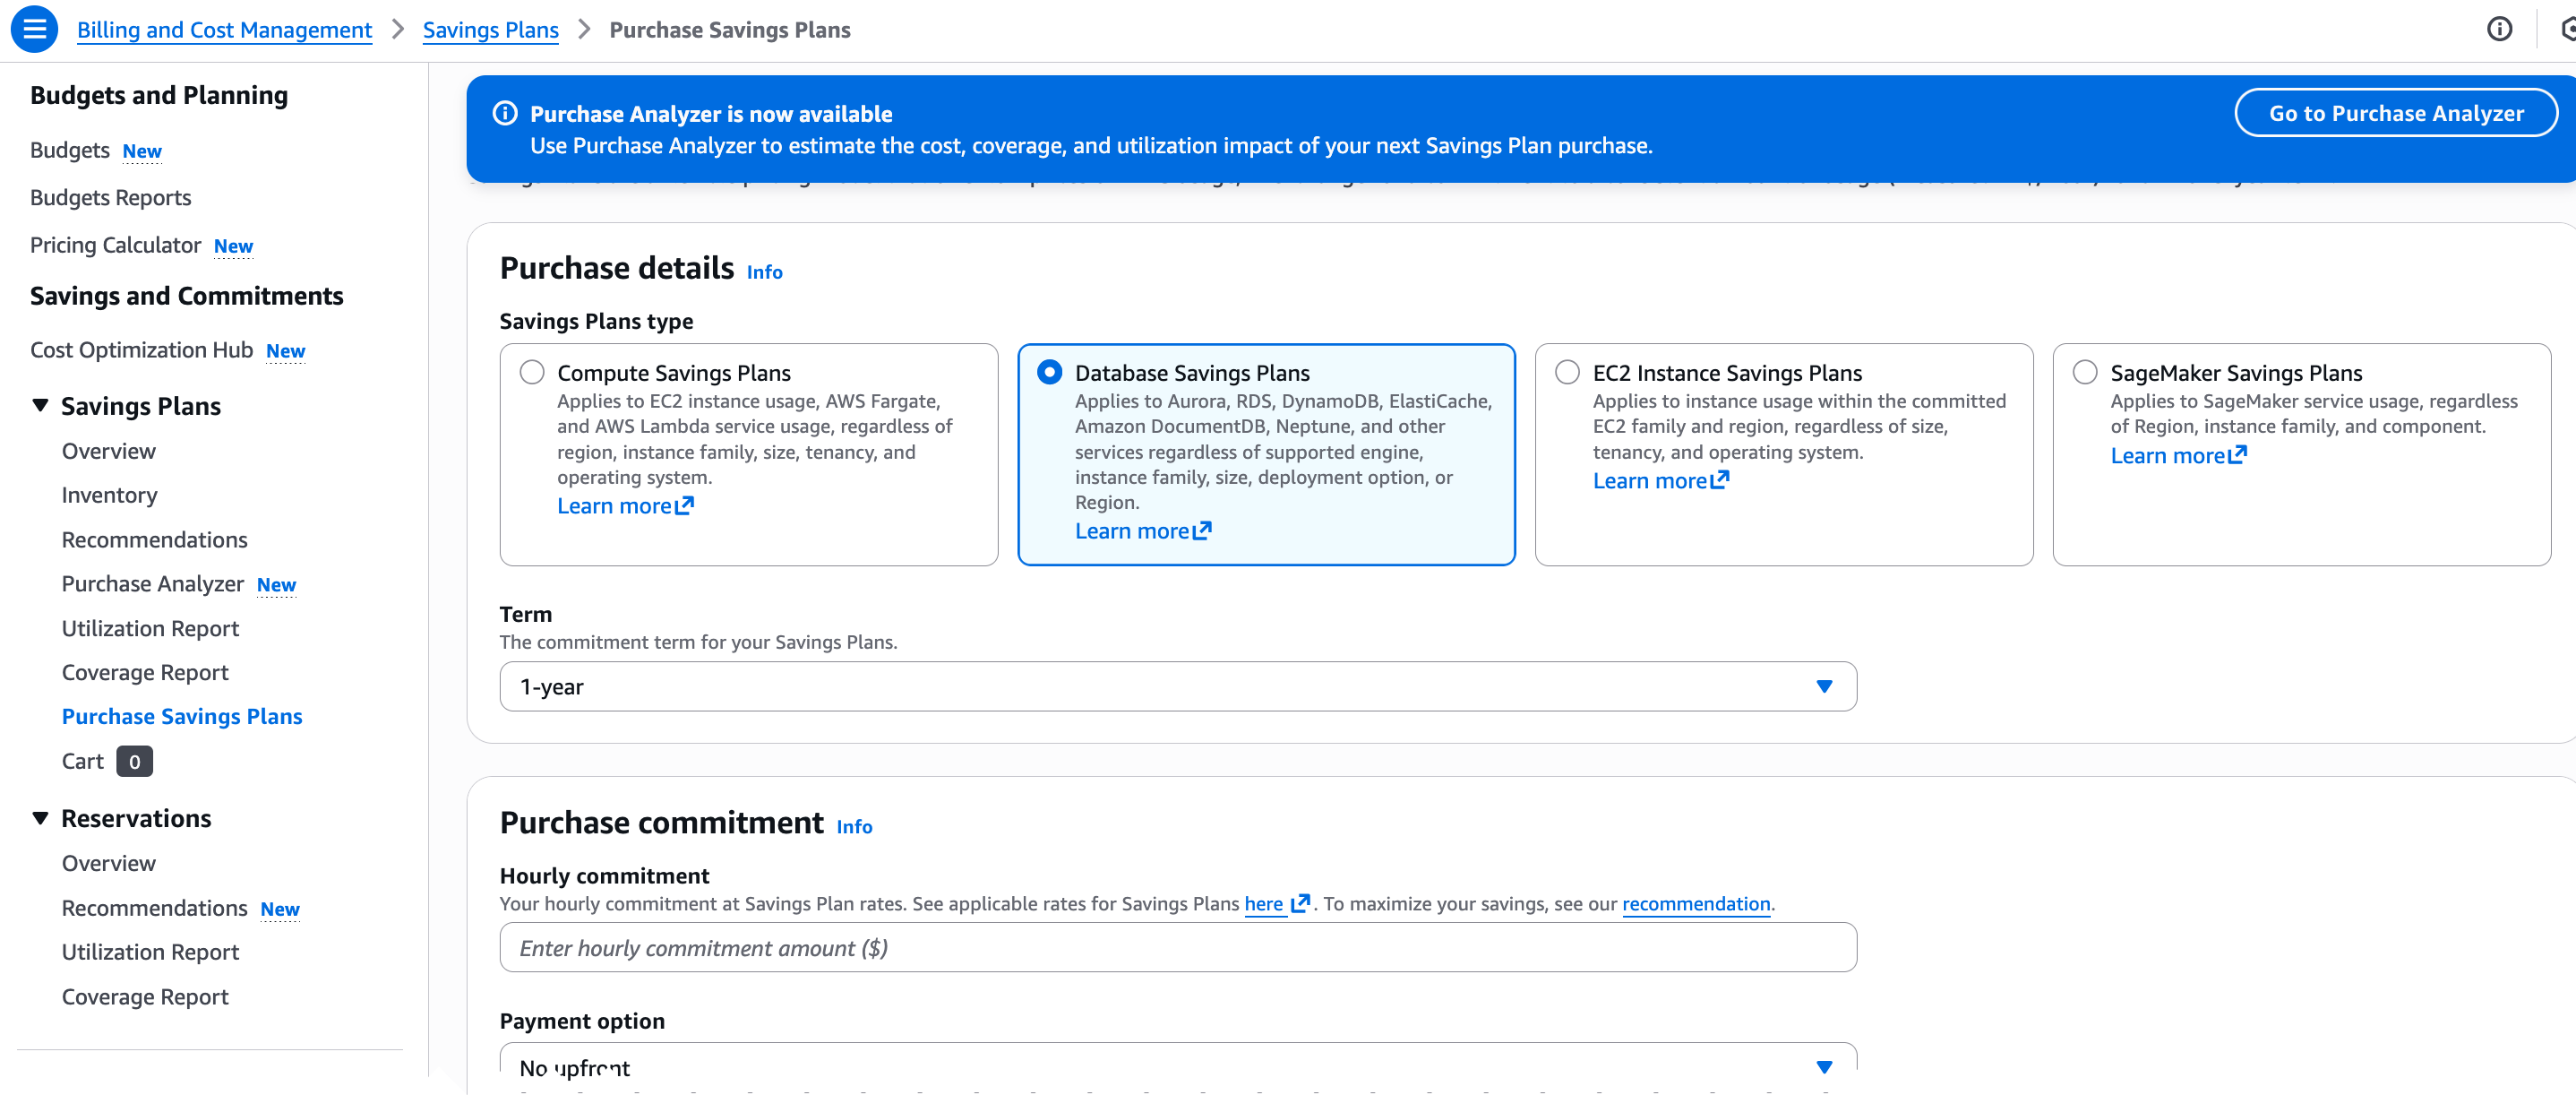
Each plan defines where pricing applies, the range of available discounts, and the level of flexibility provided across supported database engines, instance families, sizes, deployment options, or AWS Regions.
The hourly commitment automatically applies to all eligible usage regardless of Region, with support for Amazon Aurora, Amazon Relational Database Service (Amazon RDS), Amazon DynamoDB, Amazon ElastiCache, Amazon DocumentDB (with MongoDB compatibility), Amazon Neptune, Amazon Keyspaces (for Apache Cassandra), Amazon Timestream, and AWS Database Migration Service (AWS DMS). As new eligible database offerings, instance types, or Regions become available, Savings Plans will automatically apply to that usage.
Discounts vary by deployment model and service type. Serverless deployments provide up to 35% savings compared to on-demand rates. Provisioned instances across supported database services deliver up to 20% savings. For Amazon DynamoDB and Amazon Keyspaces, on-demand throughput workloads receive up to 18% savings, and provisioned capacity offers up to 12%. Together, these savings help customers optimize costs while maintaining consistent coverage for database usage. To learn more about the pricing and eligible usage, visit the Database Savings Plans pricing page.
Purchasing Database Savings Plans
AWS Billing and Cost Management Console helps you choose Savings Plans and guides you through the purchase process. You can get started from the AWS Management Console or use the AWS Command Line Interface (AWS CLI) and the API. There are two ways to evaluate Database Savings Plans purchases, in the Recommendations view and in the Purchase Analyzer.
Recommendations – are automatically generated from your recent on-demand usage. To reach the Recommendations view in the Billing and Cost Management console, choose Savings and Commitments, Savings Plans, and Recommendations in the navigation pane. In the Recommendations view, select Database Savings Plans and configure the Recommendation options. AWS Savings Plans recommendations analyze your historical on-demand usage to identify the hourly commitment that delivers the highest overall savings.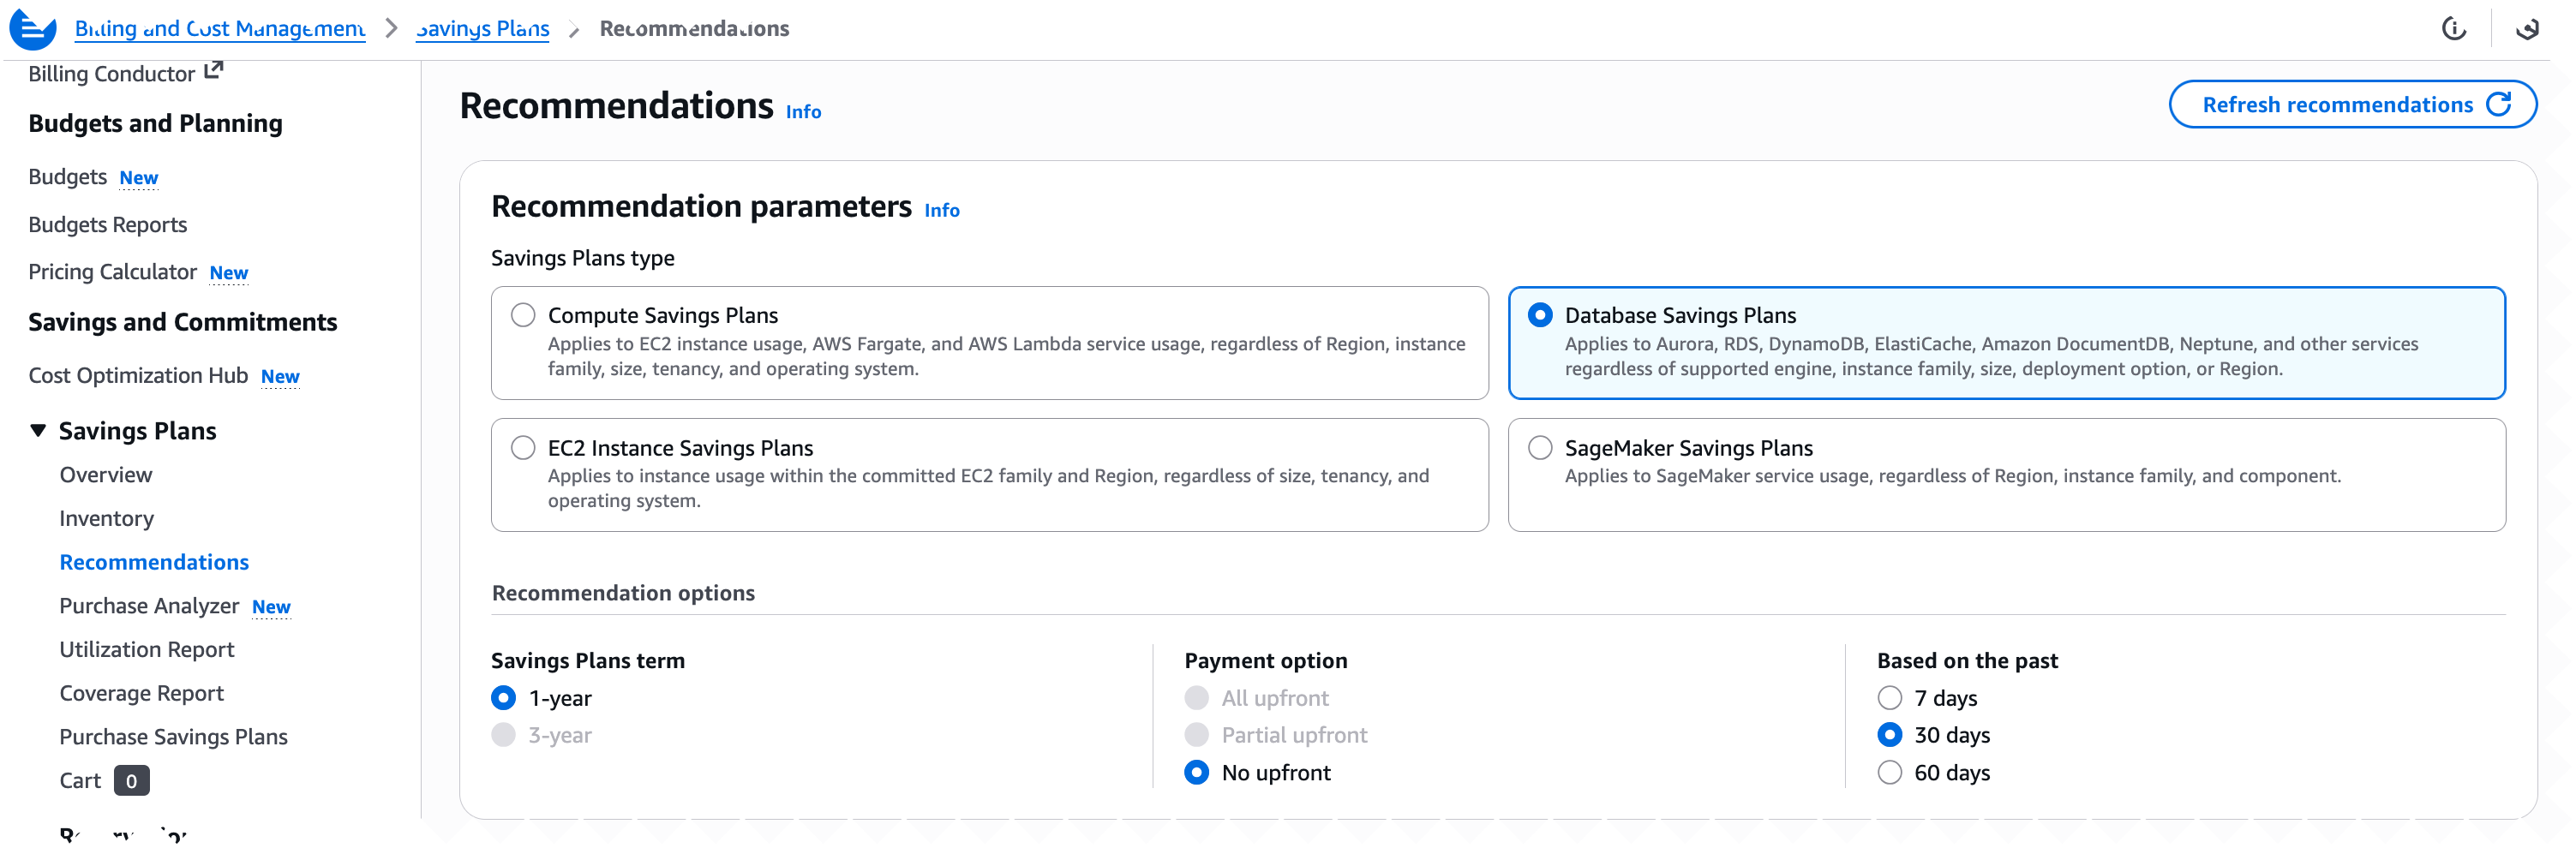
The Purchase Analyzer – is designed for modeling custom commitment levels. If you want to purchase a different amount than the recommended commitment on the Purchase Analyzer page, select Database Savings Plans and configure Lookback period and Hourly commitment to simulate alternative commitment levels and see the projected impact on Cost, Coverage, and Utilization.
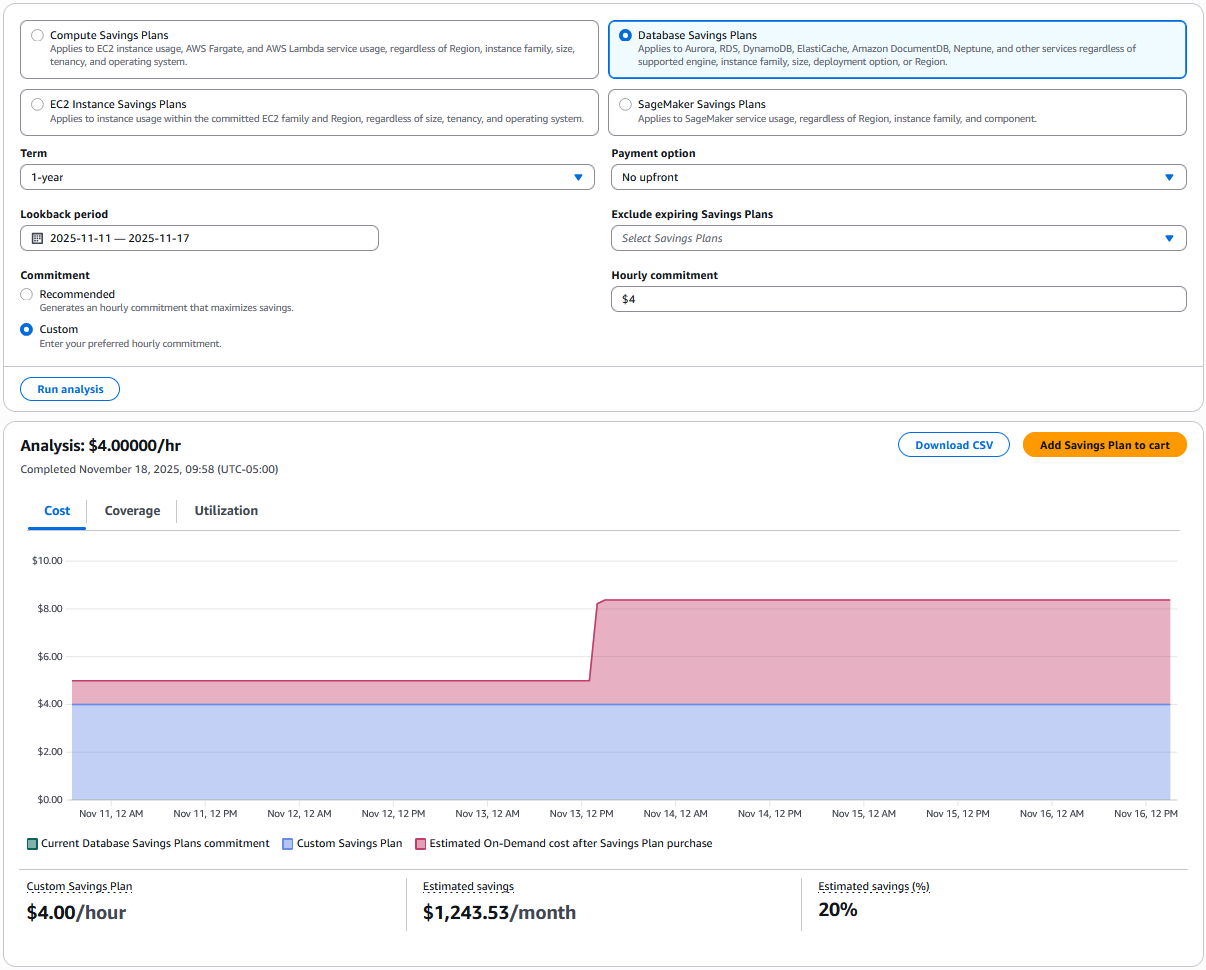
This way is preferred if your purchasing strategy includes smaller, incremental commitments over time or if you expect future usage changes that could affect your ideal purchase amount.
After reviewing the recommendations or running simulations in Savings Plans Recommendations or Savings Plans Purchase Analyzer, choose Add to cart to proceed with your chosen commitment. If you prefer to purchase directly, you can also navigate to the Purchase Savings Plans page. The console updates estimated discounts and coverage in real time as you adjust each setting, so you can evaluate the impact before completing your order.
You can learn more about how to choose and purchase Database Saving Plans by visiting the Savings Plans User Guide documents.
Now available
Database Savings Plans are available in all AWS Regions outside of China. Give them a try and start shaping your database strategy with more flexibility and predictable costs.
– Betty


 .
.