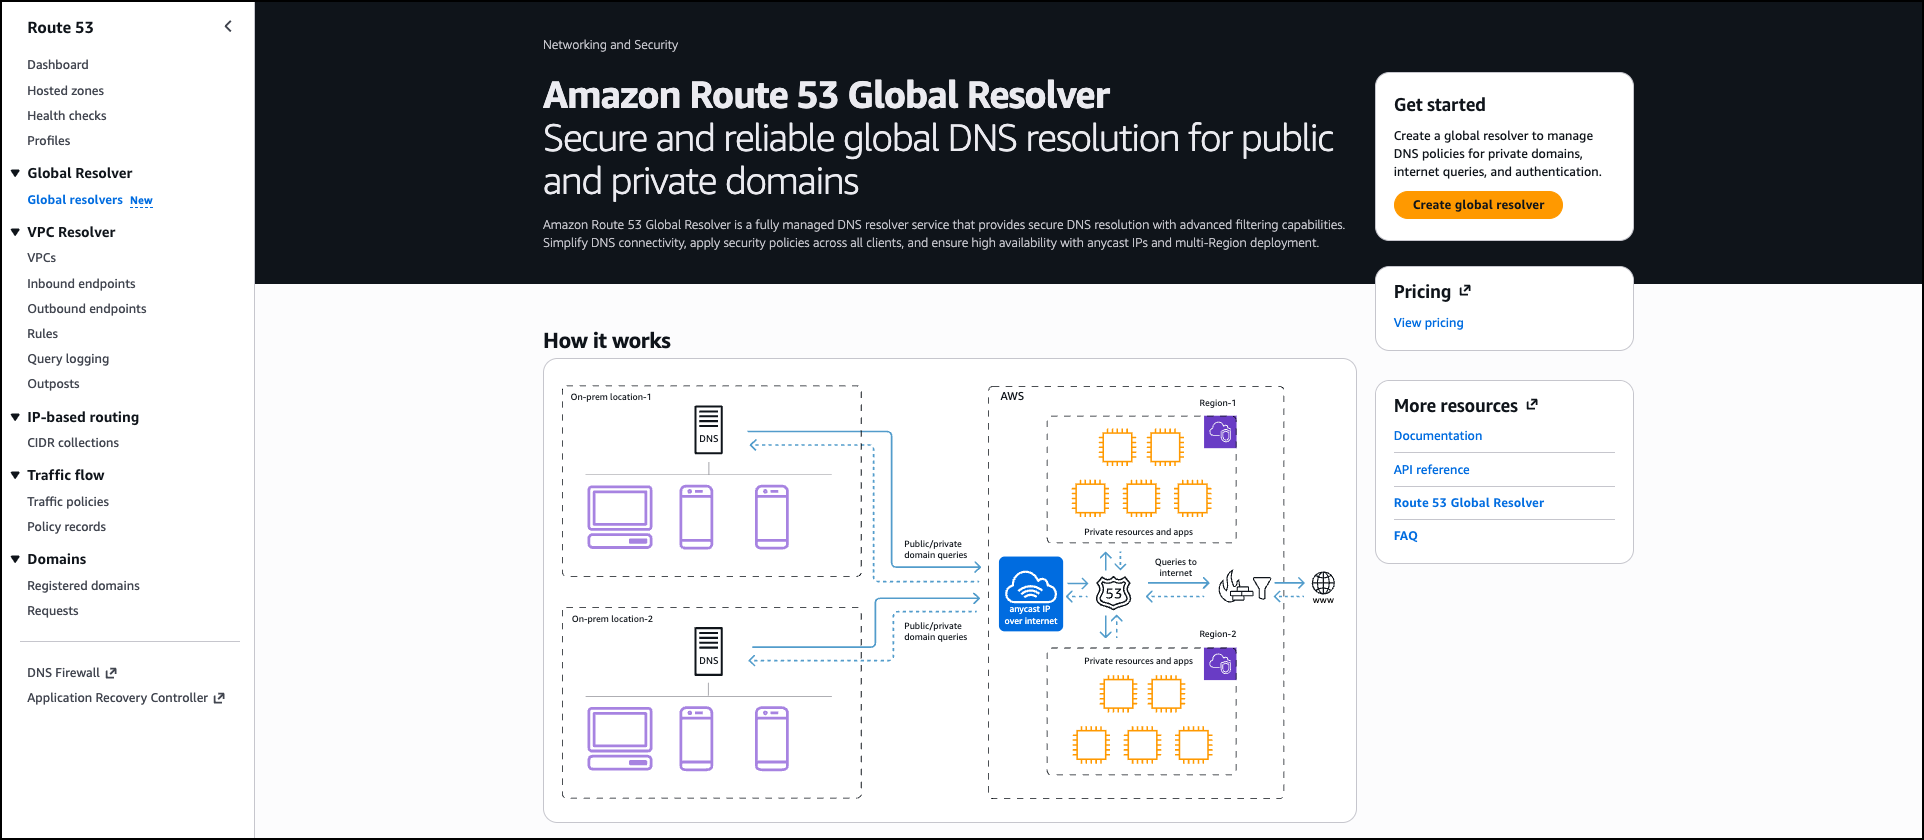
Amazon GuardDuty adds Extended Threat Detection for Amazon EC2 and Amazon ECS

This post was originally published on this site

Today, we’re announcing new enhancements to Amazon GuardDuty Extended Threat Detection with the addition of two attack sequence findings for Amazon Elastic Compute Cloud (Amazon EC2) instances and Amazon Elastic Container Service (Amazon ECS) tasks. These new findings build on the existing Extended Threat Detection capabilities, which already combine sequences involving AWS Identity and Access Management (IAM) credential misuse, unusual Amazon Simple Storage service (Amazon S3) bucket activity, and Amazon Elastic Kubernetes Service (Amazon EKS) cluster compromise. By adding coverage for EC2 instance groups and ECS clusters, this launch expands sequence-level visibility to virtual machine and container environments that support the same application. Together, these capabilities provide a more consistent and unified way to detect multistage activity across diverse Amazon Web Services (AWS) workloads.

Modern cloud environments are dynamic and distributed, often running virtual machines, containers, and serverless workloads at scale. Security teams strive to maintain visibility across these environments and connect related activities that might indicate complex, multistage attack sequences. These sequences can involve multiple steps, such as establishing initial access and persistence, providing missing credentials or performing unexpected data access, that unfold over time and across different sources. GuardDuty Extended Threat Detection automatically links these signals using AI and machine learning (ML) models trained at AWS scale to build a complete picture of the activity and surface high-confidence insights to help customers prioritize response actions. By combining evidence from diverse sources, this analysis produces high-fidelity, unified findings that would otherwise be difficult to infer from individual events.

How it works
Extended Threat Detection analyzes multiple types of security signals, including runtime activity, malware detections, VPC Flow Logs, DNS queries, and AWS CloudTrail events to identify patterns that represent a multistage attack across Amazon EC2 and Amazon ECS workloads. Detection works with the GuardDuty foundational plan, and turning on Runtime Monitoring for EC2 or ECS adds deeper process and network-level telemetry that strengthens signal analysis and increases the completeness of each attack sequence.

The new attack sequence findings combine runtime and other observed behaviors across the environment into a single critical-severity sequence. Each sequence includes an incident summary, a timeline of observed events, mapped MITRE ATT&CK® tactics and techniques, and remediation guidance to help you understand how the activity unfolded and which resources were affected.

EC2 instances and ECS tasks are often created and replaced automatically through Auto Scaling groups, shared launch templates, Amazon Machine Images (AMIs), IAM instance profiles, or cluster-level deployments. Because these resources commonly operate as part of the same application, activity observed across them might originate from a single underlying compromise. The new EC2 and ECS findings analyze these shared attributes and consolidate related signals into one sequence when GuardDuty detects a pattern affecting the group.

When a sequence is detected, the GuardDuty console highlights any critical-severity sequence findings on the Summary page, with the affected EC2 instance group or ECS cluster already identified. Selecting a finding opens a consolidated view that shows how the resources are connected, which signals contributed to the sequence, and how the activity progressed over time, helping you quickly understand the scope of impact across virtual machine and container workloads.

In addition to viewing sequences in the console, you can also see these findings in AWS Security Hub, where they appear on the new exposure dashboards alongside other GuardDuty findings to help you understand your overall security risk in one place. This detailed view establishes the context for interpreting how the analysis brings related signals together into a broader attack sequence.

Together, the analysis model and grouping logic give you a clearer, consolidated view of activity across virtual machine and container workloads, helping you focus on the events that matter instead of investigating numerous individual findings. By unifying related behaviors into a single sequence, Extended Threat Detection helps you assess the full context of an attack path and prioritize the most urgent remediation actions.

Now available
Amazon GuardDuty Extended Threat Detection with expanded coverage for EC2 instances and ECS tasks is now available in all AWS Regions where GuardDuty is offered. You can start using this capability today to detect coordinated, multistage activity across virtual machine and container workloads by combining signals from runtime activity, malware execution, and AWS API activity.

This expansion complements the existing Extended Threat Detection capabilities for Amazon EKS, providing unified visibility into coordinated, multistage activity across your AWS compute environment. To learn more, visit the Amazon GuardDuty product page.

Betty

[Guest Diary] Hunting for SharePoint In-Memory ToolShell Payloads, (Tue, Dec 2nd)

This post was originally published on this site

[This is a Guest Diary by James Woodworth, an ISC intern as part of the SANS.edu Bachelor's Degree in Applied Cybersecurity (BACS) program [1].

In July 2025, many of us were introduced to the Microsoft SharePoint exploit chain known as ToolShell. ToolShell exploits the deserialization and authentication bypass vulnerabilities, CVE-2025-53770 [2] and CVE-2025-53771 [3], in on-premises SharePoint Server 2016, 2019, and Subscription editions. When the exploit chain was initially introduced, threat actors used payloads that attempted to upload web shells to a SharePoint server’s file system. The problem for threat actors was that the uploaded web shells were easily detectable by most Endpoint Detection and Response (EDR) solutions. So the threat actors upped the game and reworked their payloads to execute in-memory. This new technique made it more difficult for defenders to detect the execution of these new payloads [4].

Many articles have been written on the technical details of the ToolShell vulnerabilities, so I won’t go into an in-depth analysis here. If you want an in-depth analysis, check out the Securelist article, ToolShell: a story of five vulnerabilities in Microsoft SharePoint [5]. What I will present to you in this post is a process using Zeek Network Security Monitor, DaemonLogger, and Wireshark to hunt for in-memory ToolShell exploit payloads and how to decode them for further analysis.

Review Zeek Logs

The first step in the hunt is to review the HTTP requests to our SharePoint server. We will do this by reviewing our Zeek http logs and looking for POST requests that contain the following indicators of a malicious request:

  • URLs:
    • /_layouts/15/ToolPane.aspx/<random>?DisplayMode=Edit&<random>=/ToolPane.aspx
    • /_layouts/16/ToolPane.aspx/<random>?DisplayMode=Edit&<random>=/ToolPane.aspx
  • Referer headers:
    • /_layouts/SignOut.aspx
    • /_layouts/./SignOut.aspx
  • Request Body:
    • Length greater than 0

Zeek log files are rotated and compressed daily. To review the compressed log files over multiple days we use a combination of two tools, zcat and zcutter.py [6]. From the /opt/zeek/logs directory we run the following commands to search all Zeek http logs for August 2025.

zcat 2025-08**/http*.log.gz | ~/bin/zcutter.py -d ts id.orig_h id.resp_p host method uri user_agent request_body_len | grep ToolPane | grep -v ""request_body_len": 0}"

Reviewing the returned http logs entries, we see many matching the indicators of a malicious request. We will focus on the highlighted entries from August 24, 2025.


Figure 1: Zeek http.log file matching indicators of a malicious request.


Prepare PCAP Files

Now that we have identified potential http requests to analyze further, our next step in the hunt will be to prepare our PCAP files for packet analysis. For this scenario we are using DaemonLogger to capture packets [7]. Each day DaemonLogger creates two PCAP files.


Figure 2: DaemonLogger PCAP files from October 31, 2025.


We will need to merge the two PCAP files to ensure we are analyzing all packets that were captured for the day in question. To do this we will use the tool mergecap from Wireshark [8]. The following command will merge the two PCAP files that we identified in Figure 2 above into a new file named 2025-08-24.pcap.

./mergecap ~/pcaps/daemonlogger.pcap.* -w ~/pcaps/2025-08-24.pcap


Figure 3: Mergecap command and resulting merged PCAP file.


Packet Analysis with Wireshark

We will now analyze the newly created PCAP file using Wireshark. With the following filter we can limit the packets displayed to only those packets containing POST requests to the URL /_layouts/15/ToolPane.aspx.

Filter: _ws.col.info matches "POST /_layouts/15/ToolPane.aspx"


Figure 4: Wireshark displaying packets containing POST requests to the URL /_layouts/15/ToolPane.aspx.


Analyzing the packet with the timestamp 2025-08-24T04:22:33, we see an HTTP POST request to the URL /_layouts/15/toolpane.aspx/lx?DisplayMode=Edit&lx=/ToolPane.aspx and a Referer header of /_layouts/./SignOut.aspx. The analysis also shows a URL encoded payload being sent via the MSOtlPn_DWP parameter. The parameter contains a property named CompressedDataTable that in turn contains a malicious payload that attempts to exploit the SharePoint deserialization vulnerability.


Figure 5: Wireshark HTTP Stream showing malicious POST request


Deserialization Vulnerability Payload Analysis

Our hunt is almost complete. Now it is time to decode the malicious deserialization payload to see what it contains. With the Wireshark HTTP Stream window still open, copy the CompressedDataTable property and save to a file named property-encoded.txt. This will include everything between CompressedDataTable%3D%22 and %22+DataTable-CaseSensitive. The property usually starts with the characters H4sI.


Figure 6: Wireshark HTTP Stream highlighting the beginning of the CompressedDataTable property.


With the CompressedDataTable property copied to a file we can decode the property using the commands below and output the results to the file property-decoded.txt.

cat property-encoded.txt | python3 -c "import sys, urllib.parse as ul; print(ul.unquote_plus(sys.stdin.read().strip()))" | base64 -d | zcat > property-decoded.txt


Figure 7: Decoded view of the CompressedDataTable property with the encoded malicious payload.


One more copy and decode and we will have our malicious in-memory payload. Open the property-decoded.txt file created in the step above. Copy the MethodParameter string to a new file named method-encoded.txt. The beginning of the string is highlighted in Figure 7 above. We will then run the following commands to decode the method.

cat method-encoded.txt | base64 -d > method-decoded.txt

Once our payload is decoded, we see that it contains a known malicious .NET Dynamiclink Library (DLL) binary named osvmhdfl.dll. If this in-memory payload was executed successfully on a vulnerable SharePoint server, it could extract machine keys and other system information and return the information in the HTTP response [9].


Figure 8: Partially decoded method containing a malicious payload.


Additional Payloads Discovered

Using this process, I have discovered security scanner payloads and payloads containing encoded PowerShell commands.

Nuclei Scanner Template CVE-2025-53770

The Project Discovery Nuclei Scanner, when using the http template CVE-2025-53770, sends the payload in Figure 9. This payload contains the .NET Dynamic-link Library (DLL) binary named jlaneafi.dll. If the SharePoint server is vulnerable, an additional HTTP response header of X-Nuclei is returned with a value of CVE-2025-53770 [10].


Figure 9: Partially decoded method containing a Nuclei Scanner template CVE-2025-53770 payload.


Encoded PowerShell Commands

I have seen variations of the payload in Figure 10 that contain encoded PowerShell commands.


Figure 10: Partially decoded method containing an encoded PowerShell payload.


Decoding the EncodedCommand value exposes the PowerShell command in Figure 11 below. If this PowerShell executed successfully it could extract system information and send that information to the threat actor’s server on port 40443.


Figure 11: Decoded PowerShell command.


Conclusion

We have completed our hunt, found our in-memory ToolShell exploit payload, and have seen additional payloads found in the wild. Use this process to hunt for payloads in your own environment and discover what new techniques threat actors are attempting against on-premise SharePoint servers vulnerable to the ToolShell exploit chain.


References

[1] https://www.sans.edu/cyber-security-programs/bachelors-degree/
[2] https://nvd.nist.gov/vuln/detail/CVE-2025-53770
[3] https://nvd.nist.gov/vuln/detail/CVE-2025-53771
[4] https://www.recordedfuture.com/blog/toolshell-exploit-chain-thousands-sharepointservers-risk
[5] https://securelist.com/toolshell-explained/117045/
[6] https://www.activecountermeasures.com/zcutter-more-flexible-zeek-log-processing/
[7] https://github.com/Cisco-Talos/Daemonlogger
[8] https://www.wireshark.org/docs/wsug_html_chunked/AppToolsmergecap.html
[9] https://www.cisa.gov/sites/default/files/2025-08/MAR-251132.c1.v1.CLEAR_.pdf
[10] https://github.com/projectdiscovery/nuclei-templates/blob/main/http/cves/2025/CVE-2025-53770.yaml


Jesse La Grew
Handler

(c) SANS Internet Storm Center. https://isc.sans.edu Creative Commons Attribution-Noncommercial 3.0 United States License.

AWS Transform for mainframe introduces Reimagine capabilities and automated testing functionality

This post was originally published on this site

In May, 2025, we launched AWS Transform for mainframe, the first agentic AI service for modernizing mainframe workloads at scale. The AI-powered mainframe agent accelerates mainframe modernization by automating complex, resource-intensive tasks across every phase of modernization—from initial assessment to final deployment. You can streamline the migration of legacy mainframe applications, including COBOL, CICS, DB2, and VSAM to modern cloud environments—cutting modernization timelines from years to months.

Today, we’re announcing enhanced capabilities in AWS Transform for mainframe that include AI-powered analysis features, support for the Reimagine modernization pattern, and testing automation. These enhancements solve two critical challenges in mainframe modernization: the need to completely transform applications rather than merely move them to the cloud, and the extensive time and expertise required for testing.

  • Reimagining mainframe modernization – This is a new AI-driven approach that completely reimagines the customer’s application architecture using modern patterns or moving from batch process to real-time functions. By combining the enhanced business logic extraction with new data lineage analysis and automated data dictionary generation from the legacy source code through AWS Transform, customers transform monolithic mainframe applications written in languages like COBOL into more modern architectural styles, like microservices.
  • Automated testing – Customers can use new automated test plan generation, test data collection scripts, and test case automation scripts. AWS Transform for mainframe also provides functional testing tools for data migration, results validation, and terminal connectivity. These AI-powered capabilities work together to accelerate testing timelines and improve accuracy through automation.

Let’s learn more about reimagining mainframe modernization and automated testing capabilities.

How to reimagine mainframe modernization
We recognize that mainframe modernization is not a one-size-fits-all proposition. Whereas tactical approaches focus on augmentation and maintaining existing systems, strategic modernization offers distinct paths: Replatform, Refactor, Replace, or the new Reimagine.

In the Reimagine pattern, AWS Transform AI-powered analysis combines mainframe system analysis with organizational knowledge to create detailed business and technical documentation and architecture recommendations. This helps preserve critical business logic while enabling modern cloud-native capabilities.

AWS Transform provides new advanced data analysis capabilities that are essential for successful mainframe modernization, including data lineage analysis and automated data dictionary generation. These features work together to define the structure and meaning to accompany the usage and relationships of mainframe data. Customers gain complete visibility into their data landscape, enabling informed decision-making for modernization. Their technical teams can confidently redesign data architectures while preserving critical business logic and relationships.

The Reimagining strategy follows the principle of human in the loop validation, which means that AI-generated application specifications and code such as AWS Transform and Kiro are continuously validated by domain experts. This collaborative approach between AI capabilities and human judgment significantly reduces transformation risk while maintaining the speed advantages of AI-powered modernization.

The pathway has a three-phase methodology to transform legacy mainframe applications into cloud-native microservices:

  • Reverse engineering to extract business logic and rules from existing COBOL or job control language (JCL) code using AWS Transform for mainframe.
  • Forward engineering to generate microservice specification, modernized source code, infrastructure as code (IaC), and modernized database.
  • Deploy and test to deploy the generated microservices to Amazon Web Services (AWS) using IaC and to test the functionality of the modernized application.

Although microservices architecture offers significant benefits for mainframe modernization, it’s crucial to understand that it’s not the best solution for every scenario. The choice of architectural patterns should be driven by the specific requirements and constraints of the system. The key is to select an architecture that aligns with both current needs and future aspirations, recognizing that architectural decisions can evolve over time as organizations mature their cloud-native capabilities.

The flexible approach supports both do-it-yourself and partner-led development, so you can use your preferred tools while maintaining the integrity of your business processes. You get the benefits of modern cloud architecture while preserving decades of business logic and reducing project risk.

Automated testing in action
The new automated testing feature supports IBM z/OS mainframe batch application stack at launch, which helps organizations address a wider range of modernization scenarios while maintaining consistent processes and tooling.

Here are the new mainframe capabilities:

  • Plan test cases – Create test plans from mainframe code, business logic, and scheduler plans.
  • Generate test data collection scripts – Create JCL scripts for data collection from your mainframe to your test plan.
  • Generate test automation scripts – Generate execution scripts to automate testing of modernized applications running in the target AWS environment.

To get started with automated testing, you should set up a workspace, assign a specific role to each user, and invite them to onboard your workspace. To learn more, visit Getting started with AWS Transform in the AWS Transform User Guide.

Choose Create job in your workspace. You can see all types of supported transformation jobs. For this example, I select the Mainframe Modernization job to modernize mainframe applications.

After a new job is created, you can kick off modernization for tests generation. This workflow is sequential and it is a place for you to answer the AI agent’s questions, providing the necessary input. You can add your collaborators and specify resource location where the codebase or documentation is located in your Amazon Simple Storage Service (Amazon S3) bucket.

I use a sample application for a credit card management system as the mainframe banking case with the presentation (BMS screens), business logic (COBOL) and data (VSAM/DB2), including online transaction processing and batch jobs.

After finishing the steps of analyzing code, extracting business logic, decomposing code, planning migration wave, you can experience new automated testing capabilities such as planning test cases, generating test data collection scripts, and test automation scripts.

The new testing workflow creates a test plan for your modernization project and generates test data collection scripts. You will have three planning steps:

  • Configure test plan inputs – You can link your test plan to your other job files. The test plan is generated based on analyzing the mainframe application code and can provide more details optionally using the extracted business logic, the technical documentation, the decomposition, and using a scheduler plan.
  • Define test plan scope – You can define the entry point, the specific program where the application’s execution flow begins. For example, the JCL for a batch job. In the test plan, each functional test case is designed to start the execution from a specific entry point.
  • Refine test plan – A test plan is made up of sequential test cases. You can reorder them, add new ones, merge multiple cases, or split one into two on the test case detail page. Batch test cases are composed of a sequence of JCLs following the scheduler plan.

Generating test data collection scripts collects test data from mainframe applications for functional equivalence testing. This step actively generates JCL scripts that will help you gather test data from the sample application’s various data sources (such as VSAM files or DB2 databases) for use in testing the modernized application. The step is designed to create automated scripts that can extract test data from VSAM datasets, query DB2 tables for sample data, collect sequential data sets, and generate data collection workflows. After this step is completed, you’ll have comprehensive test data collection scripts ready to use.

To learn more about automated testing, visit Modernization of mainframe applications in the AWS Transform User Guide.

Now available
The new capabilities in AWS Transform for mainframe are available today in all AWS Regions where AWS Transform for mainframe is offered. For Regional availability, visit the AWS Services by Region. Currently, we offer our core features—including assessment and transformation—at no cost to AWS customers. To learn more, visit AWS Transform Pricing page.

Give it a try in the AWS Transform console. To learn more, visit the AWS Transform for mainframe product page and send feedback to AWS re:Post for AWS Transform for mainframe or through your usual AWS Support contacts.

Channy

AWS Transform announces full-stack Windows modernization capabilities

This post was originally published on this site

Earlier this year in May, we announced the general availability of AWS Transform for .NET, the first agentic AI service for modernizing .NET applications at scale. During the early adoption period of the service, we received valuable feedback indicating that, in addition to .NET application modernization, you would like to modernize SQL Server and legacy UI frameworks. Your applications typically follow a three-tier architecture—presentation tier, application tier, and database tier—and you need a comprehensive solution that can transform all of these tiers in a coordinated way.

Today, based on your feedback, we’re excited to announce AWS Transform for full-stack Windows modernization, to offload complex, tedious modernization work across the Windows application stack. You can now identify application and database dependencies and modernize them in an orchestrated way through a centralized experience.

AWS Transform accelerates full-stack Windows modernization by up to five times across application, UI, database, and deployment layers. Along with porting .NET Framework applications to cross-platform .NET, it migrates SQL Server databases to Amazon Aurora PostgreSQL-Compatible Edition with intelligent stored procedure conversion and dependent application code refactoring. For validation and testing, AWS Transform deploys applications to Amazon Elastic Compute Cloud (Amazon EC2) Linux or Amazon Elastic Container Service (Amazon ECS), and provides customizable AWS CloudFormation templates and deployment configurations for production use. AWS Transform has also added capabilities to modernize ASP.NET Web Forms UI to Blazor.

There is much to explore, so in this post I’ll provide the first look at AWS Transform for full-stack Windows modernization capabilities across all layers.

Create a full-stack Windows modernization transformation job
AWS Transform connects to your source code repositories and database servers, analyzes application and database dependencies, creates modernization waves, and orchestrates full-stack transformations for each wave.

To get started with AWS Transform, I first complete the onboarding steps outlined in the getting started with AWS Transform user guide. After onboarding, I sign in to the AWS Transform console using my credentials and create a job for full-stack Windows modernization.

Create a new job for Windows Modernization
Create a new job by choosing SQL Server Database Modernization

After creating the job, I complete the prerequisites. Then, I configure the database connector for AWS Transform to securely access SQL Server databases running on Amazon EC2 and Amazon Relational Database Service (Amazon RDS). The connector can connect to multiple databases within the same SQL Server instance.

Create new database connector by adding connector name and AWS Account ID

Next, I set up a connector to connect to my source code repositories.

Add a source code connector by adding Connection name, AWS Account ID and Code Connector Arn

Furthermore, I have the option to choose if I would like AWS Transform to deploy the transformed applications. I choose Yes and provide the target AWS account ID and AWS Region for deploying the applications. The deployment option can be configured later as well.

Choose if you would like to deploy transformed apps

After the connectors are set up, AWS Transform connects to the resources and runs the validation to verify IAM roles, network settings, and related AWS resources.

After the successful validation, AWS Transform discovers databases and their associated source code repositories. It identifies dependencies between databases and applications to create waves for transforming related components together. Based on this analysis, AWS Transform creates a wave-based transformation plan.

Start assessment for discovered database and source code repositories

Assessing database and dependent applications
For the assessment, I review the databases and source code repositories discovered by AWS Transform and choose the appropriate branches for code repositories. AWS Transform scans these databases and source code repositories, then presents a list of databases along with their dependent .NET applications and transformation complexity.

Start wave planning of asessed databases and dependent repositories

I choose the target databases and repositories for modernization. AWS Transform analyzes these selections and generates a comprehensive SQL Modernization Assessment Report with a detailed wave plan. I download the report to review the proposed modernization plan. The report includes an executive summary, wave plan, dependencies between databases and code repositories, and complexity analysis.

View SQL Modernization Assessment Report

Wave transformation at scale
The wave plan generated by AWS Transform consists of four steps for each wave. First, it converts the SQL Server schema to PostgreSQL. Second, it migrates the data. Third, it transforms the dependent .NET application code to make it PostgreSQL compatible. Finally, it deploys the application for testing.

Before converting the SQL Server schema, I can either create a new PostgreSQL database or choose an existing one as the target database.

Choose or create target database

After I choose the source and target databases, AWS Transform generates conversion reports for my review. AWS Transform converts the SQL Server schema to PostgreSQL-compatible structures, including tables, indexes, constraints, and stored procedures.

Download Schema conversion reports

For any schema that AWS Transform can’t automatically convert, I can manually address them in the AWS Database Migration Service (AWS DMS) console. Alternatively, I can fix them in my preferred SQL editor and update the target database instance.

After completing schema conversion, I have the option to proceed with data migration, which is an optional step. AWS Transform uses AWS DMS to migrate data from my SQL Server instance to the PostgreSQL database instance. I can choose to perform data migration later, after completing all transformations, or work with test data by loading it into my target database.

Choose if you would like to migrate data

The next step is code transformation. I specify a target branch for AWS Transform to upload the transformed code artifacts. AWS Transform updates the codebase to make the application compatible with the converted PostgreSQL database.

Specify target branch destination for transformed codebase

With this release, AWS Transform for full-stack Windows modernization supports only codebases in .NET 6 or later. For codebases in .NET Framework 3.1+, I first use AWS Transform for .NET to port them to cross-platform .NET. I’ll expand on this in a following section.

After the conversion is completed, I can view the source and target branches along with their code transformation status. I can also download and review the transformation report.

Download transformation report

Modernizing .NET Framework applications with UI layer
One major feature we’re releasing today is the modernization of UI frameworks from ASP.NET Web Forms to Blazor. This is added to existing support for modernizing model-view-controller (MVC) Razor views to ASP.NET Core Razor views.

As mentioned previously, if I have a .NET application in legacy .NET Framework, then I continue using AWS Transform for .NET to port it to cross-platform .NET. For legacy applications with UIs built on ASP.NET Web Forms, AWS Transform now modernizes the UI layer to Blazor along with porting the backend code.

AWS Transform for .NET converts ASP.NET Web Forms projects to Blazor on ASP.NET Core, facilitating the migration of ASP.NET websites to Linux. The UI modernization feature is enabled by default in AWS Transform for .NET on both the AWS Transform web console and Visual Studio extension.

During the modernization process, AWS Transform handles the conversion of ASPX pages, ASCX custom controls, and code-behind files, implementing them as server-side Blazor components rather than web assembly. The following project and file changes are made during the transformation:

From To Description
*.aspx, *.ascx *.razor .aspx pages and .ascx custom controls become .razor files
Web.config appsettings.json Web.config settings become appsettings.json settings
Global.asax Program.cs Global .asax code becomes Program.cs code
*.master *layout.razor Master files become layout.razor files

Image showcasing how the specific project files are transformed

Other new features in AWS Transform for .NET
Along with UI porting, AWS Transform for .NET has added support for more transformation capabilities and enhanced developer experience. These new features include the following:

  • Port to .NET 10 and .NET Standard – AWS Transform now supports porting to .NET 10, the latest Long-Term Support (LTS) release, which was released on November 11, 2025. It also supports porting class libraries to .NET Standard, a formal specification for a set of APIs that are common across all .NET implementations. Furthermore, AWS Transform is now available with AWS Toolkit for Visual Studio 2026.
  • Editable transformation report – After the assessment is complete, you can now view and customize the transformation plan based on your specific requirements and preferences. For example, you can update package replacement details.
  • Real-time transformation updates with estimated remaining time – Depending on the size and complexity of the codebase, AWS Transform can take some time to complete the porting. You can now track transformation updates in real-time along with the estimated remaining time.
  • Next steps markdown – After the transformation is complete, AWS Transform now generates a next steps markdown file with the remaining tasks to complete the porting. You can use this as a revised plan to repeat the transformation with AWS Transform or use AI code-companions to complete the porting.

Things to know
Some more things to know are:

  • AWS Regions – AWS Transform for full-stack Windows modernization is generally available today in the US East (N. Virginia) Region. For Regional availability and future roadmap, visit the AWS Capabilities by Region.
  • Pricing – Currently, there is no added charge for Windows modernization features of AWS Transform. Any resources you create or continue to use in your AWS account using the output of AWS Transform are billed according to their standard pricing. For limits and quotas, refer to the AWS Transform User Guide.
  • SQL Server versions supported – AWS Transform supports the transformation of SQL Server versions from 2008 R2 through 2022, including all editions (Express, Standard, and Enterprise). SQL Server must be hosted on Amazon RDS or Amazon EC2 in the same Region as AWS Transform.
  • Entity Framework versions supported – AWS Transform supports the modernization of Entity Framework versions 6.3 through 6.5 and Entity Framework Core 1.0 through 8.0.
  • Getting started – To get started, visit AWS Transform for full-stack Windows modernization User Guide.

Prasad

Introducing AWS Transform custom: Crush tech debt with AI-powered code modernization

This post was originally published on this site

Technical debt is one of the most persistent challenges facing enterprise development teams today. Studies show that organizations spend 20% of their IT budget on technical debt instead of advancing new capabilities. Whether it’s upgrading legacy frameworks, migrating to newer runtime versions, or refactoring outdated code patterns, these essential but repetitive tasks consume valuable developer time that could be spent on innovation.

Today, we’re excited to announce AWS Transform custom, a new agent that fundamentally changes how organizations approach modernization at scale. This intelligent agent combines pre-built transformations for Java, Node.js, and Python upgrades with the ability to define custom transformations. By learning specific transformation patterns and automating them across entire codebases, customers using AWS Transform custom have achieved up to 80% reduction in execution time in many cases, freeing developers to focus on innovation.

You can define transformations using your documentation, natural language descriptions, and code samples. The service then applies these specific patterns consistently across hundreds or thousands of repositories, improving its effectiveness through both explicit feedback and implicit signals like developers’ manual fixes within your transformation projects.

AWS Transform custom offers both CLI and web interfaces to suit different modernization needs. You can use the CLI to define transformations through natural language interactions and execute them on local codebases, either interactively or autonomously. You can also integrate it into code modernization pipelines or workflows, making it ideal for machine-driven automation. Meanwhile, the web interface provides comprehensive campaign management capabilities, helping teams track and coordinate transformation progress across multiple repositories at scale.

Language and framework modernization
AWS Transform supports runtime upgrades without the need to provide additional information, understanding not only the syntax changes required but also the subtle behavioral differences and optimization opportunities that come with newer versions. The same intelligent approach applies to Node.js, Python and Java runtime upgrades, and even extends to infrastructure-level transitions, such as migrating workloads from x86 processors to AWS Graviton.

It also navigates framework modernization with sophistication. When organizations need to update their Spring Boot applications to take advantage of newer features and security patches, AWS Transform custom doesn’t merely update version numbers but understands the cascading effects of dependency changes, configuration updates, and API modifications.

For teams facing more dramatic shifts, such as migrating from Angular to React, AWS Transform custom can learn the patterns of component translation, state management conversion, and routing logic transformation that make such migrations successful.

Infrastructure and enterprise-scale transformations
The challenge of keeping up with evolving APIs and SDKs becomes particularly acute in cloud-based environments where services are continuously improving. AWS Transform custom supports AWS SDK updates across a broad spectrum of programming languages that enterprises use including Java, Python, and JavaScript. The service understands not only the mechanical aspects of API changes, but also recognizes best practices and optimization opportunities available in newer SDK versions.

Infrastructure as Code transformations represent another critical capability, especially as organizations evaluate different tooling strategies. Whether you’re converting AWS Cloud Development Kit (AWS CDK) templates to Terraform for standardization purposes, or updating AWS CloudFormation configurations to access new service features, AWS Transform custom understands the declarative nature of these tools and can maintain the intent and structure of your infrastructure definitions.

Beyond these common scenarios, AWS Transform custom excels at addressing the unique, organization-specific code patterns that accumulate over years of development. Every enterprise has its own architectural conventions, utility libraries, and coding standards that need to evolve over time. It can learn these custom patterns and help refactor them systematically so that institutional knowledge and best practices are applied consistently across the entire application portfolio.

AWS Transform custom is designed with enterprise development workflows in mind, enabling center of excellence teams and system integrators to define and execute organization-wide transformations while application developers focus on reviewing and integrating the transformed code. DevOps engineers can then configure integrations with existing continuous integration and continuous delivery (CI/CD) pipelines and source control systems. It also includes pre-built transformations for Java, Node.js and Python runtime updates which can be particularly useful for AWS Lambda functions, along with transformations for AWS SDK modernization to help teams get started immediately.

Getting started
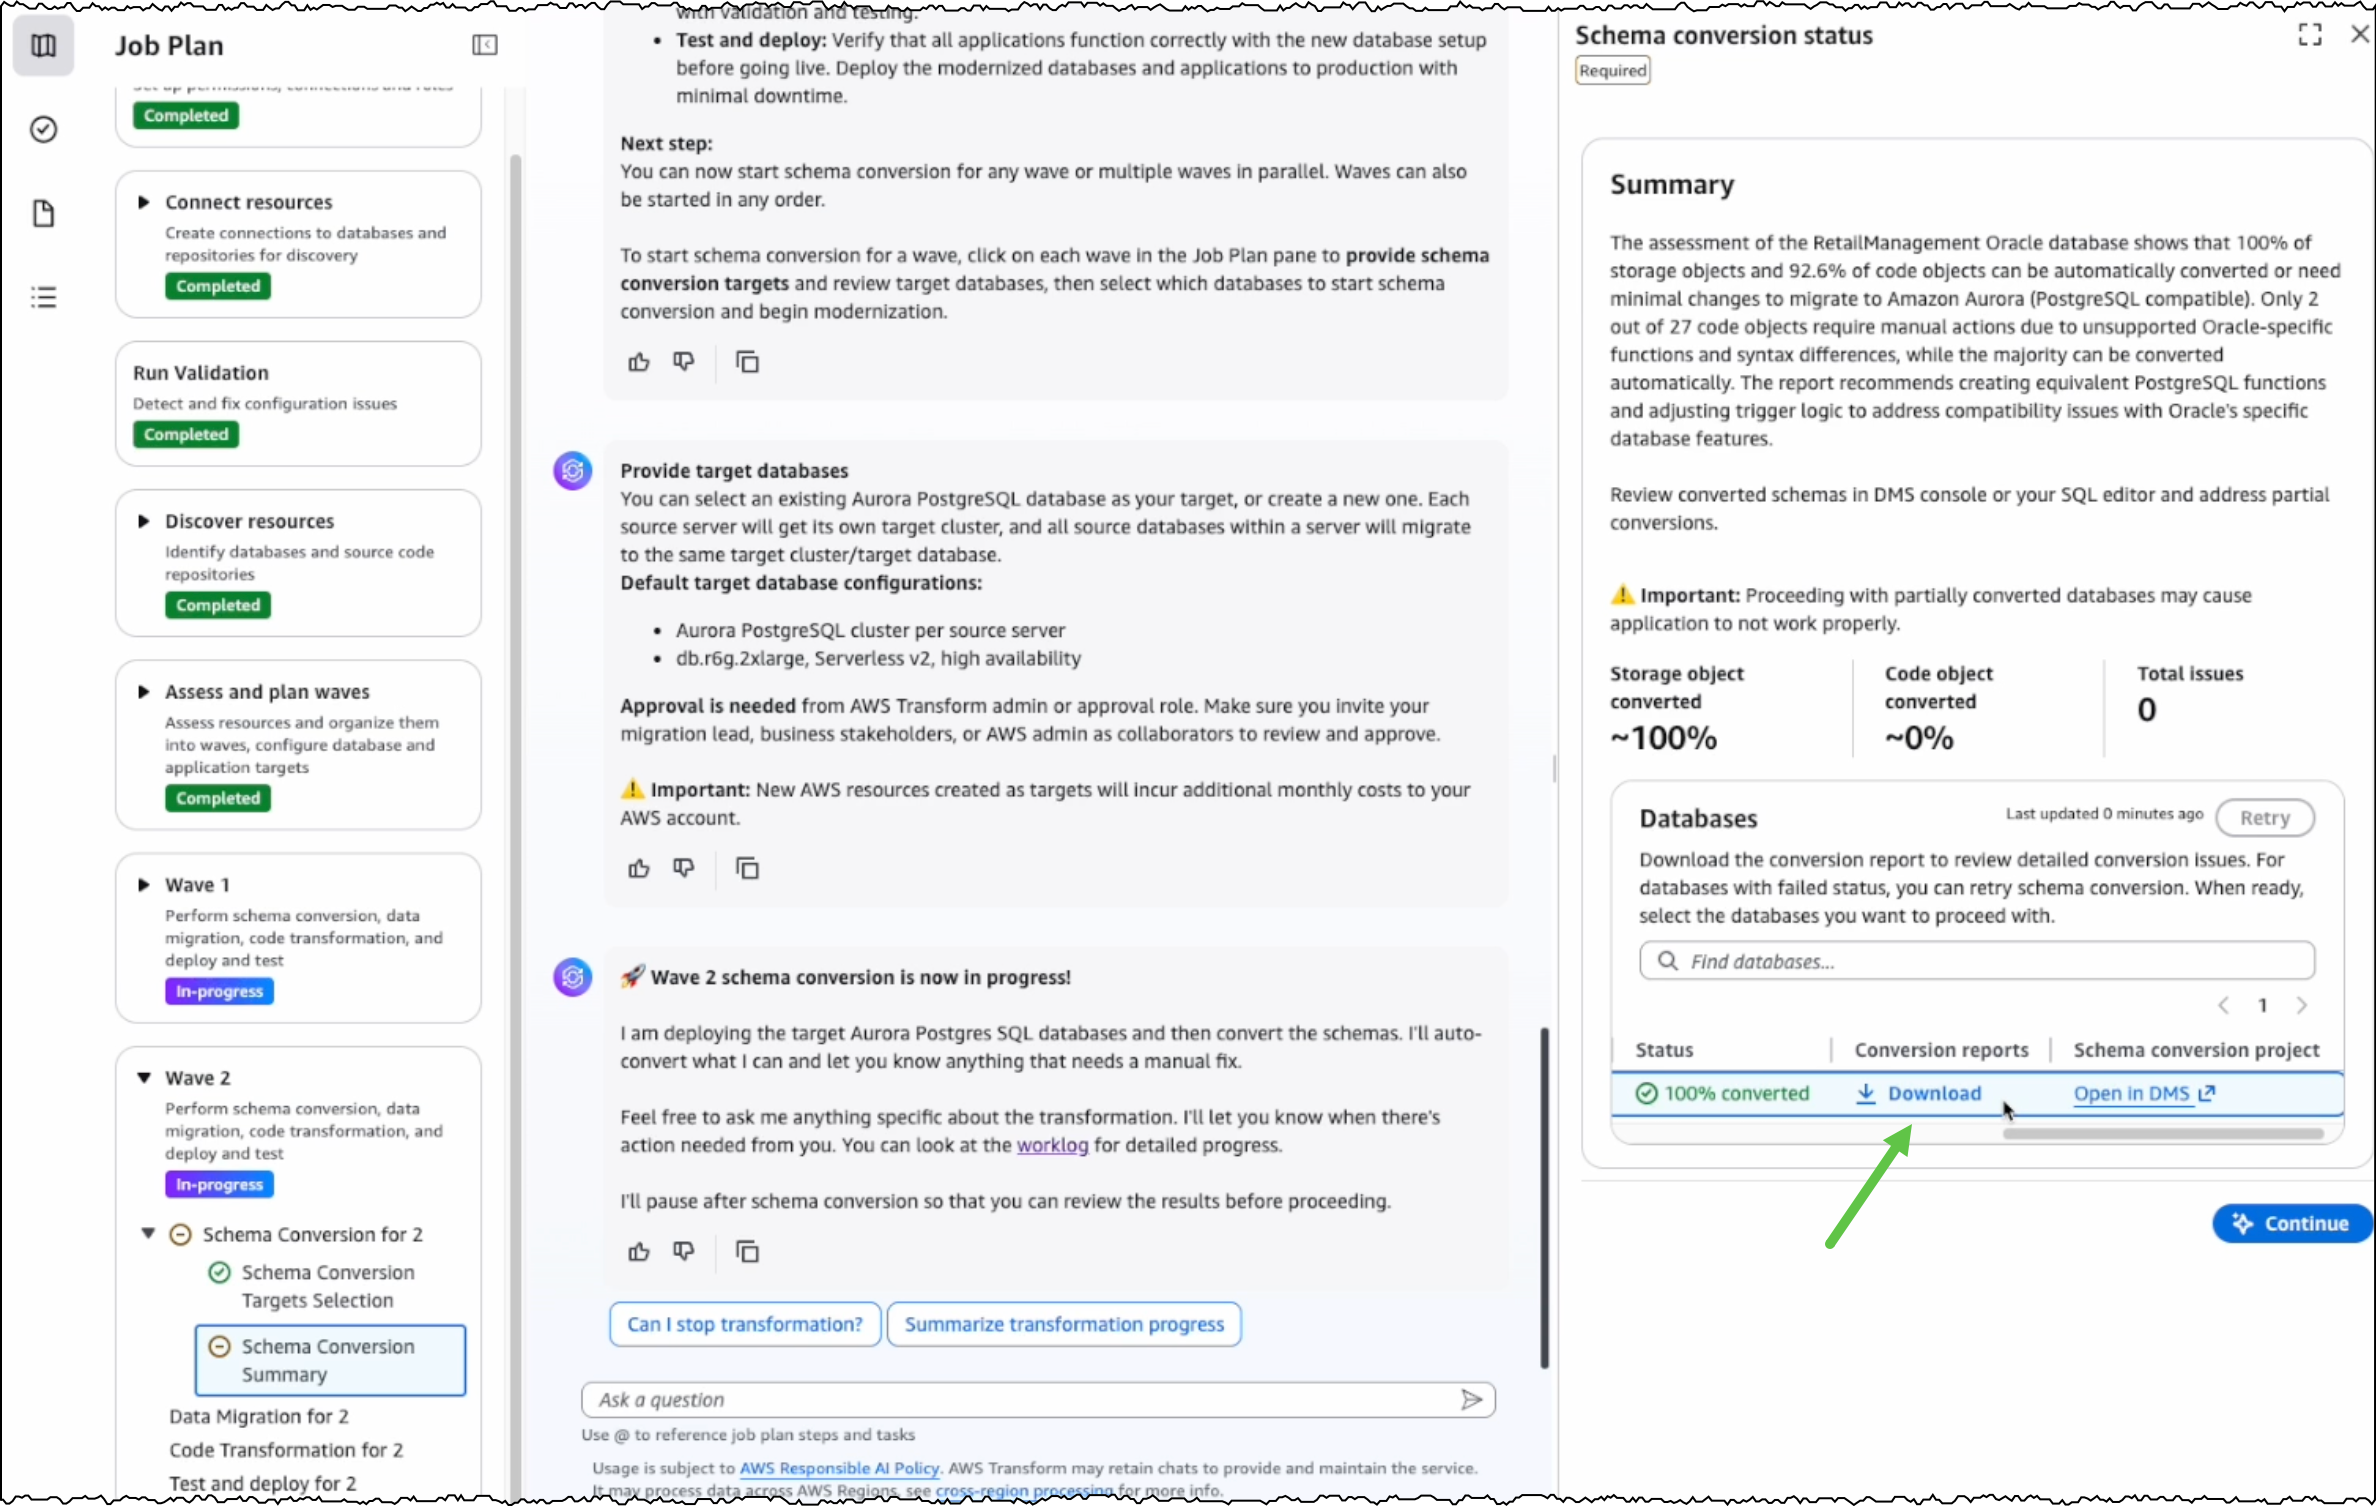
AWS Transform makes complex code transformations manageable through both pre-built and custom transformation capabilities. Let’s start by exploring how to use an existing transformation to address a common modernization challenge: upgrading AWS Lambda functions due to end-of-life (EOL) runtime support.

For this example, I’ll demonstrate migrating a Python 3.8 Lambda function to Python 3.13, as Python 3.8 reached EOL and is no longer receiving security updates. I’ll use the CLI for this demo, but I encourage you to also explore the web interface’s powerful campaign management capabilities.

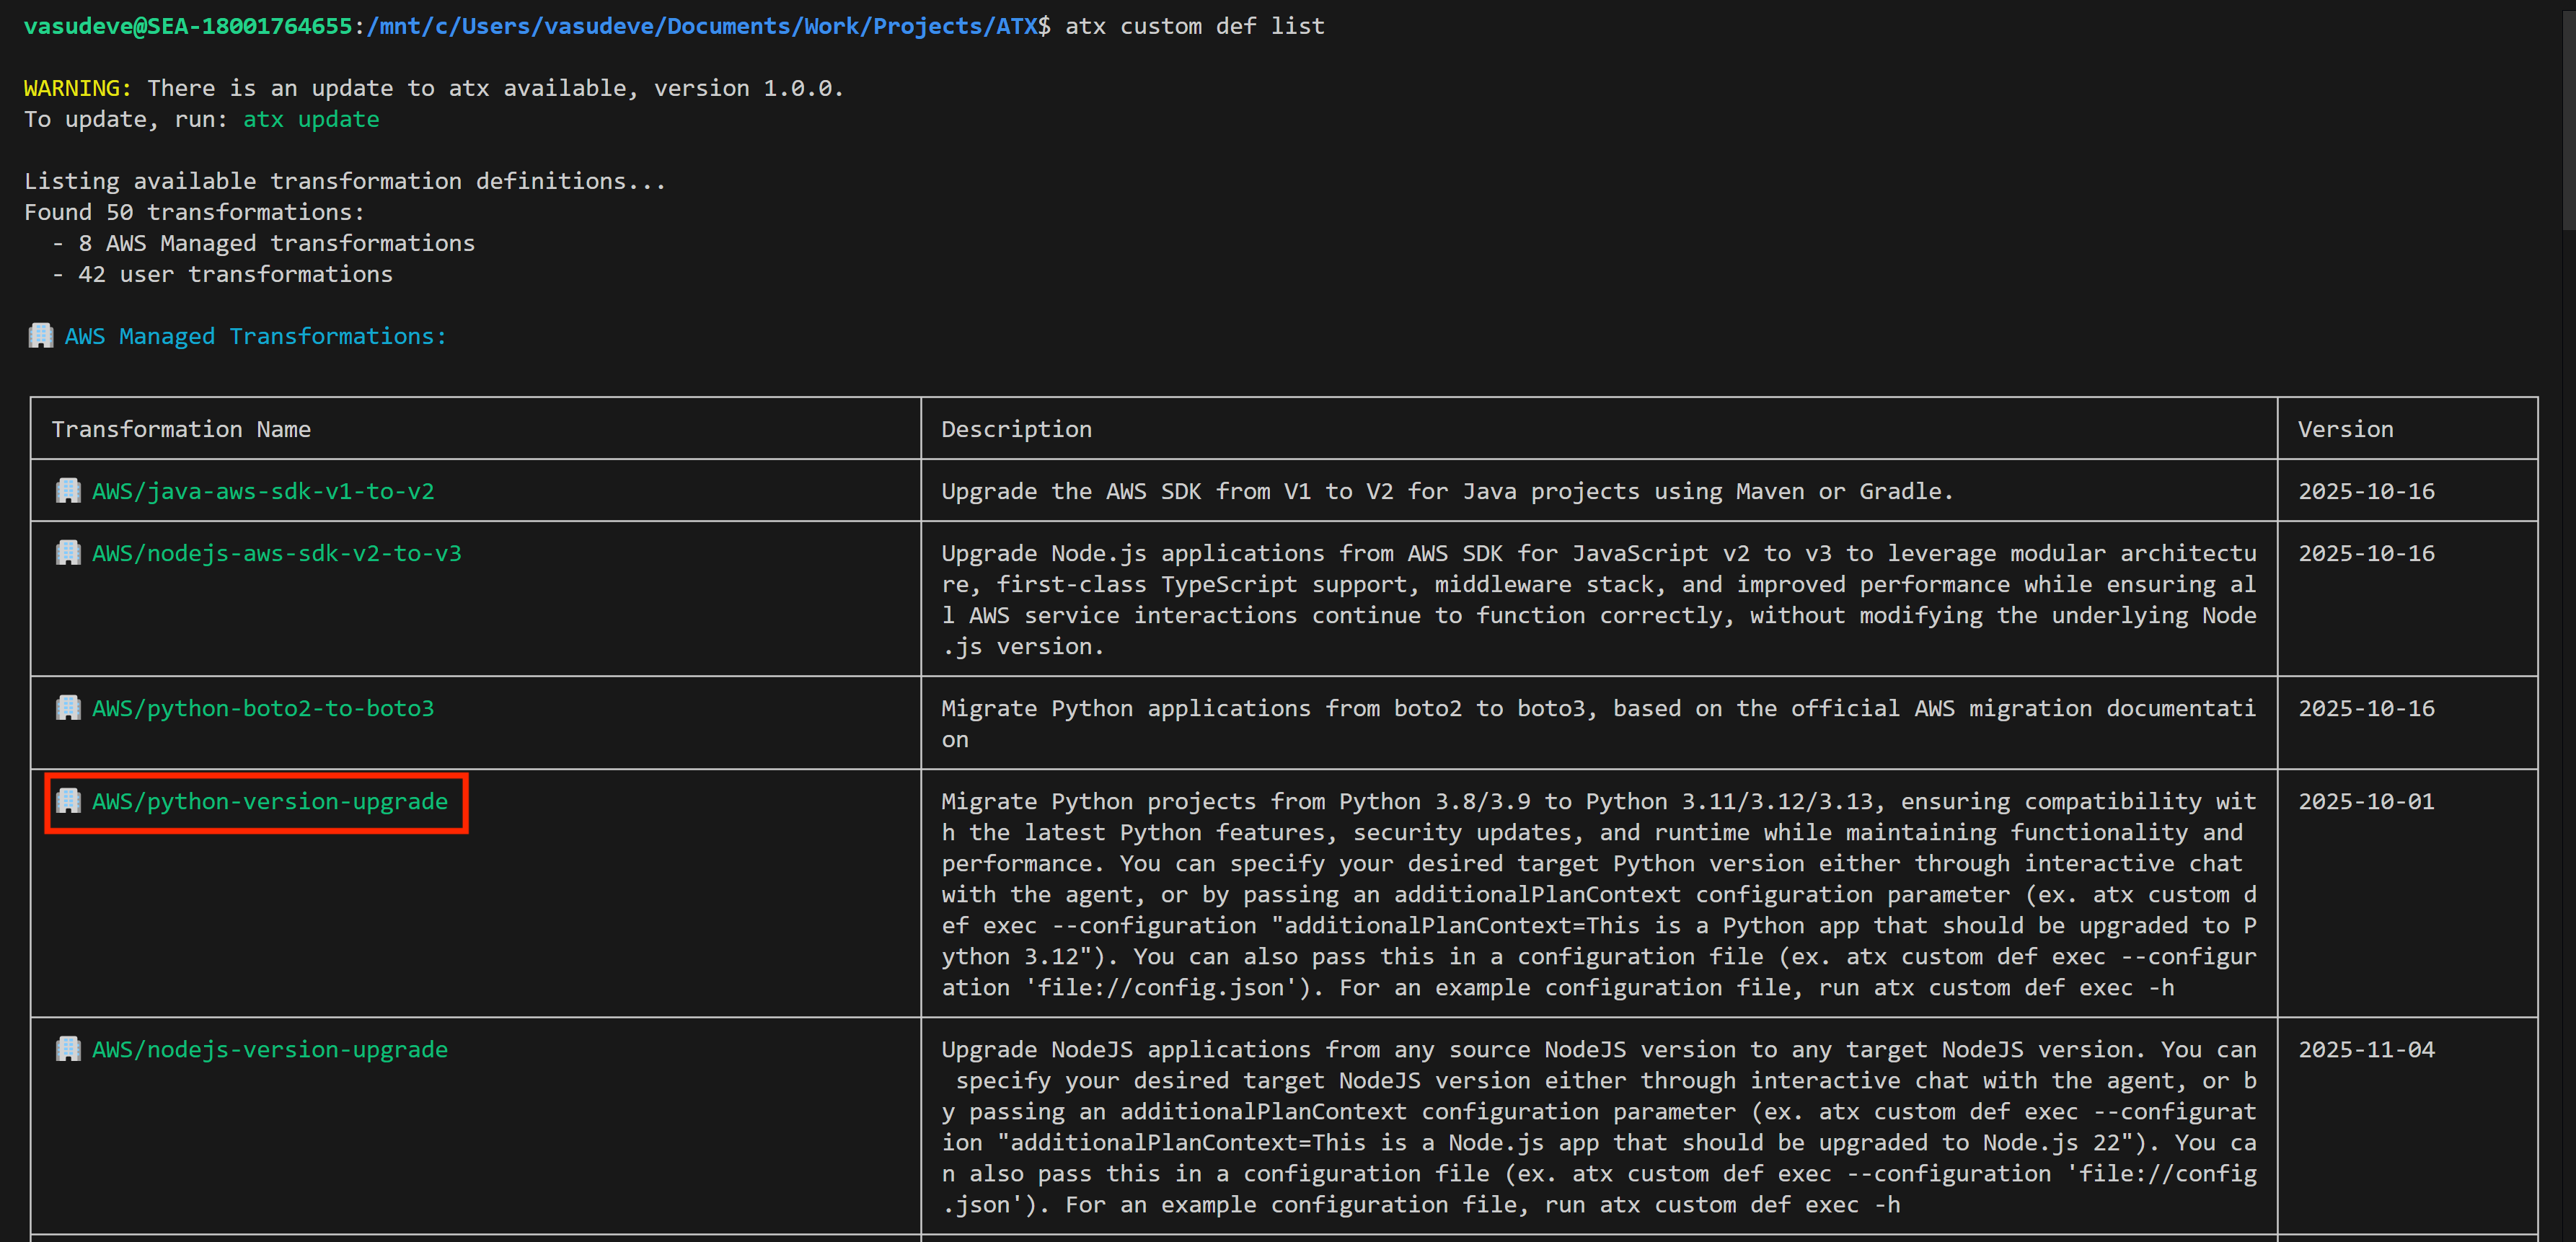
First, I use the command atx custom def list to explore the available transformation definitions. You can also access this functionality through a conversational interface by typing only atx instead of issuing the command directly, if you prefer.

This command displays all available transformations, including both AWS-managed defaults and any existing custom transformations created by users in my organization. AWS-managed transformations are identified by the AWS/ prefix, indicating they’re maintained and updated by AWS. In the results, I can see several options such as AWS/java-version-upgrade for Java runtime modernization, AWS/python-boto2-to-boto3-migration for updating Python AWS SDK usage, AWS/nodejs-version-upgrade for Node.js runtime updates.

For my Python 3.8 to 3.13 migration, I’ll use the AWS/python-version-upgrade transformation.

You run a migration by using the atx custom def exec command.  Please consult the documentation for more details about the command and all its options. Here, I run it against my project repository specifying the transformation name. I also add pytest to run unit tests for validation. More importantly, I use the additionalPlanContext section in the  --configuration input to specify which Python version I want to upgrade to. For reference, here’s the command I have for my demo (I’ve used multiple lines and indented it here for clarity):

atx custom def exec 
-p /mnt/c/Users/vasudeve/Documents/Work/Projects/ATX/lambda/todoapilambda 
-n AWS/python-version-upgrade
-C "pytest" 
--configuration 
    "additionalPlanContext= The target Python version to upgrade to is Python 3.13" 
-x -t

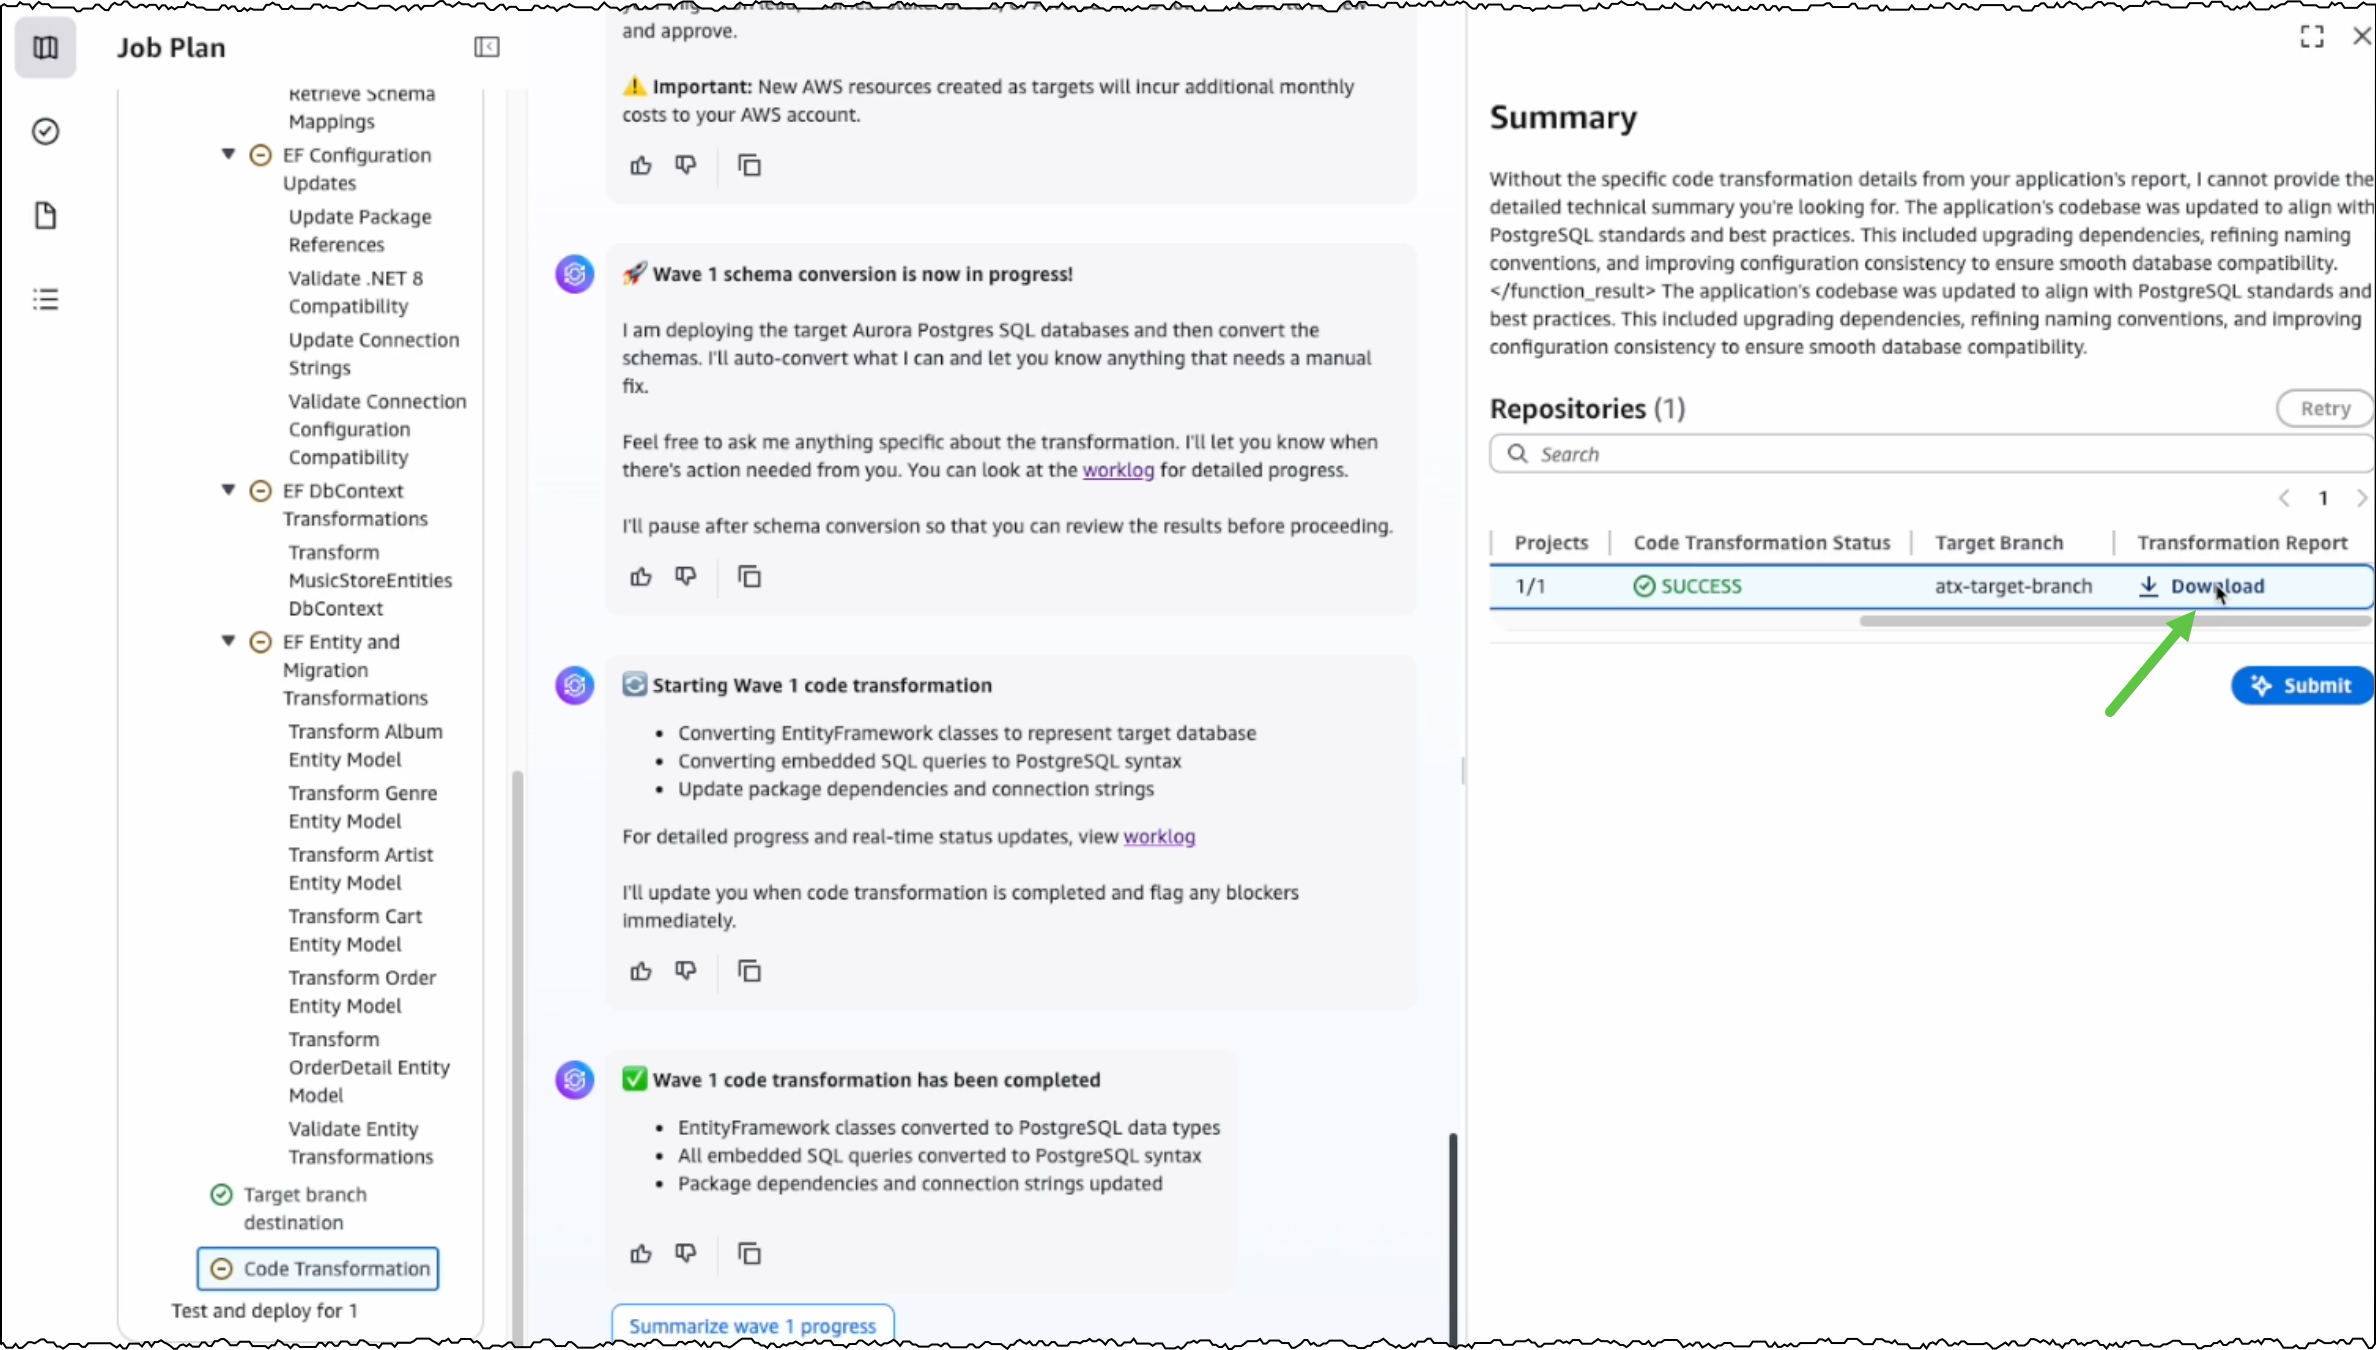
AWS Transform then starts the migration process. It analyzes my Lambda function code, identifies Python 3.8-specific patterns, and automatically applies the necessary changes for Python 3.13 compatibility. This includes updating syntax for deprecated features, modifying import statements, and adjusting any version-specific behaviors.

After execution, it provides a comprehensive summary including a report on dependencies updated in requirements.txt with Python 3.13-compatible package versions, instances of deprecated syntax replaced with current equivalents, updated runtime configuration notes for AWS Lambda deployment, suggested test cases to validate the migration, and more. It also provides a body of evidence that serve as proof of success.

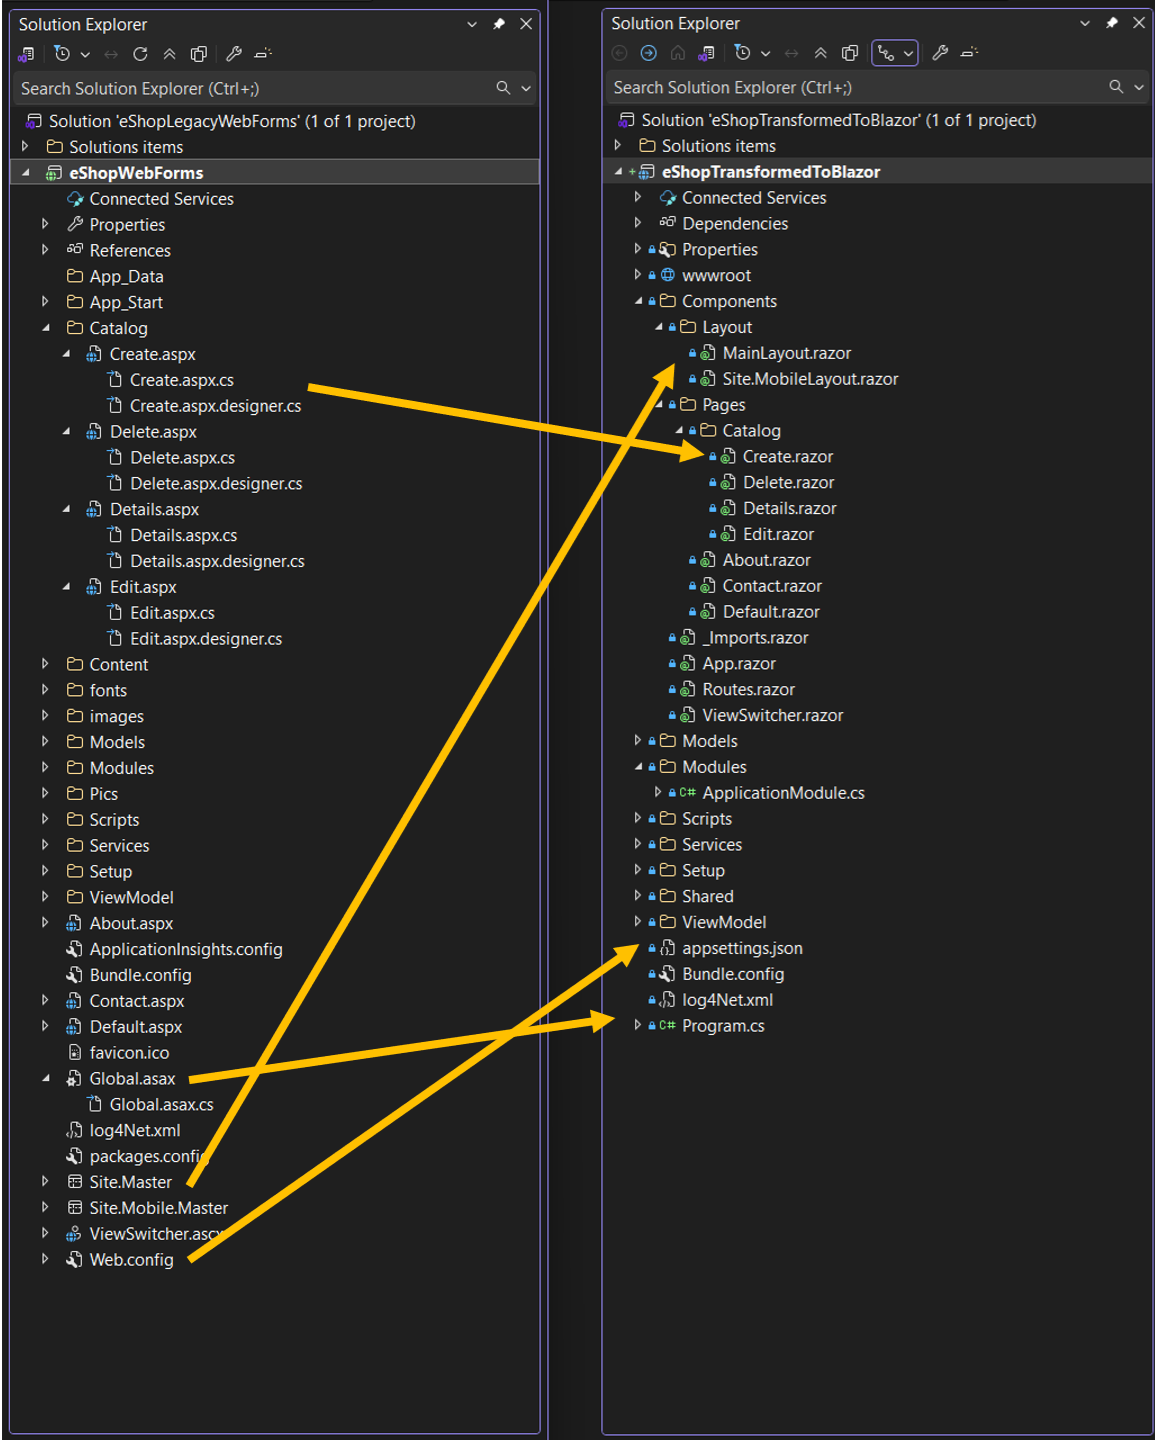
The migrated code lives in a local branch so you can review and merge when satisfied. Alternatively, you can keep providing feedback and reiterating until yo’re happy that the migration is fully complete and meets your expectations.

This automated process changes what would typically require hours of manual work into a streamlined, consistent upgrade that maintains code quality while maintaining compatibility with the newer Python runtime.

Creating a new custom transformation
While AWS-managed transformations handle common scenarios effectively, you can also create custom transformations tailored to your organization’s specific needs. Let’s explore how to create a custom transformation to see how AWS Transform learns from your specific requirements.

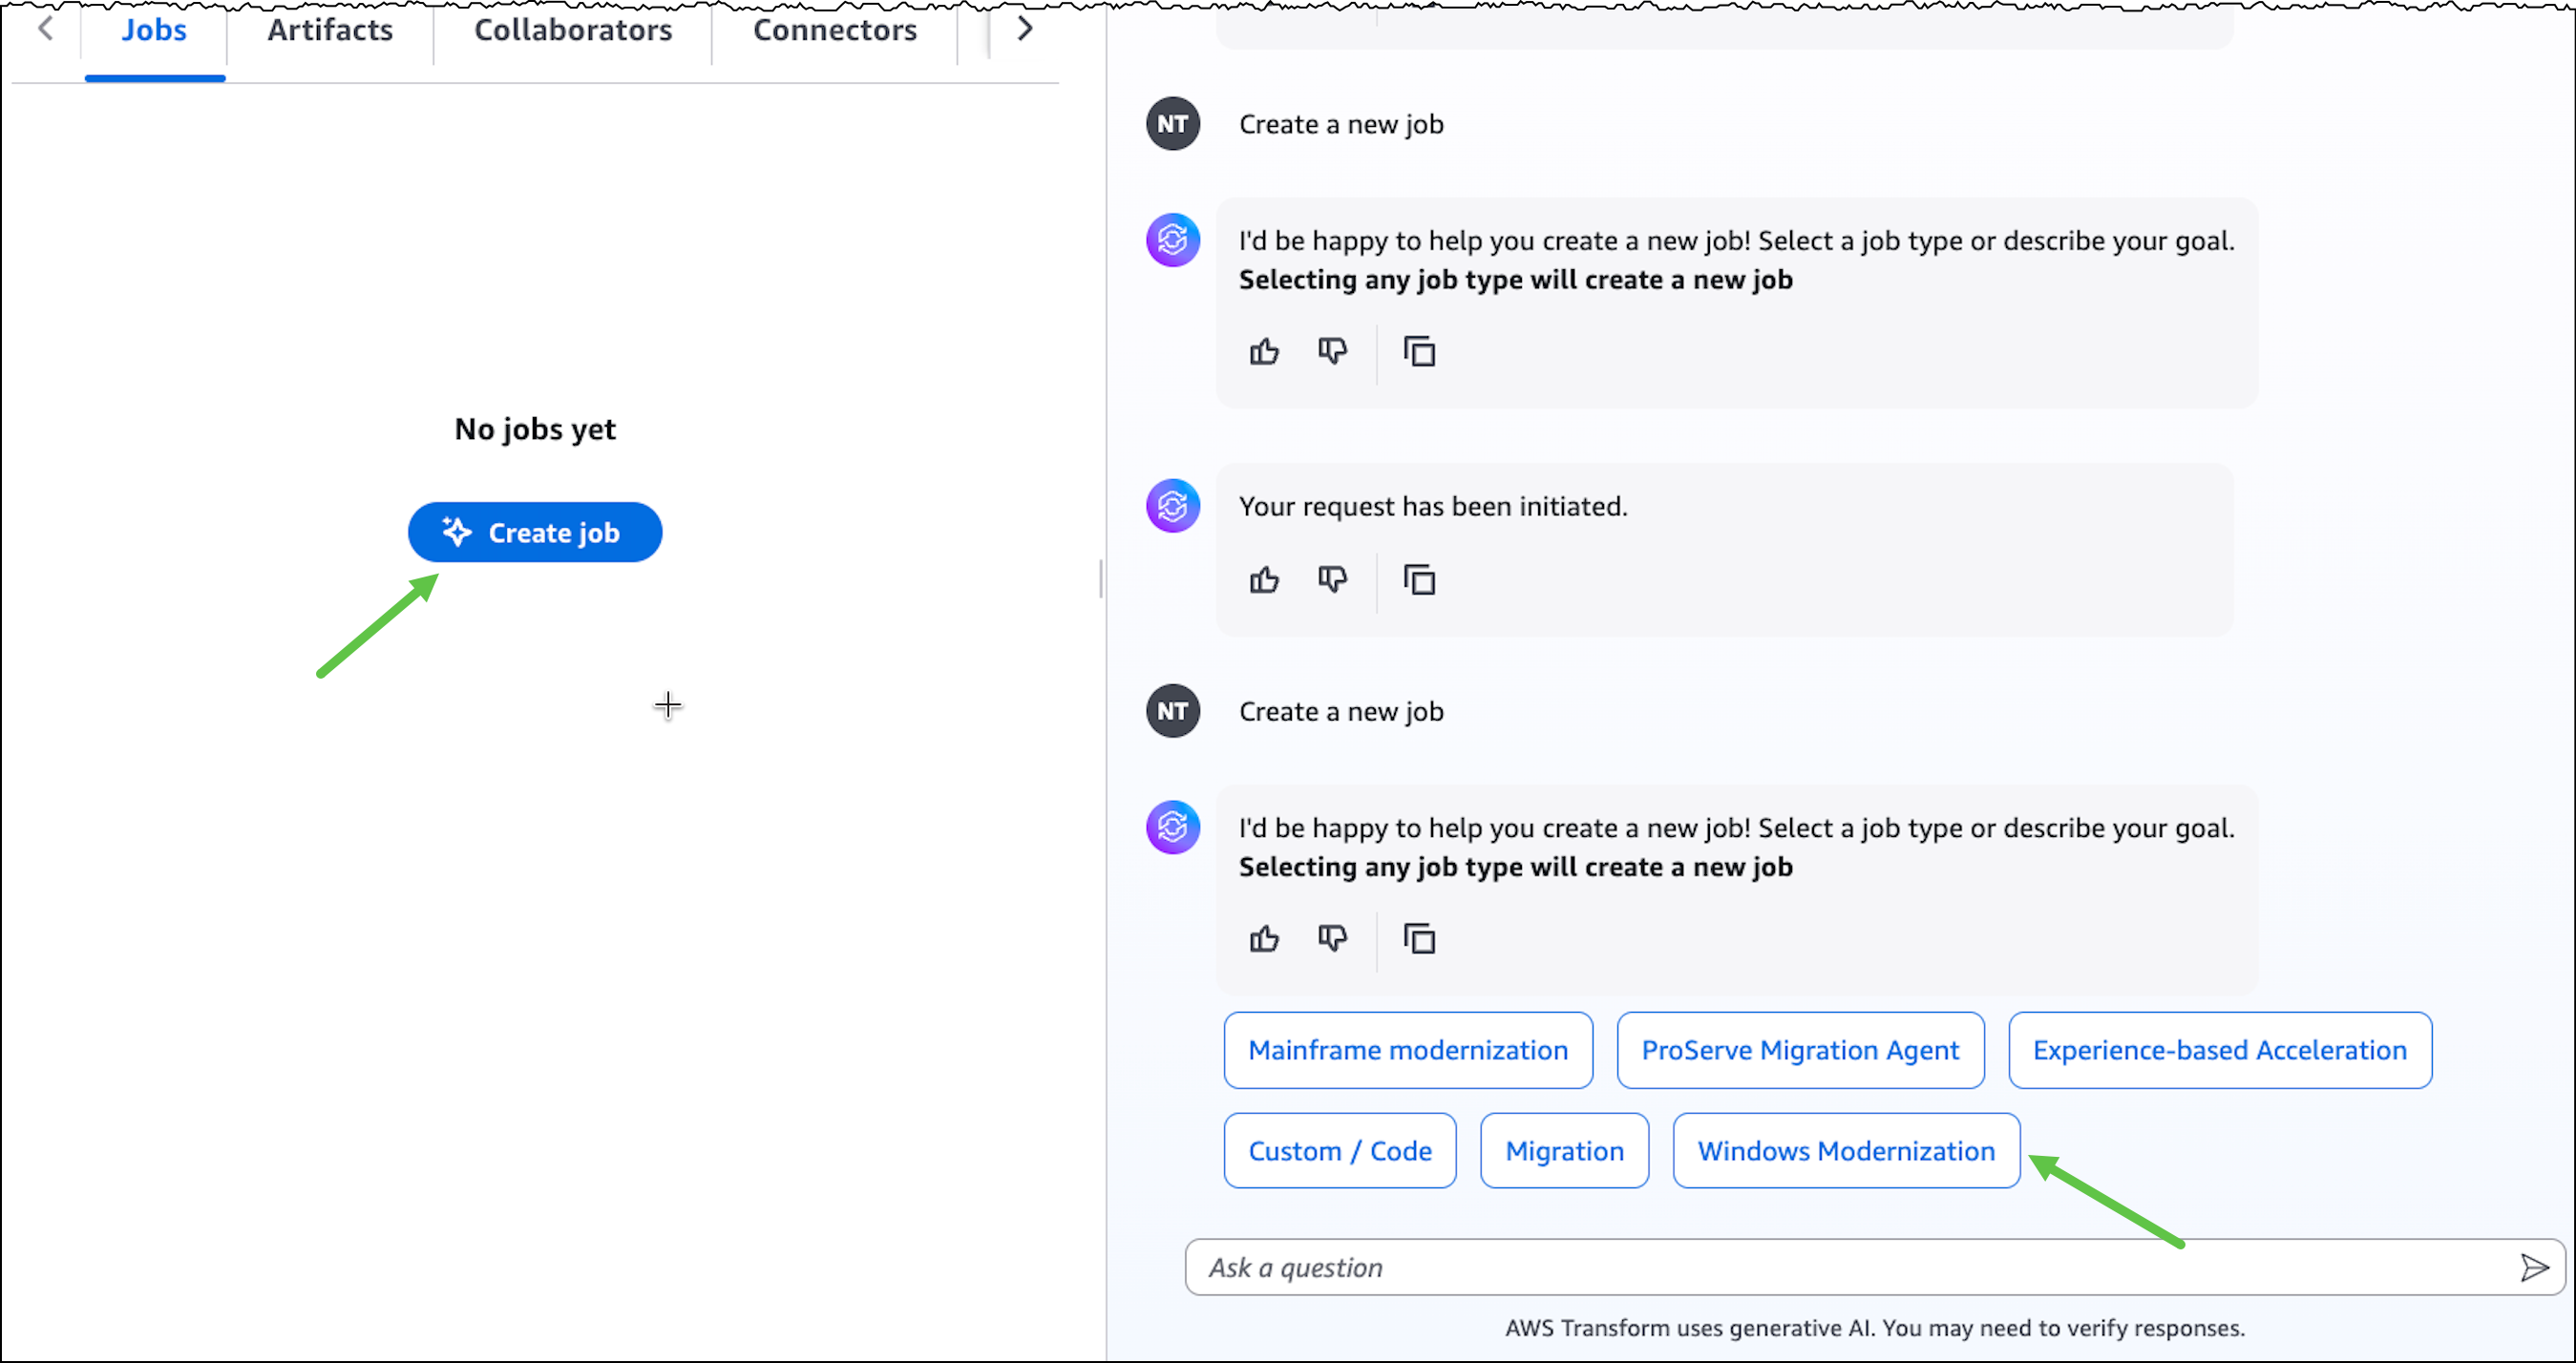
I type atx to initialize the atx cli and start the process.

The first thing it asks me is if I want to use one of the existing transformations or create a new one. I choose to create a new one. Notice that from here on the whole conversation takes place using natural language, not commands. I typed new one but I could have typed I want to create a new one and it would’ve understood it exactly the same.

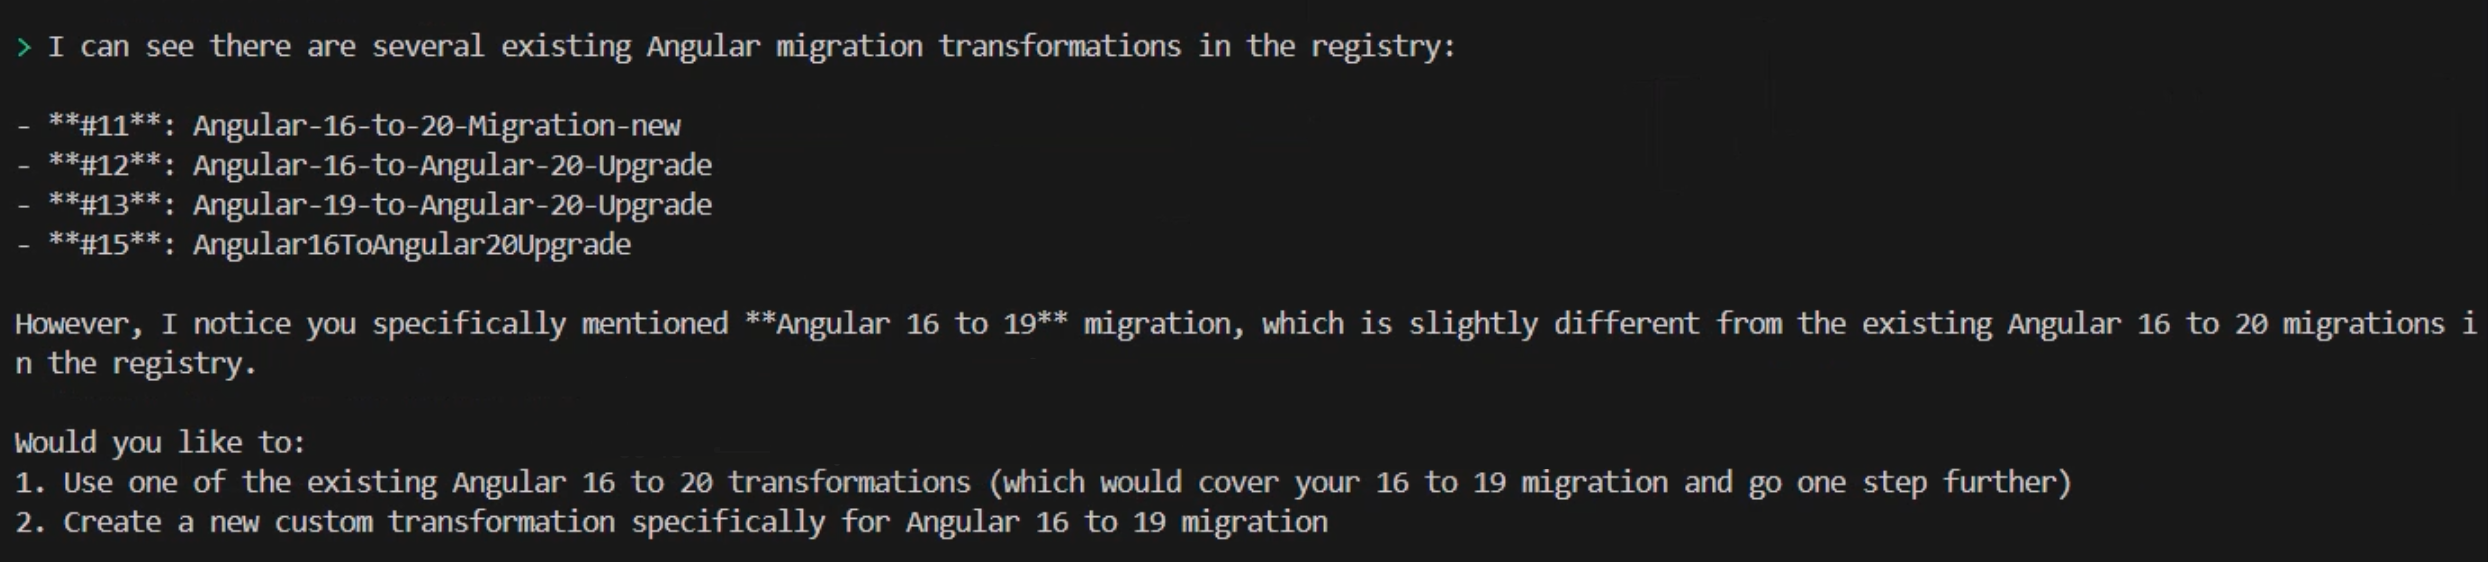
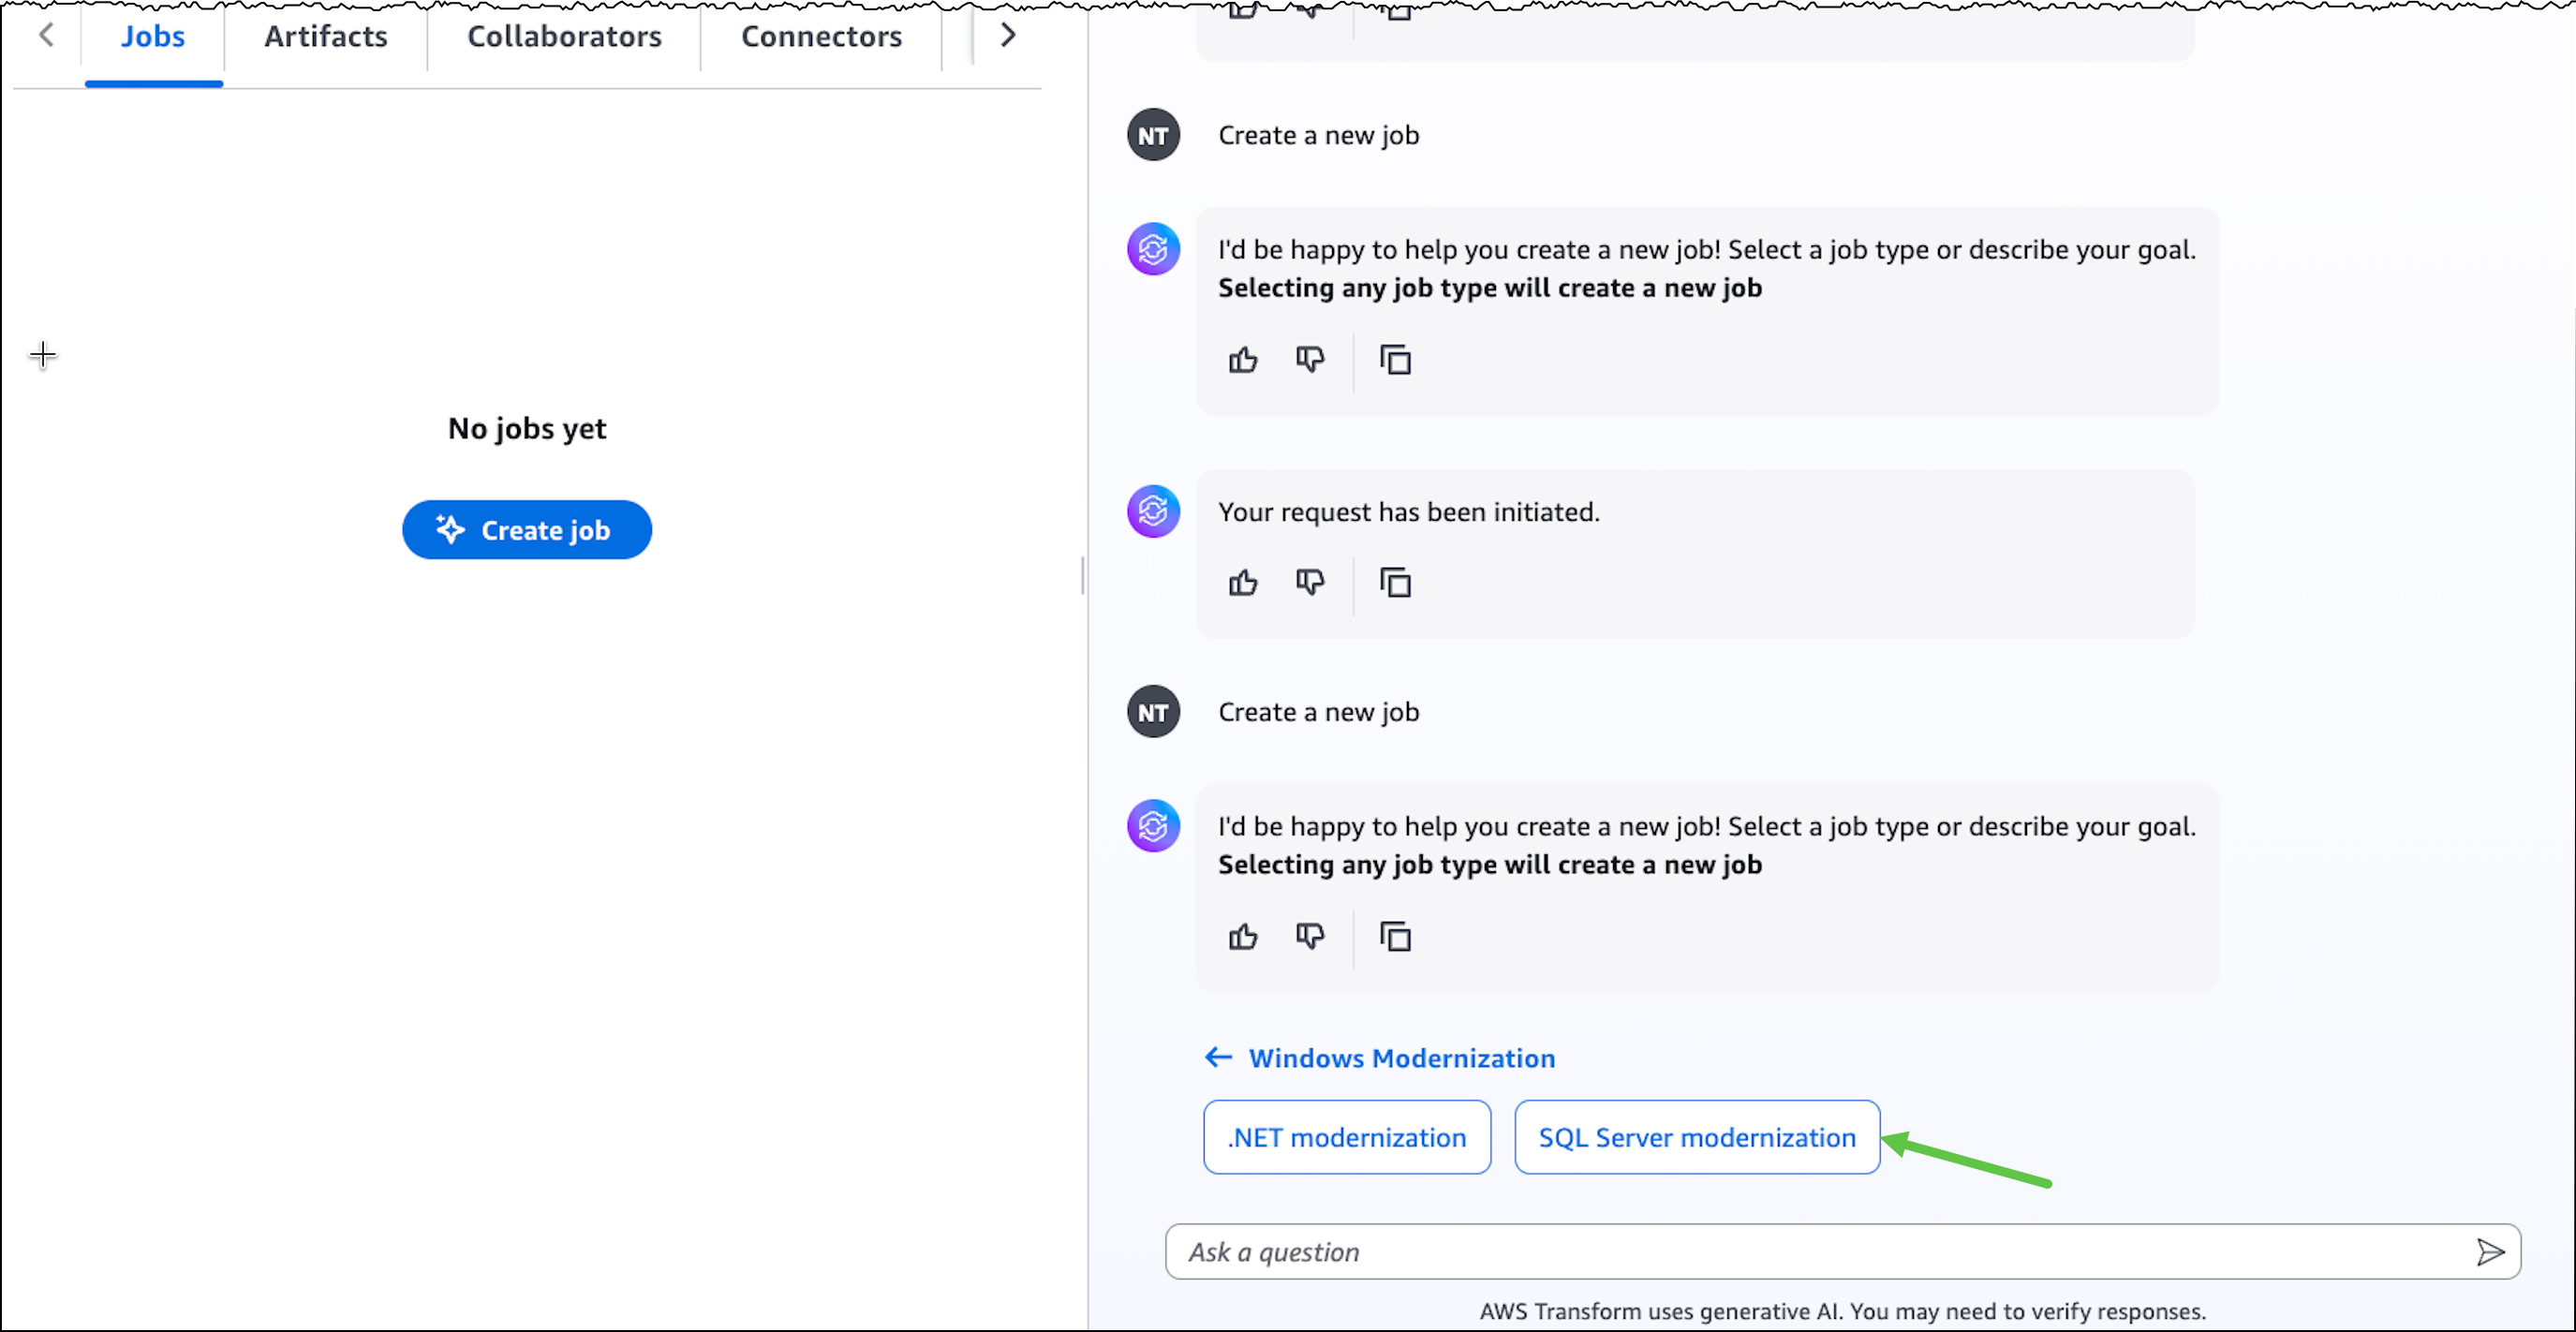
It then prompts me to provide more information about the kind of transformation I’d like to perform. For this demo, I’m going to migrate an Angular application, so I type angular 16 to 19 application migration which prompts the CLI to search for all transformations available for this type of migration. In my case, my team has already created and made available a few Angular migrations, so it shows me those. However, it warns me that none of them is an exact match to my specific request for migrating from Angular 16 to 19. It then asks if I’d like to select from one of the existing transformations listed or create a custom one.

I choose to create a custom one by continuing to use natural language and typing create a new one as a command. Again, this could be any variation of that statement provided that you indicate your intentions clearly. It follows by asking me a few questions including whether I have any useful documentation, example code or migration guides that I can provide to help customize the transformation plan.

For this demo, I’m only going to rely on AWS Transform to provide me with good defaults. I type I don't have these details. Follow best practices. and the CLI responds by telling me that it will create a comprehensive transformation definition for migrating Angular 16 to Angular 19.  Of course, I relied on the pre-trained data to generate results based on best practices. As usual, the recommendation is to provide as much information and relevant data as possible at this stage of the process for better results. However, you don’t need to have all the data upfront. You can keep on providing data at any time› as you iterate through the process of creating the custom transformation definition.

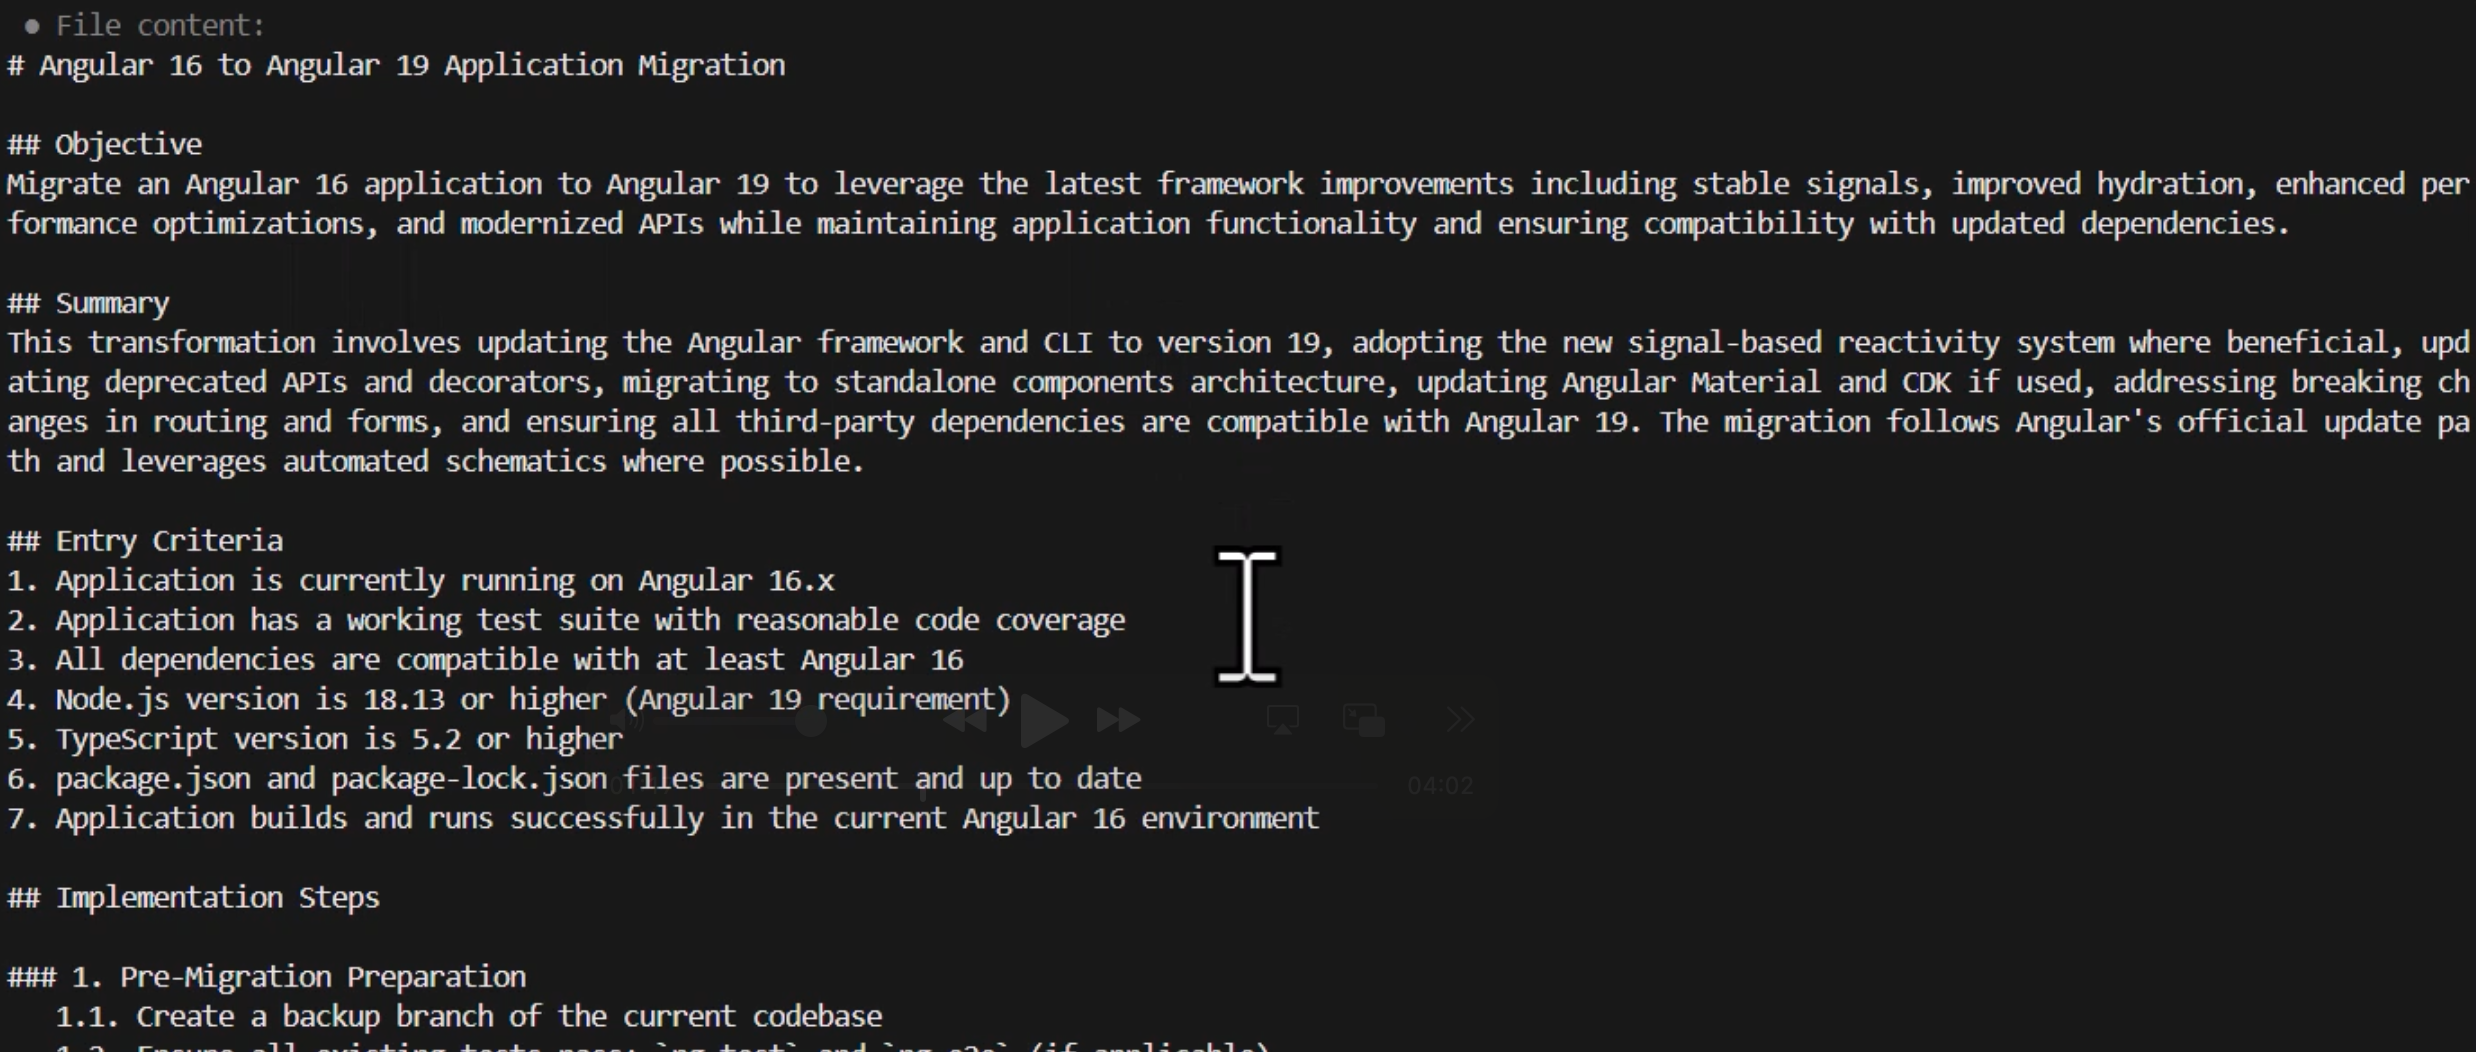
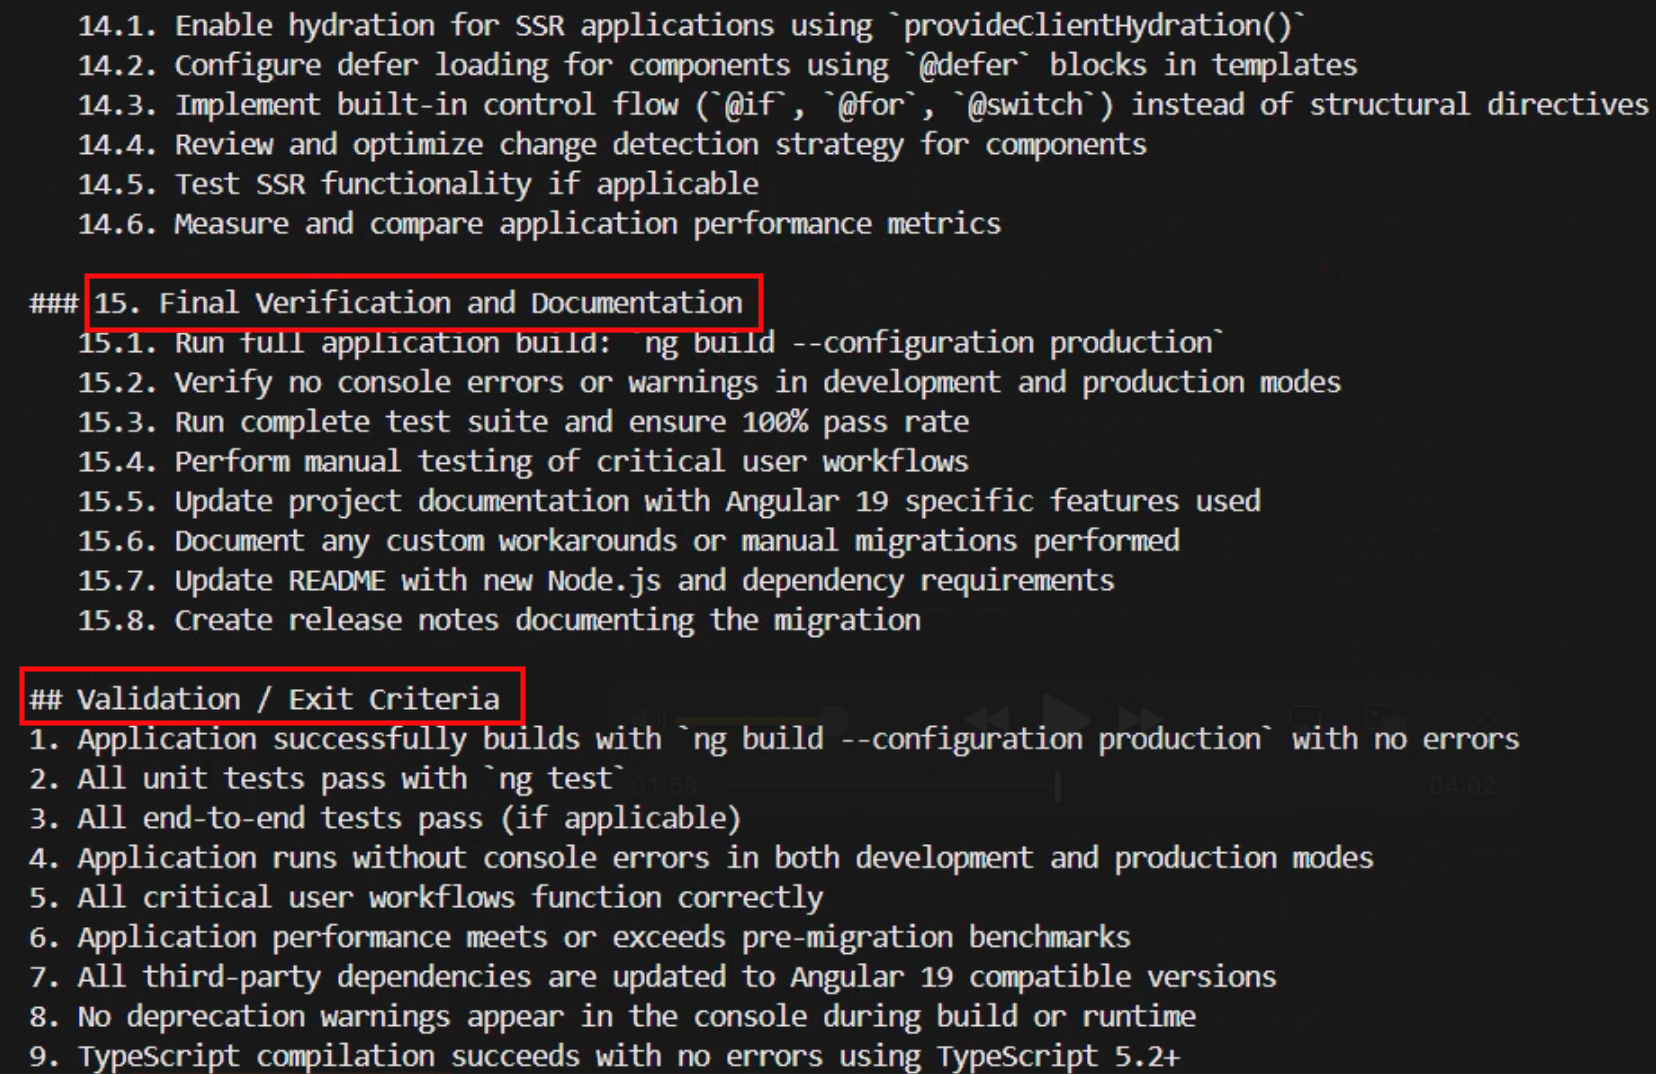
The transformation definition is generated as a markup file containing a summary and a comprehensive sequence of implementation steps grouped logically into phases such as premigration preparation, processing and partitioning, static dependency analysis, searching and applying specific transformation rules, and step-by-step migration and iterative validation.

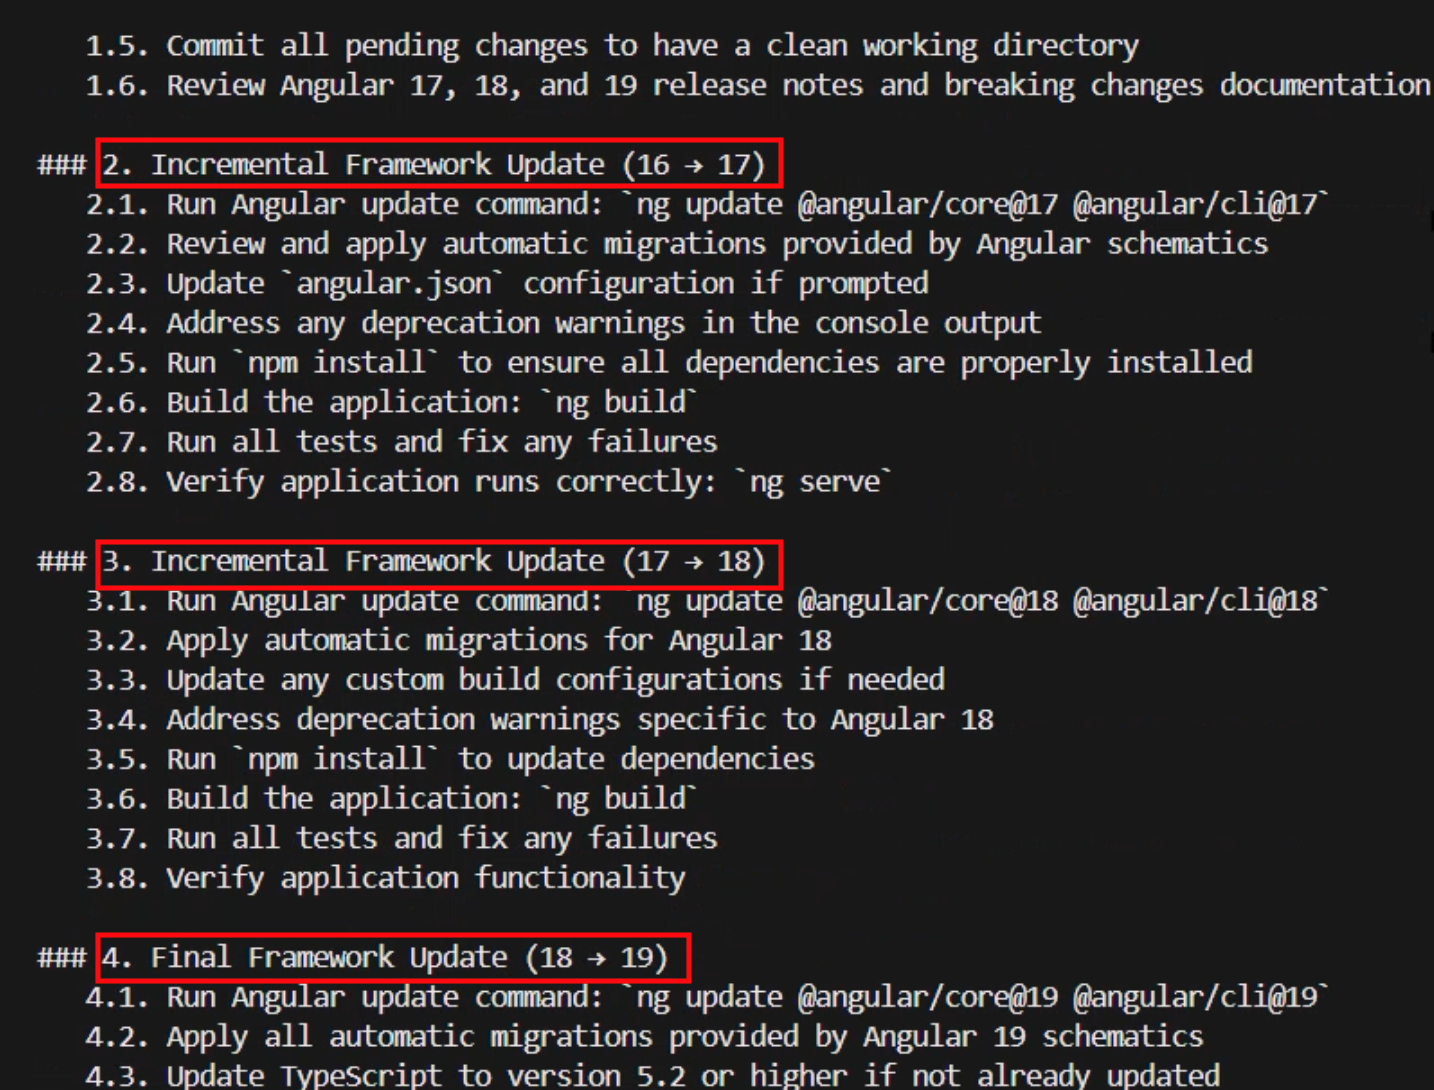
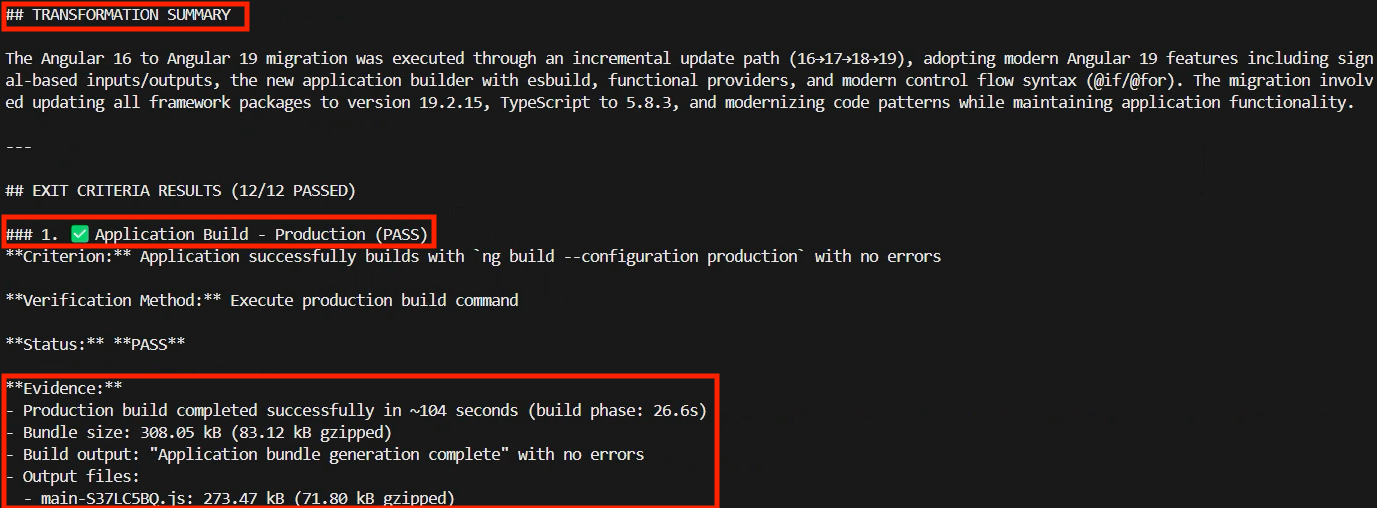
It’s interesting to see that AWS Transform opted for the best practice of doing incremental framework updates creating steps for migrating the application first to 17 then 18 then 19 instead of trying to go directly from 16 to 19 to minimize issues.

Note that the plan includes various stages of testing and verification to confirm that the various phases can be concluded with confidence. At the very end, it also includes a final validation stage listing exit criteria that performs a comprehensive set of tests against all aspects of the application that will be used to accept the migration as successfully complete.

After the transformation definition is created, AWS Transform asks me about what I would like to do next. I can choose to review or modify the transformation definition and I can reiterate through this process as much as I need until I arrive at one that I’m satisfied with. I can also choose to already apply this transformation definition to an Angular codebase. However, first I want to make this transformation available to my team members as well as myself so we can all use it again in the future. So, I choose option 4 to publish this transformation to the registry.

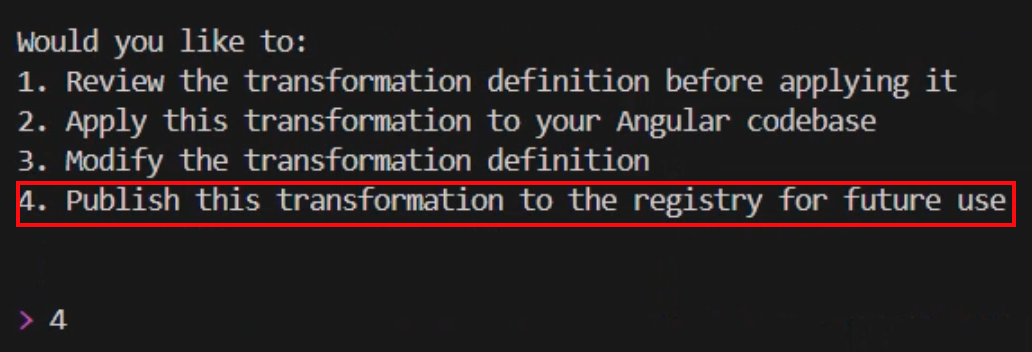
This custom transformation needs a name and a description of its objective which is displayed when users browse the registry. AWS Transforms automatically extracts those from context for me and asks me if I would like to modify them before going ahead. I like the sensible default of “Angular-16-to-19-Migration”, and the objective is clearly stated, so I choose to accept the suggestions and publish it by answering with yes, looks good.

Now that the transformation definition is created and published, I can use it and run it multiple times against any code repository. Let’s apply the transformation to a code repository with a project written in Angular 16. I now choose option 1 from the follow-up prompt and the CLI asks me for the path in my file system to the application that I want to migrate and, optionally, the build command that it should use.

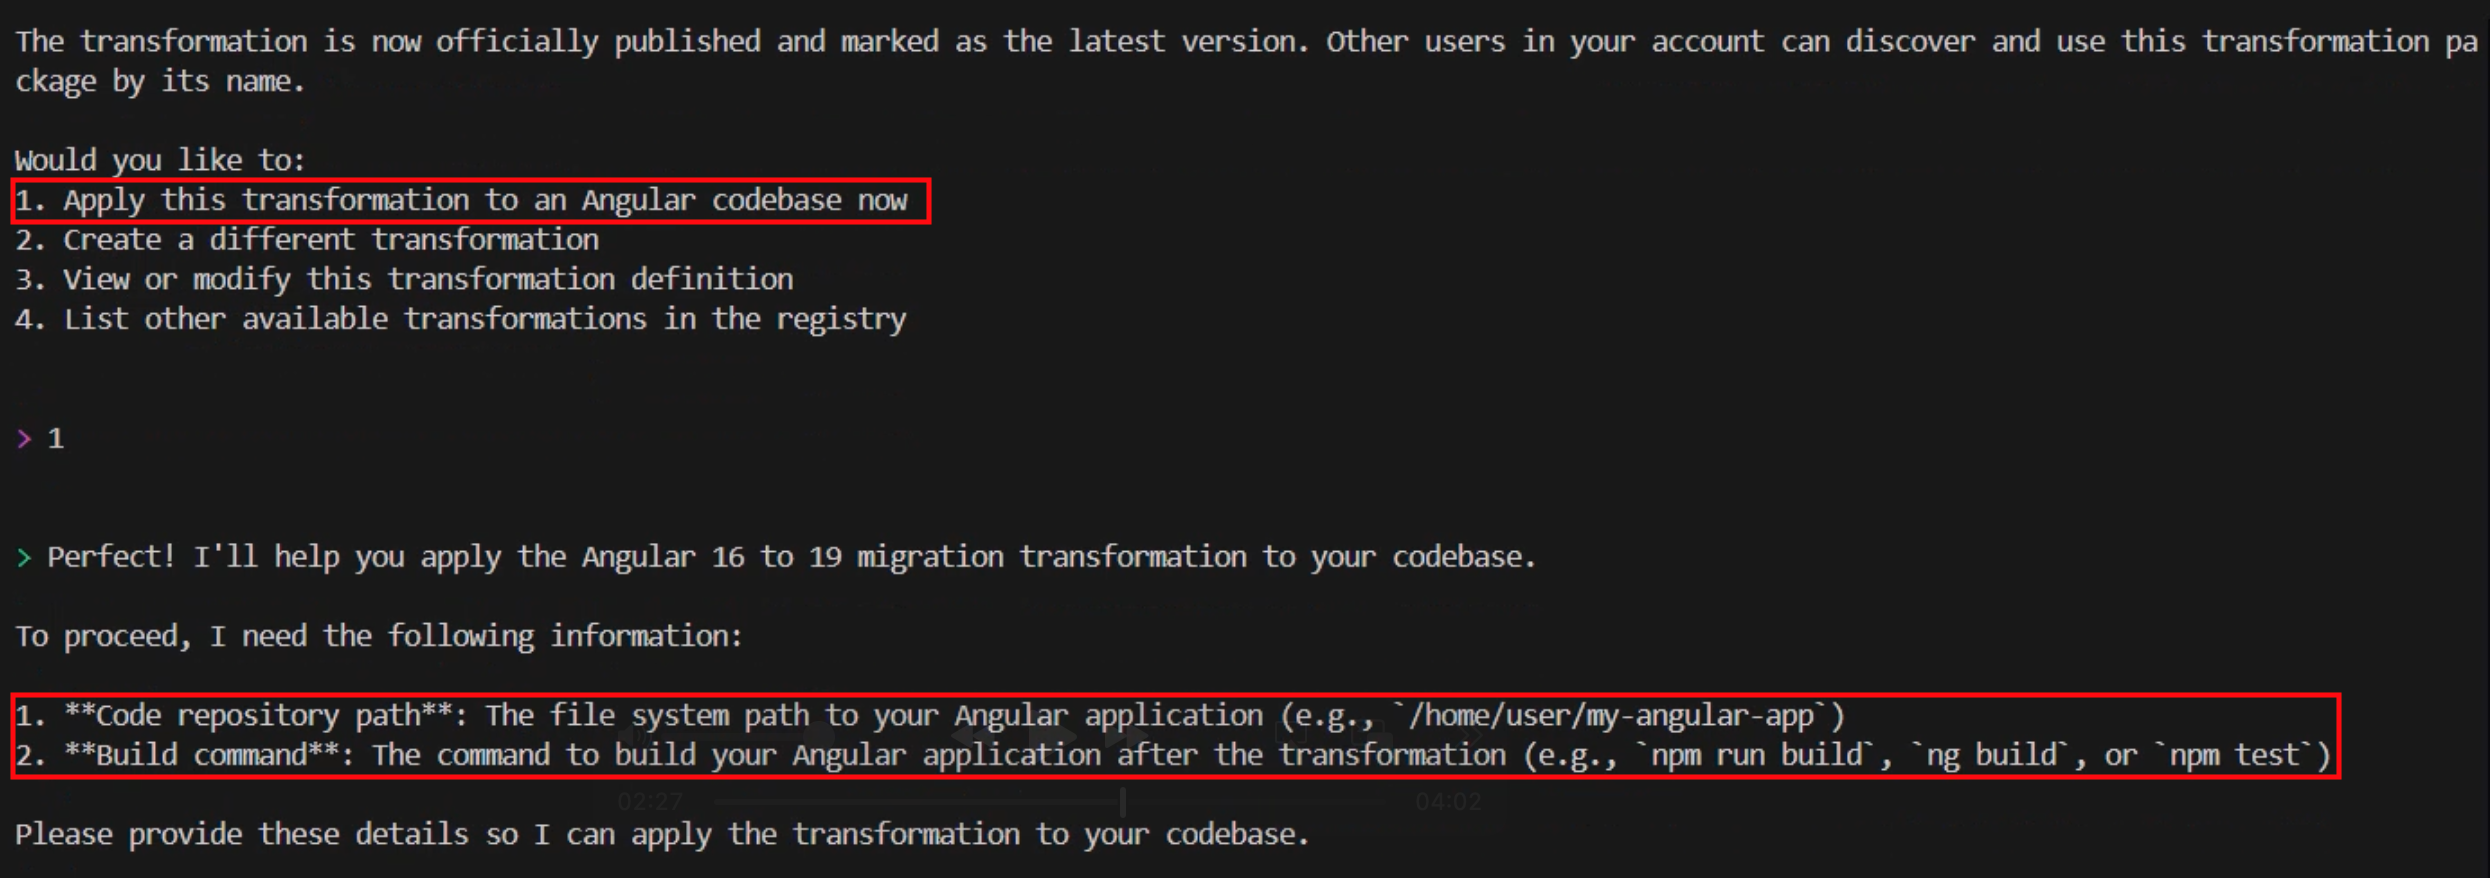
After I provide that information, AWS Transform proceeds to analyze the code base and formulate a thorough step-by-step transformation plan based on the definition created earlier. After it’s done, it creates a JSON file containing the detailed migration plan specifically designed for applying our transformation definition to this code base. Similar to the process of creating the transformation definition, you can review and iterate through this plan as much as you need, providing it with feedback and adjusting it to any specific requirements you might have.

When I’m ready to accept the plan, I can use natural language to tell AWS Transform that we can start the migration process. I type looks good, proceed and watch the progress in my shell as it starts executing the plan and making the changes to my code base one step at a time.

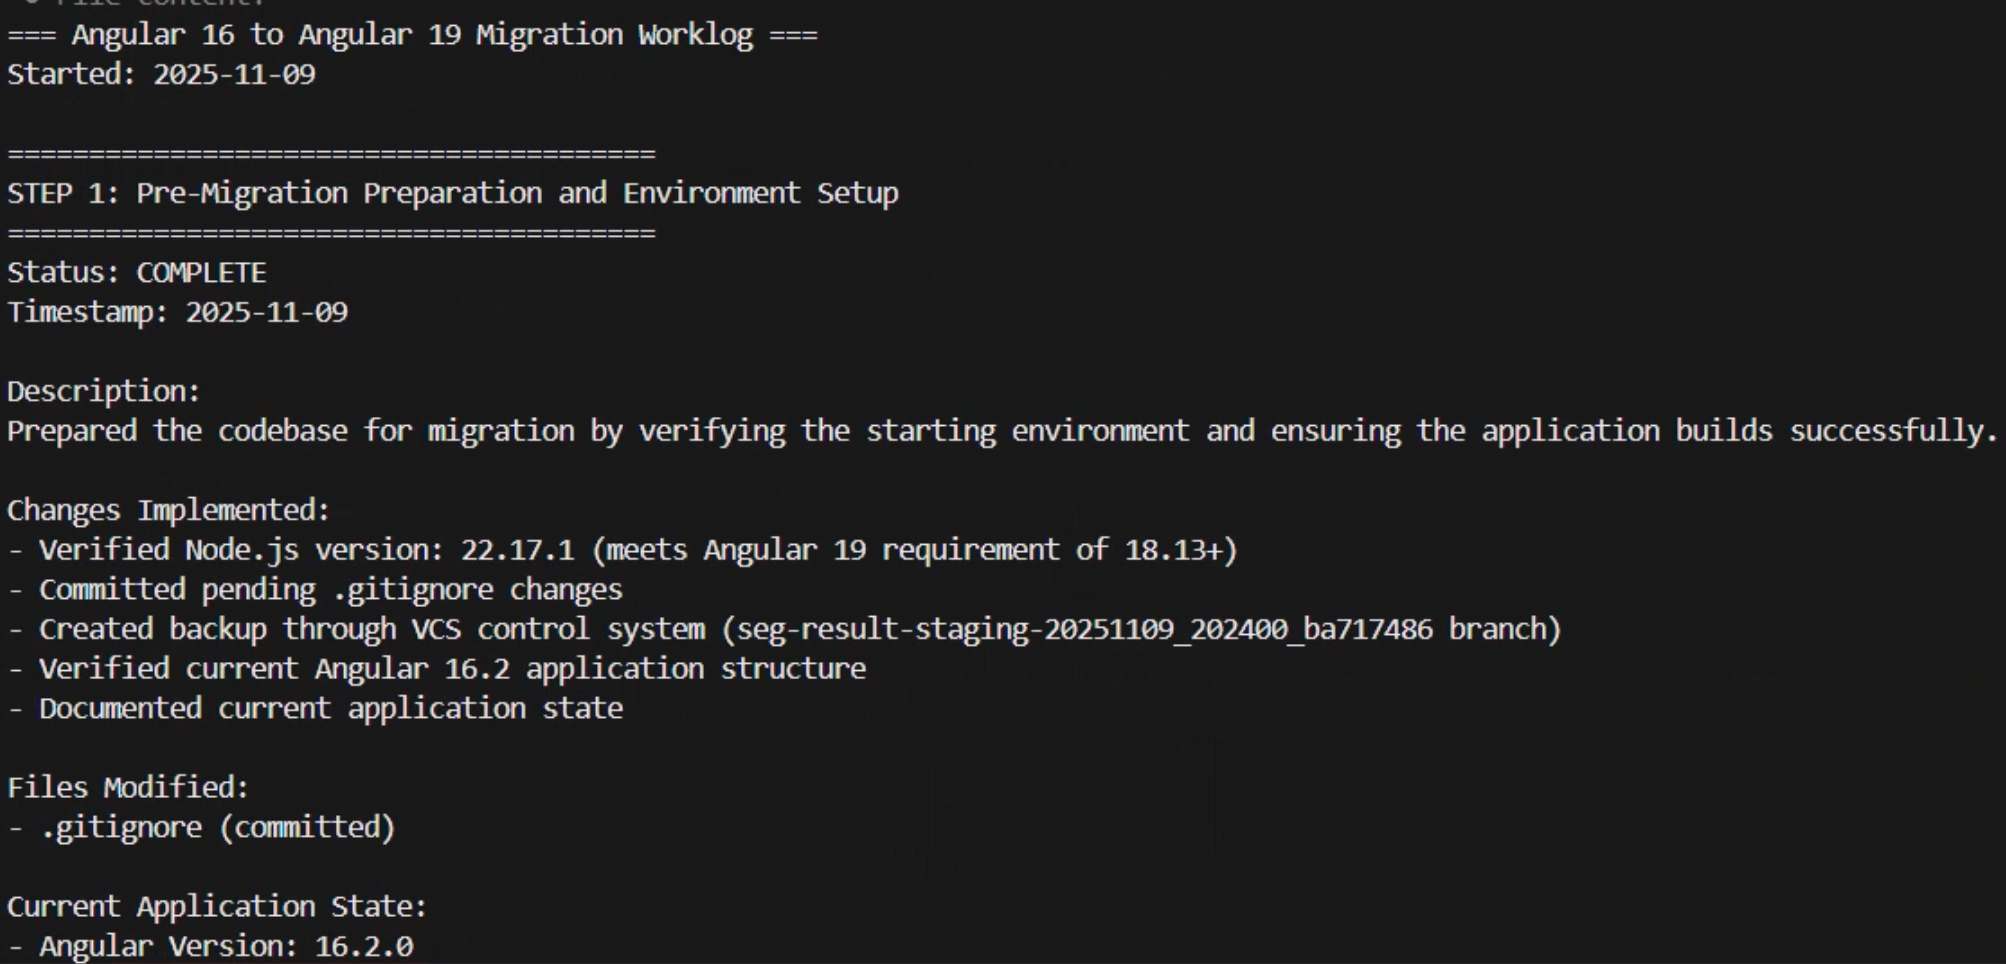
The time it takes will vary depending on the complexity of the application. In my case, it took a few minutes to complete. After it has finished, it provides me with a transformation summary and the status of each one of the exit criteria that were included in the final verification phase of the plan alongside all the evidence to support the reported status. For example, the Application Build – Production criteria was listed as passed and some of the evidence provided included the incremental Git commits, the time that it took to complete the production build, the bundle size, the build output message, and the details about all the output files created.

Conclusion
AWS Transform represents a fundamental shift in how organizations approach code modernization and technical debt. The service helps to transform what was at one time a fragmented, team-by-team effort into a unified, intelligent capability that eliminates knowledge silos, keeping your best practices and institutional knowledge available as scalable assets across the entire organization. This helps to accelerate modernization initiatives while freeing developers to spend more time on innovation and driving business value instead of focusing on repetitive maintenance and modernization tasks.

Things to know

AWS Transform custom is now generally available. Visit the get started guide to start your first transformation campaign or check out the documentation to learn more about setting up custom transformation definitions.

Top announcements of AWS re:Invent 2025

This post was originally published on this site

Matt Garman stands on stage at re:Invent 2024We’re rounding up the most exciting and impactful announcements from AWS re:Invent 2025, which takes place November 30-December 4 in Las Vegas. This guide highlights the innovations that will help you build, scale, and transform your business in the cloud.

We’ll update this roundup throughout re:Invent with our curation of the major announcements from each keynote session and more. To see the complete list of all AWS launches, visit What’s New with AWS.

(This post was updated Nov. 30, 2025.)


Analytics

AWS Clean Rooms launches privacy-enhancing dataset generation for ML model training
Train ML models on sensitive collaborative data by generating synthetic datasets that preserve statistical patterns while protecting individual privacy through configurable noise levels and protection against re-identification.

Compute

Introducing AWS Lambda Managed Instances: Serverless simplicity with EC2 flexibility
Run Lambda functions on EC2 compute while maintaining serverless simplicity—enabling access to specialized hardware and cost optimizations through EC2 pricing models, with AWS handling all infrastructure management.

Containers

Announcing Amazon EKS Capabilities for workload orchestration and cloud resource management
Streamline Kubernetes development with fully managed platform capabilities that handle workload orchestration and cloud resource management, eliminating infrastructure maintenance while providing enterprise-grade reliability and security.

Networking & Content Delivery

Introducing Amazon Route 53 Global Resolver for secure anycast DNS resolution (preview)
Simplify hybrid DNS management with a unified service that resolves public and private domains globally through secure, anycast-based resolution while reducing operational overhead and maintaining consistent security controls.

Partner Network

AWS Partner Central now available in AWS Management Console
Access Partner Central directly through the AWS Console to streamline your journey from customer to Partner—manage solutions, opportunities, and marketplace listings in one unified interface with enterprise-grade security.

Security, Identity, & Compliance

Simplify IAM policy creation with IAM Policy Autopilot, a new open source MCP server for builders
Speed up AWS development with an open source tool that analyzes your code to generate valid IAM policies, providing AI coding assistants with up-to-date AWS service knowledge and reliable permission recommendations.

Introducing Amazon Route 53 Global Resolver for secure anycast DNS resolution (preview)

This post was originally published on this site

Today, we’re announcing Amazon Route 53 Global Resolver, a new Amazon Route 53 service that provides secure and reliable DNS resolution globally for queries from anywhere (preview). You can use Global Resolver to resolve DNS queries to public domains on the internet and private domains associated with Route 53 private hosted zones. Route 53 Global Resolver offers network administrators a unified solution to resolve queries from authenticated clients and sources in on-premises data centers, branch offices, and remote locations through globally distributed anycast IP addresses. This service includes built-in security controls including DNS traffic filtering, support for encrypted queries, and centralized logging to help organizations reduce operational overhead while maintaining compliance with security requirements.

Organizations with hybrid deployments face operational complexity when managing DNS resolution across distributed environments. Resolving public internet domains and private application domains often requires maintaining split DNS infrastructure, which increases cost and administrative burden especially when replicating to multiple locations. Network administrators must configure custom forwarding solutions, deploy Route 53 Resolver endpoints for private domain resolution, and implement separate security controls across different locations. Additionally, they must configure and maintain multi-Region failover strategies for Route 53 Resolver endpoints and provide consistent security policy enforcement across all Regions while testing failover scenarios.

Route 53 Global Resolver has key capabilities that address these challenges. The service resolves both public internet domains and Route 53 private hosted zones, eliminating the need for separate split-DNS forwarding. It provides DNS resolution through multiple protocols, including DNS over UDP (Do53), DNS-over-HTTPS (DoH), and DNS-over-TLS (DoT). Each deployment provides a single set of common IPv4 and IPv6 anycast IP addresses that route queries to the nearest AWS Region, reducing latency for distributed client populations.

Route 53 Global Resolver provides integrated security features equivalent to Route 53 Resolver DNS Firewall. Administrators can configure filtering rules using AWS Managed Domain Lists that provide flexible controls with lists classified by DNS threats (malware, spam, phishing) or web content (adult sites, gambling, social networking) that might not be safe for work or create custom domain lists by importing domains from a file. Advanced threat protection detects and blocks domain generation algorithm (DGA) patterns and DNS tunneling attempts. For encrypted DNS traffic, Route 53 Global Resolver supports DoH and DoT protocols to protect queries from unauthorized access during transit.

Route 53 Global Resolver only accepts traffic from known clients that need to authenticate with the Resolver. For Do53, DoT, and DoH connections, administrators can configure IP and CIDR allowlists. For DoH and DoT connections, token-based authentication provides granular access control with customizable expiration periods and revocation capabilities. Administrators can assign tokens to specific client groups or individual devices based on organizational requirements.

Route 53 Global Resolver supports DNSSEC validation to verify the authenticity and integrity of DNS responses from public nameservers. It also includes EDNS Client Subnet support, which forwards client subnet information to enable more accurate geographic-based DNS responses from content delivery networks.

Getting started with Route 53 Global Resolver
This walkthrough shows how to configure Route 53 Global Resolver for an organization with offices on the US East and West coasts that needs to resolve both public domains and private applications hosted in Route 53 private hosted zones. To configure Route 53 Global Resolver, go to the AWS Management Console, choose Global resolvers from the navigation pane, and choose Create global resolver.

In the Resolver details section, enter a Resolver name such as corporate-dns-resolver. Add an optional description like DNS resolver for corporate offices and remote clients. In the Regions section, choose the AWS Regions where you want the resolver to operate, such as US East (N. Virginia) and US West (Oregon). The anycast architecture routes DNS queries from your clients to the nearest selected Region.

After the resolver is created, the console displays the resolver details, including the anycast IPv4 and IPv6 addresses that you will use for DNS queries. You can proceed to create a DNS view by choosing Create DNS view to configure client authentication and DNS query resolution settings.

In the Create DNS view section, enter a DNS view name such as primary-view and optionally add a Description like DNS view for corporate offices. A DNS view helps you create different logical groupings for your clients and sources, and determine the DNS resolution for those groups. This helps you maintain different DNS filtering rules and private hosted zone resolution policies for different clients in your organization.

For DNSSEC validation, choose Enable to verify the authenticity of DNS responses from public DNS servers. For Firewall rules fail open behavior, choose Disable to block DNS queries when firewall rules can’t be evaluated, which provides additional security. For EDNS client subnet, keep Enable selected to forward client location information to DNS servers, which allows content delivery networks to provide more accurate geographic responses. DNS view creation might take a few minutes to become operational.

After the DNS view is created and operational, configure DNS Firewall rules to filter network traffic by choosing Create rule. In the Create DNS Firewall rules section, enter a Rule name such as block-malware-domains and optionally add a description. For Rule configuration type, you can choose Customer managed domain lists, AWS managed domain lists provided by AWS or DNS Firewall Advanced protection.

For this walkthrough, choose AWS managed domain lists. In the Domain lists dropdown, choose one or more AWS managed lists such as Threat – Malware to block known malicious domains. You can leave Query type empty to apply the rule to all DNS query types. In this example, choose A to apply this rule only to IPv4 address queries. In the Rule action section, select Block to prevent DNS resolution for domains that match the selected lists. For Response to send for Block action, keep NODATA selected to indicate that the query was successful but no response is available, then choose Create rules.

The next step is to configure access sources to specify which IP addresses or CIDR blocks are allowed to send DNS queries to the resolver. Navigate to the Access sources tab in the DNS view and then choose Create access source.

In the Access source details section, enter a Rule name such as office-networks to identify the access source. In the CIDR block field, enter the IP address range for your offices to allow queries from that network. For Protocol, select Do53 for standard DNS queries over UDP or choose DoH or DoT if you want to require encrypted DNS connections from clients. After configuring these settings, choose Create access source to allow the specified network to send DNS queries to the resolver.

Next, navigate to the Access tokens tab in the DNS view to create token-based authentication for clients and choose Create access token. In the Access token details section, enter a Token name such as remote-clients-token. For Token expiry, select an expiration period from the dropdown based on your security requirements, such as 365 days for long-term client access, or choose a shorter duration like 30 days or 90 days for tighter access control. After configuring these settings, choose Create access token to generate the token, which clients can use to authenticate DoH and DoT connections to the resolver.

After the access token is created, navigate to the Private hosted zones tab in the DNS view to associate Route 53 private hosted zones with the DNS view so that the resolver can resolve queries for your private application domains. Choose Associate private hosted zone and in the Private hosted zones section, select a private hosted zone from the list that you want the resolver to handle. After selecting the zone, choose Associate to enable the resolver to respond to DNS queries for these private domains from your configured access sources.

With the DNS view configured, firewall rules created, access sources and tokens defined, and private hosted zones associated, the Route 53 Global Resolver setup is complete and ready to handle DNS queries from your configured clients.

After creating your Route 53 Global Resolver, you need to configure your DNS clients to send queries to the resolver’s anycast IP addresses. The configuration method depends on the access control you configured in your DNS view:

  • For IP-based access sources (CIDR blocks) – Configure your source clients to point DNS traffic to the Route 53 Global Resolver anycast IP addresses provided in the resolver details. Global Resolver will only allow access from allowlisted IPs that you have specified in your access sources. You can also associate the access sources to different DNS views to provide more granular DNS resolution views for different sets of IPs.
  • For access token–based authentication – Deploy the tokens on your clients to authenticate DoH and DoT connections with Route 53 Global Resolver. You must also configure your clients to point the DNS traffic to the Route 53 Global Resolver anycast IP addresses provided in the resolver details.

For detailed configuration instructions for your specific operating system and protocol, refer to the technical documentation.

Additional things to know
We’re renaming the existing Route 53 Resolver to Route 53 VPC Resolver. This naming change clarifies the architectural distinction between the two services. VPC Resolver operates Regionally within your VPCs to provide DNS resolution for resources in your Amazon VPC environment. VPC Resolver continues to support inbound and outbound resolver endpoints for hybrid DNS architectures within specific AWS Regions.

Route 53 Global Resolver complements Route 53 VPC Resolver by providing internet-reachable, global and private DNS resolution for on-premises and remote clients without requiring VPC deployment or private connections.

Existing VPC Resolver configurations remain unchanged and continue to function as configured. The renaming affects the service name in the AWS Management Console and documentation, but API operation names remain unchanged. If your architecture requires DNS resolution for resources within your VPCs, continue using VPC Resolver.

Join the preview
Route 53 Global Resolver reduces operational overhead by providing unified DNS resolution for public and private domains through a single managed service. The global anycast architecture improves reliability and reduces latency for distributed clients. Integrated security controls and centralized logging help organizations maintain consistent security policies across all locations while meeting compliance requirements.

To learn more about Amazon Route 53 Global Resolver, visit the Amazon Route 53 documentation.

You can start using Route 53 Global Resolver through the AWS Management Console in US East (N. Virginia), US East (Ohio), US West (N. California), US West (Oregon), Europe (Frankfurt), Europe (Ireland), Europe (London), Asia Pacific (Mumbai), Asia Pacific (Singapore), Asia Pacific (Tokyo), and Asia Pacific (Sydney) Regions.

— Esra

AWS Partner Central now available in AWS Management Console

This post was originally published on this site

Today, we’re announcing that AWS Partner Central is now available directly in the AWS Management Console, creating a unified experience that transforms how you engage with AWS as both customers and AWS Partners.

As someone who has worked with countless AWS customers over the years, I’ve observed how organizations evolve in their AWS journey. Many of our most successful Partners began as AWS customers—first using our services to build their own infrastructure and solutions, then expanding to create offerings for others. Seeing this natural progression from customer to Partner, we recognized an opportunity to streamline these traditionally separate experiences into one unified journey.

As AWS evolved, so did the needs of our Partner community. Organizations today operate in multiple capacities: using AWS services for their own infrastructure while simultaneously building and delivering solutions for their customers. Modern businesses need streamlined workflows that support their growth from AWS customer to Partner to AWS Marketplace Seller, with enterprise-grade security features that match how they actually work with AWS today.

A new unified console experience
The integration of AWS Partner Central into the Console represents a fundamental shift in partnership accessibility. For existing AWS customers, such as you, becoming an AWS Partner is now as clear as accessing any other AWS service. The familiar console interface provides direct access to partnership opportunities, program benefits, and AWS Marketplace capabilities without needing separate logins or navigation between different systems.

Getting started as an AWS Partner now takes only a few clicks within your existing console environment. You can discover partnership opportunities, understand program requirements, and begin your Partner journey without leaving the AWS interface you already know and trust.

The console integration creates an intuitive pathway for existing customers to transition into AWS Marketplace Sellers. You can now access AWS Marketplace Seller capabilities alongside your existing AWS services, managing both your infrastructure and AWS Marketplace business from a single interface. Private offer requests and negotiations can be managed directly within AWS Partner Central, and you can manage your AWS Marketplace listings alongside your other AWS activities through streamlined workflows.

Becoming an AWS Partner
The unified console experience provides access to comprehensive partnership benefits designed to accelerate your business growth.

Join the AWS Partner Network (APN) and complete your Partner and AWS Marketplace Seller requirements seamlessly within the same interface. Enroll in Partner Paths that align with your customer solutions to build, market, list, and sell in AWS Marketplace while growing alongside AWS. When you are established, use the Partner programs to differentiate your solution, list in AWS Marketplace to improve your go-to-market discoverability, and build AWS expertise through certifications to drive profitability by capturing new revenue streams. Scale your business by selling or reselling software and professional services in AWS Marketplace, helping you accelerate deals, boost revenue, and expand your customer reach to new geographies, industries, and segments.

Throughout your journey, you can continue using Amazon Q in the console, which provides personalized guidance through AWS Partner Assistant.

Let’s see the new Partner Central console
The new AWS Partner Central is accessible like any other AWS service from the console. Among many new capabilities, it provides four key sections that support Partner operations and business growth within the AWS Partner Network:

1. It helps you sell your solutions

AWS Partner Central - Solutions

You can create and publish solutions that address specific customer needs through AWS Marketplace. Solutions are made up of products such as software as a service (SaaS), Amazon Machine Images (AMI), containers, professional services, AI agents and tools, and more. The solutions management capability guides you through building offerings that include both products you own and those you are authorized to resell. You can craft compelling value propositions and descriptions that clearly communicate your solution benefits to potential buyers browsing AWS Marketplace.

I choose Create solution to start listing a new solution in the AWS Marketplace, as shown in the following figure.

AWS Partner Central - Create solution

2. It helps you update and manage your Partner profile

AWS Partner Central - Manage profile

Your Partner profile showcases your organization’s expertise and capabilities to the AWS community. You control how your business appears to potential customers and Partners by highlighting the industry segments you serve and describing your primary products or services. Profile visibility settings provide you with the option to choose whether your information is public or private.

3. It helps you track opportunities

AWS Partner Central - Track Opportunities

You can manage your pipeline of AWS customers, supporting joint collaborations with AWS on customer engagements. You monitor these prospects using clear status indicators: approved, rejected, draft, and pending approval. The opportunity dashboard shows stages, estimated AWS Monthly Recurring Revenue, and other key metrics that help you understand your pipeline. You can create more opportunities directly within the console and export data for your own reporting and analysis.

4. It provides you with the ability to discover and connect with other Partners

After becoming an AWS Partner, you get access to the AWS Partners network, where you can search for other Partners. You can connect with them to collaborate on sales opportunities and expand your customer outreach.

AWS Partner Central - Discover and Search for partners

You search through available Partners using filters for industry, location, Partner program type, and specialization. The centralized dashboard shows your active connections, pending requests, and connection history, so that you can manage business relationships and identify collaboration opportunities that can expand your reach. Like all other AWS services, these Partner connection capabilities are now available as APIs, which provide automation and integration into your existing workflows.

AWS Partner Central - Manage contact requests

These capabilities work together within the new AWS Partner Central console, accessible directly from the console, helping you transition from AWS customer to successful Partner with enterprise-grade security and streamlined workflows.

The technical foundation: Migrating the identity system
This unified console experience is made possible by our migration to a modern identity system built on AWS Identity and Access Management (IAM). We’ve transitioned from legacy identity infrastructure to IAM Identity Center, providing enterprise-grade security capabilities including single sign-on capabilities and multi-factor authentication. With security as job zero, this migration provides new and existing Partners with the possibility to connect their own identity providers to AWS Partner Central. It provides seamless integration with existing enterprise authentication systems while removing the complexity of managing separate credentials across different services.

One more thing
APIs are the core of what we do at AWS, and AWS Partner Central is no different. You can automate and streamline your co-sell workflows by connecting your business tools to AWS Partner Central. The APIs offered by AWS Partner Central help you accelerate APN benefits—from Account Management (Account API) and Solution Management (Solution API) to co-selling with Opportunity and Leads APIs, and Benefits APIs for faster benefit activation.

You can use these APIs to engage with AWS and grow your Partner business from your own CRM tools.

Get started today
This integration between the console and AWS Partner Central reflects our commitment to reducing complexity and improving the Partner experience. We’re bringing AWS Partner Central into the console to create a more intuitive path for organizations to grow with AWS from initial customer adoption through to full partnership engagement and AWS Marketplace success.

Your journey from AWS customer to successful AWS Partner and AWS Marketplace Seller starts with a few clicks in your console. I encourage you to explore the new unified experience today and discover how AWS Partner Central in the console can accelerate your organization’s growth and success within the AWS community.

Ready to get started? Visit AWS Partner Central in your console to learn more about the AWS Partner Network and discover the partnership path that’s right for your organization.

— seb

Introducing AWS Lambda Managed Instances: Serverless simplicity with EC2 flexibility

This post was originally published on this site

Today, we’re announcing AWS Lambda Managed Instances, a new capability you can use to run AWS Lambda functions on your Amazon Elastic Compute Cloud (Amazon EC2) compute while maintaining serverless operational simplicity. This enhancement addresses a key customer need: accessing specialized compute options and optimizing costs for steady-state workloads without sacrificing the serverless development experience you know and love.

Although Lambda eliminates infrastructure management, some workloads require specialized hardware, such as specific CPU architectures, or cost optimizations from Amazon EC2 purchasing commitments. This tension forces many teams to manage infrastructure themselves, sacrificing the serverless benefits of Lambda only to access the compute options or pricing models they need. This often leads to a significant architectural shift and greater operational responsibility.

Lambda Managed Instances
You can use Lambda Managed Instances to define how your Lambda functions run on EC2 instances. Amazon Web Services (AWS) handles setting up and managing these instances in your account. You get access to the latest generation of Amazon EC2 instances, and AWS handles all the operational complexity—instance lifecycle management, OS patching, load balancing, and auto scaling. This means you can select compute profiles optimized for your specific workload requirements, like high-bandwidth networking for data-intensive applications, without taking on the operational burden of managing Amazon EC2 infrastructure.

Each execution environment can process multiple requests rather than handling just one request at a time. This can significantly reduce compute consumption, because your code can efficiently share resources across concurrent requests instead of spinning up separate execution environments for each invocation. Lambda Managed Instances provides access to Amazon EC2 commitment-based pricing models such as Compute Savings Plans and Reserved Instances, which can provide up to a 72% discount over Amazon EC2 On-Demand pricing. This offers significant cost savings for steady-state workloads while maintaining the familiar Lambda programming model.

Let’s try it out
To take Lambda Managed Instances for a spin, I first need to create a Capacity provider. As shown in the following image, there is a new tab for creating these in the navigation pane under Additional resources.

Lambda Managed Instances Console

Creating a Capacity provider is where I specify the virtual private cloud (VPC), subnet configuration and security groups. With a capacity provider configuration, I can also tell Lambda where to provision and manage the instances.

I can also specify the EC2 instance types I’d like to include or exclude, or I can choose to include all instance types for high diversity. Additionally, I can specify a few controls related to auto scaling, including the Maximum vCPU count, and if I want to use Auto scaling or use a CPU policy.

After I have my capacity provider configured, I can choose it through its Amazon Resource Name (ARN) when I go to create a new Lambda function. Here I can also select the memory allocation I want along with a memory-to-vCPU ratio.

Working with Lambda Managed Instances
Now that we’ve seen the basic setup, let’s explore how Lambda Managed Instances works in more detail. The feature organizes EC2 instances into capacity providers that you configure through the Lambda console, AWS Command Line Interface (AWS CLI), or infrastructure as code (IaC) tools such as AWS CloudFormation, AWS Serverless Application Model (AWS SAM), AWS Cloud Development Kit (AWS CDK) and Terraform. Each capacity provider defines the compute characteristics you need, including instance type, networking configuration, and scaling parameters.

When creating a capacity provider, you can choose from the latest generation of EC2 instances to match your workload requirements. For cost-optimized general-purpose compute, you could choose AWS Graviton4 based instances that deliver excellent price performance. If you’re not sure which instance type to select, AWS Lambda provides optimized defaults that balance performance and cost based on your function configuration.

After creating a capacity provider, you attach your Lambda functions to it through a straightforward configuration change. Before attaching a function, you should review your code for programming patterns that can cause issues in multiconcurrency environments, such as writing to or reading from file paths that aren’t unique per request or using shared memory spaces and variables across invocations.

Lambda automatically routes requests to preprovisioned execution environments on the instances, eliminating cold starts that can affect first-request latency. Each execution environment can handle multiple concurrent requests through the multiconcurrency feature, maximizing resource utilization across your functions. When additional capacity is needed during traffic increases, AWS automatically launches new instances within tens of seconds and adds them to your capacity provider. The capacity provider can absorb traffic spikes of up to 50% without needing to scale by default, but built-in circuit breakers protect your compute resources during extreme traffic surges by temporarily throttling requests with 429 status codes if the capacity provider reaches maximum provisioned capacity and additional capacity is still being spun up.

The operational and architectural model remains serverless throughout this process. AWS handles instance provisioning, OS patching, security updates, load balancing across instances, and automatic scaling based on demand. AWS automatically applies security patches and bug fixes to operating system and runtime components, often without disrupting running applications. Additionally, instances have a maximum 14-day lifetime to align with industry security and compliance standards. You don’t need to write automatic scaling policies, configure load balancers, or manage instance lifecycle yourself, and your function code, event source integrations, AWS Identity and Access Management (AWS IAM) permissions, and Amazon CloudWatch monitoring remain unchanged.

Now available
You can start using Lambda Managed Instances today through the Lambda console, AWS CLI, or AWS SDKs. The feature is available in US East (N. Virginia), US East (Ohio), US West (Oregon), Asia Pacific (Tokyo), and Europe (Ireland) Regions. For Regional availability and future roadmap, visit the AWS Capabilities by Region. Learn more about it in the AWS Lambda documentation.

Pricing for Lambda Managed Instances has three components. First, you pay standard Lambda request charges of $0.20 per million invocations. Second, you pay standard Amazon EC2 instance charges for the compute capacity provisioned. Your existing Amazon EC2 pricing agreements, including Compute Savings Plans and Reserved Instances, can be applied to these instance charges to reduce costs for steady-state workloads. Third, you pay a compute management fee of 15% calculated on the EC2 on-demand instance price to cover AWS’s operational management of your instances. Note that unlike traditional Lambda functions, you are not charged separately for execution duration per request. The multiconcurrency feature helps further optimize costs by reducing the total compute time required to process your requests.

The initial release supports the latest versions of Node.js, Java, .NET and Python runtimes, with support for other languages coming soon. The feature integrates with existing Lambda workflows including function versioning, aliases, AWS CloudWatch Lambda Insights, AWS AppConfig extensions, and deployment tools like AWS SAM and AWS CDK. You can migrate existing Lambda functions to Lambda Managed Instances without changing your function code (as long as it has been validated to be thread safe for multiconcurrency) making it easy to adopt this capability for workloads that would benefit from specialized compute or cost optimization.

Lambda Managed Instances represents a significant expansion of Lambda’s capabilities, which means you can run a broader range of workloads while preserving the serverless operational model. Whether you’re optimizing costs for high-traffic applications, or accessing the latest processor architectures like Graviton4, this new capability provides the flexibility you need without operational complexity. We’re excited to see what you build with Lambda Managed Instances.

Simplify IAM policy creation with IAM Policy Autopilot, a new open source MCP server for builders

This post was originally published on this site

Today, we’re announcing IAM Policy Autopilot, a new open source Model Context Protocol (MCP) server that analyzes your application code and helps your AI coding assistants generate AWS Identity and Access Management (IAM) identity-based policies. IAM Policy Autopilot accelerates initial development by providing builders with a starting point that they can review and further refine. It integrates with AI coding assistants such as Kiro, Claude Code, Cursor, and Cline, and it provides them with AWS Identity and Access Management (IAM) knowledge and understanding of the latest AWS services and features. IAM Policy Autopilot is available at no additional cost, runs locally, and you can get started by visiting our GitHub repository.

Amazon Web Services (AWS) applications require IAM policies for their roles. Builders on AWS, from developers to business leaders, engage with IAM as part of their workflow. Developers typically start with broader permissions and refine them over time, balancing rapid development with security. They often use AI coding assistants in hopes of accelerating development and authoring IAM permissions. However, these AI tools don’t fully understand the nuances of IAM and can miss permissions or suggest invalid actions. Builders seek solutions that provide reliable IAM knowledge, integrate with AI assistants and get them started with policy creation, so that they can focus on building applications.

Create valid policies with AWS knowledge
IAM Policy Autopilot addresses these challenges by generating identity-based IAM policies directly from your application code. Using deterministic code analysis, it creates reliable and valid policies, so you spend less time authoring and debugging permissions. IAM Policy Autopilot incorporates AWS knowledge, including published AWS service reference implementation, to stay up to date. It uses this information to understand how code and SDK calls map to IAM actions and stays current with the latest AWS services and operations.

The generated policies provide a starting point for you to review and scope down to implement least privilege permissions. As you modify your application code—whether adding new AWS service integrations or updating existing ones—you only need to run IAM Policy Autopilot again to get updated permissions.

Getting started with IAM Policy Autopilot
Developers can get started with IAM Policy Autopilot in minutes by downloading and integrating it with their workflow.

As an MCP server, IAM Policy Autopilot operates in the background as builders converse with their AI coding assistants. When your application needs IAM policies, your coding assistants can call IAM Policy Autopilot to analyze AWS SDK calls within your application and generate required identity-based IAM policies, providing you with necessary permissions to start with. After permissions are created, if you still encounter Access Denied errors during testing, the AI coding assistant invokes IAM Policy Autopilot to analyze the denial and propose targeted IAM policy fixes. After you review and approve the suggested changes, IAM Policy Autopilot updates the permissions.

You can also use IAM Policy Autopilot as a standalone command line interface (CLI) tool to generate policies directly or fix missing permissions. Both the CLI tool and the MCP server provide the same policy creation and troubleshooting capabilities, so you can choose the integration that best fits your workflow.

When using IAM Policy Autopilot, you should also understand the best practices to maximize its benefits. IAM Policy Autopilot generates identity-based policies and doesn’t create resource-based policies, permission boundaries, service control policies (SCPs) or resource control policies (RCPs). IAM Policy Autopilot generates policies that prioritize functionality over minimal permissions. You should always review the generated policies and refine if necessary so they align with your security requirements before deploying them.

Let’s try it out
To set up IAM Policy Autopilot, I first need to install it on my system. To do so, I just need to run a one-liner script:

curl https://github.com/awslabs/iam-policy-autopilot/raw/refs/heads/main/install.sh | bash

Then I can follow the instructions to install any MCP server for my IDE of choice. Today, I’m using Kiro!

In a new chat session in Kiro, I start with a straightforward prompt, where I ask Kiro to read the files in my file-to-queue folder and create a new AWS CloudFormation file so I can deploy the application. This folder contains an automated Amazon Simple Storage Service (Amazon S3) file router that scans a bucket and sends notifications to Amazon Simple Queue Service (Amazon SQS) queues or Amazon EventBridge based on configurable prefix-matching rules, enabling event-driven workflows triggered by file locations.

The last part asks Kiro to make sure I’m including necessary IAM policies. This should be enough to get Kiro to use the IAM Policy Autopilot MCP server.

Next, Kiro uses the IAM Policy Autopilot MCP server to generate a new policy document, as depicted in the following image. After it’s done, Kiro will move on to building out our CloudFormation template and some additional documentation and relevant code files.

IAM Policy Autopilot

Finally, we can see our generated CloudFormation template with a new policy document, all generated using the IAM Policy Autopilot MCP server!

IAM Policy Autopilot

Enhanced development workflow
IAM Policy Autopilot integrates with AWS services across multiple areas. For core AWS services, IAM Policy Autopilot analyzes your application’s usage of services such as Amazon S3, AWS Lambda, Amazon DynamoDB, Amazon Elastic Compute Cloud (Amazon EC2), and Amazon CloudWatch Logs, then generates necessary permissions your code needs based on the SDK calls it discovers. After the policies are created, you can copy the policy directly into your CloudFormation template, AWS Cloud Development Kit (AWS CDK) stack, or Terraform configuration. You can also prompt your AI coding assistants to integrate it for you.

IAM Policy Autopilot also complements existing IAM tools such as AWS IAM Access Analyzer by providing functional policies as a starting point, which you can then validate using IAM Access Analyzer policy validation or refine over time with unused access analysis.

Now available
IAM Policy Autopilot is available as an open source tool on GitHub at no additional cost. The tool currently supports Python, TypeScript, and Go applications.

These capabilities represent a significant step forward in simplifying the AWS development experience so builders of different experience levels can develop and deploy applications more efficiently.