This
post was originally published on
this siteIn his last two diaries, Xavier discussed recent malware campaigns that download JPEG files with embedded malicious payload[1,2]. At that point in time, I’ve not come across the malicious “MSI image” myself, but while I was going over malware samples that were caught by one of my customer’s e-mail proxies during last week, I found another campaign in which the same technique was used.
Xavier already discussed how the final portion of a payload that was embedded in the JPEG was employed, but since the campaign he came across used a batch downloader as the first stage, and the one I found employed JScript instead, I thought it might be worthwhile to look at the first part of the infection chain in more detail, and discuss few tips and tricks that may ease analysis of malicious scripts along the way.
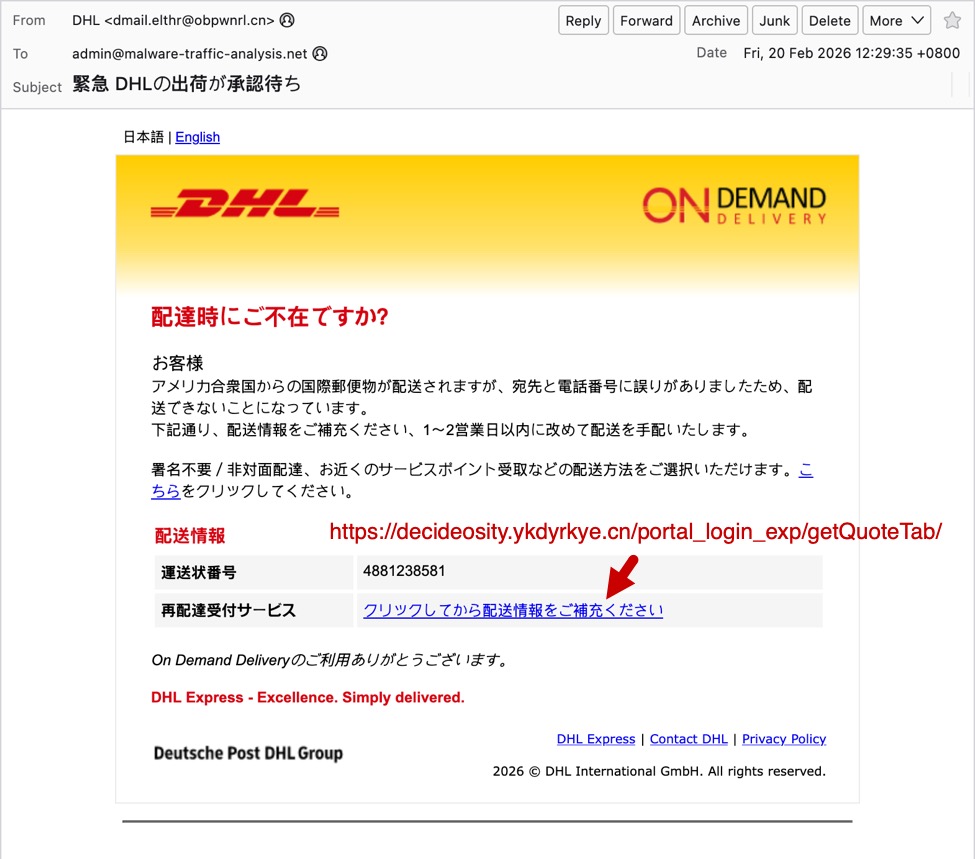
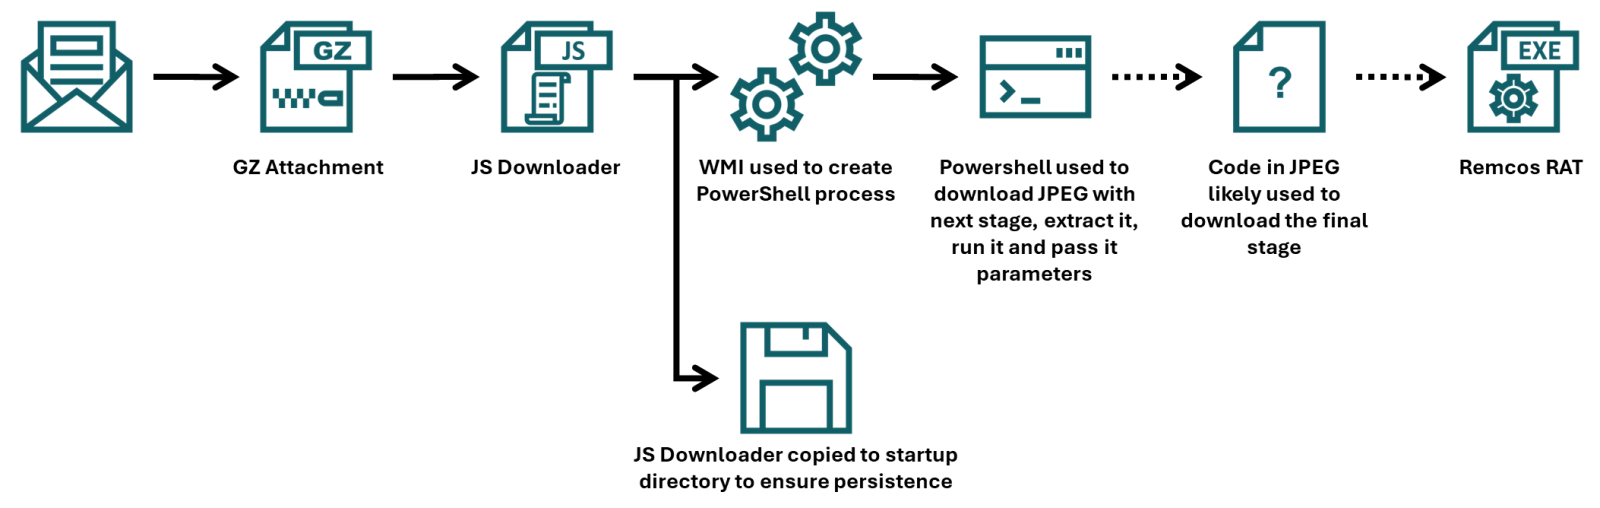
To that end, we should start with the e-mail to which the JScript file (in a GZIP “envelope”) was attached.
The e-mail had a spoofed sender address to make it look like it came from a legitimate Czech company, and in its body was present a logo of the same organization, so at first glance, it might have looked somewhat trustworthy. Nevertheless, this would only hold if the message didn’t fail the usual DMARC/SPF checks, which it did, and therefore would probably be quarantined by most e-mail servers, regardless of the malicious attachment.
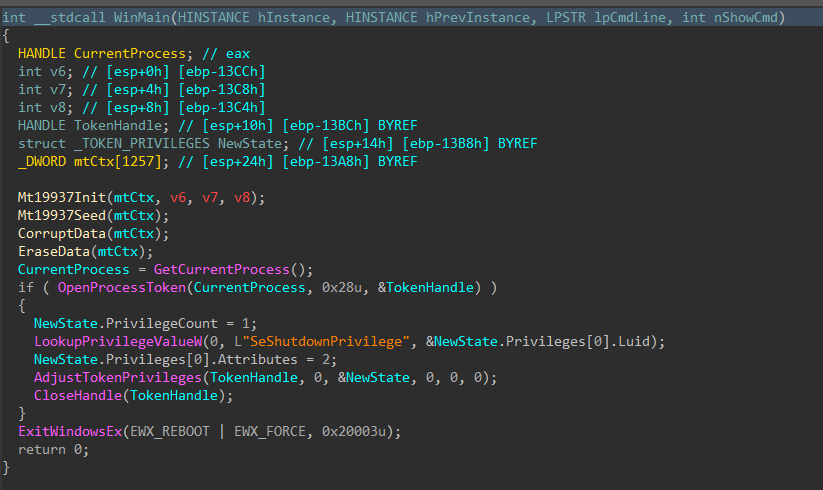
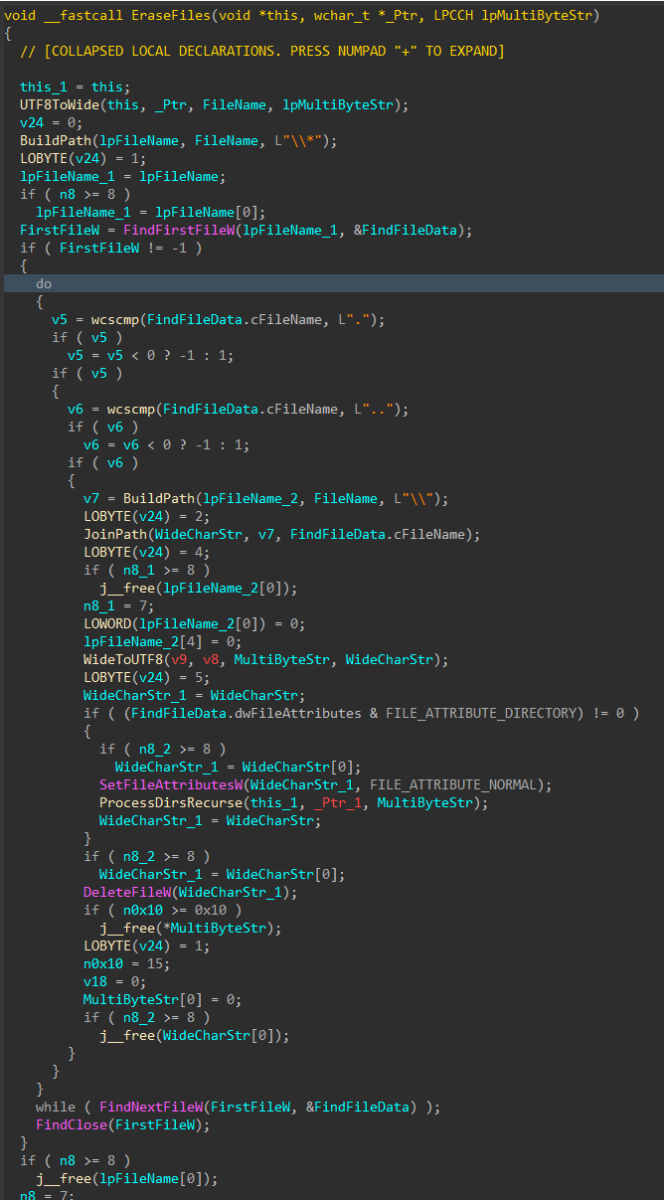
As we’ve already mentioned, the attachment was a JScript file. It was quite a large one, “weighing in” at 1.17 MB. The large file size was caused by a first layer of obfuscation. The script contained 17,222 lines, of which 17,188 were the same, as you can see in the following image.
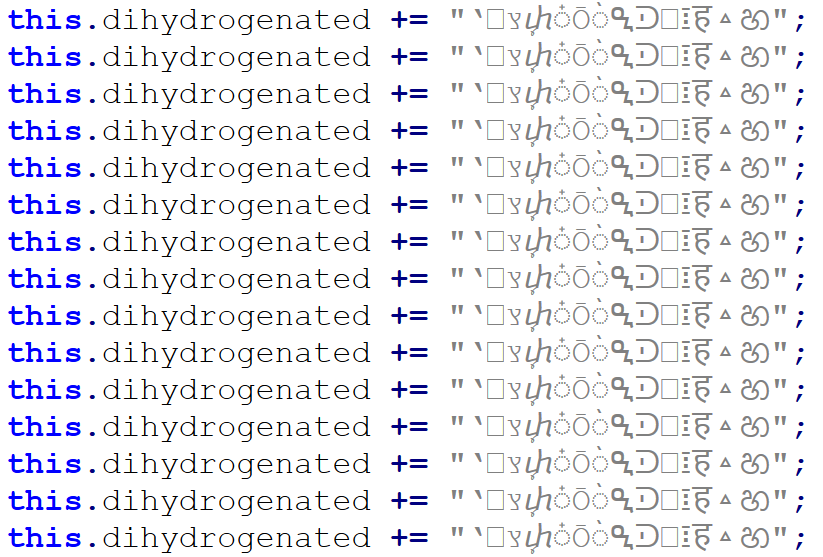
Once these were removed, only 34 lines (29 not counting empty ones) remained, and the file size shrank to only 31 kB.
The first 10 lines are an attempt at achieving elementary persistence – the code is supposed to copy the JScript file to the startup folder.
The intent of the remaining 19 lines is somewhat less clear, since they are protected using some basic obfuscation techniques.
In cases where only few lines of obfuscated malicious code remain (and not necessarily just then), it is often beneficial to start the analysis at the end and work upwards.
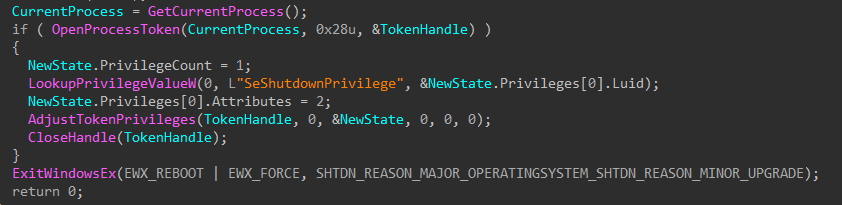
Here, we see that the last three lines of code may be ignored, as they are intended only to show an error message if the script fails. The only thing that might be of interest in terms of CTI is the fact that the error message is written in Brazilian Portuguese.
Right above the error handling code, we see a call using four different variables – childfree, salsas, Alexia and hypodermical, which are defined right above. In all of them, the same obfuscation technique is used – simple inclusion of the identical, strange looking string. If we remove it, and clean up the code a little bit, we can clearly see that the script constructs a PowerShell command line and then leverages WMI’s Win32_Process.Create method[3] to spawn a hidden PowerShell instance. That instance decodes the Base64-encoded contents of the whatsamatta variable using UTF-8 and executes the resulting script via Invoke-Expression.
At this point, the only thing remaining would be to look at the “whatsamatta” variable. Even here, the “begin at the end” approach can help us, since if we were to look at the final characters of the line that defines it, we would see that it was obfuscated in the same manner as the previously discussed variables (simple inclusion of a garbage string), only this time using different characters, since it ended in the following code:
.split("?????").join("");
If we removed this final layer of obfuscation, we would end up with an ~2kB of Base64 encoded PowerShell. To decode Base64, we could use CyberChef or any other appropriate tool.
We would then get just the following 17 lines of code, where the same type of obfuscation discussed previously was used.
We can clearly see that the “connected” variable contains a URL, from which the next stage of the payload is supposed to be downloaded. At this point, we could slightly modify the code and let it deobfuscate the string automatically[4], or do it manually, since it would mean doing just four replacements. In either case, we would end up with the following URL:
hxxps[:]//ia600603[.]us[.]archive[.]org/13/items/msi-pro-with-b-64_202602/MSI_PRO_with_b64.png
At the time of writing, the URL was no longer live, but from VirusTotal, we can learn that the file would have been a JPEG (with a PNG extension), also distributed under the name optimized_msi.png[5,6], which is a file name that Xavier observed being used in his latest diary.
If we go back to our code, we can see that a Base64-encoded string would be parsed out from the downloaded image file and loaded using reflection, after which its Main method would be called using the arguments contained in the “argsBase64” variable. So, although we lack the image with the actual payload, we can at least look at what parameters would be passed to it.
Simply decoding the string would give us the following:
'==Ad4RnL3VmTlxWaGRWZ0JXZ252bD9yby5SYjVmblNHblR3bo9yL6MHc0RHa','','C:UsersPublicDownloads','Name_File','cmd','1','cmd','','URL','C:UsersPublicDownloads','Name_File','js','1','','Task_Name','0','','',''
As we can see, it is probable that the Downloads folder would be used in some way, as well as Windows command line, but we might also notice the one remaining obfuscated string in first position. It is obfuscated only by reversing the order of characters and Base64 encoding. This can be deduced from the two equal signs at the beginning, since one or two equal signs are often present at the end of Base64 encoded strings. If we were to decode this string, we would get the following URL:
hxxps[:]//hotelseneca[.]ro/ConvertedFileNew.txt
Unlike the previous URL, this one was still active at the time of writing. The TXT file contained a reversed, Base64 encoded EXE file, which – according to information found on VirusTotal[7] for its hash – turned out to be a sample of Remcos RAT. So, even though we lack one part of the infection chain, we can quite reasonably assume that this particular malware was its intended final stage.
IoCs
URLs
hxxps[:]//ia600603[.]us[.]archive[.]org/13/items/msi-pro-with-b-64_202602/MSI_PRO_with_b64.png
hxxps[:]//hotelseneca[.]ro/ConvertedFileNew.txt
Files
JS file (1st stage)
SHA-1 – a34fc702072fbf26e8cada1c7790b0603fcc9e5c
SHA-256 – edc04c2ab377741ef50b5ecbfc90645870ed753db8a43aa4d0ddcd26205ca2a4
TXT file (3rd stage – encoded)
SHA-1 – bcdb258d4c708c59d6b1354009fb0d96a0e51dc0
SHA-256 – b6fdb00270914cdbc248cacfac85749fa7445fca1122a854dce7dea8f251019c
EXE file (3rd stage – decoded)
SHA-1 – 45bfcd40f6c56ff73962e608e8d7e6e492a26ab9
SHA-256 – 1158ef7830d20d6b811df3f6e4d21d41c4242455e964bde888cd5d891e2844da
[1] https://isc.sans.edu/diary/Malicious+Script+Delivering+More+Maliciousness/32682/
[2] https://isc.sans.edu/diary/Tracking+Malware+Campaigns+With+Reused+Material/32726/
[3] https://learn.microsoft.com/en-us/windows/win32/cimwin32prov/win32-processstartup
[4] https://isc.sans.edu/diary/Passive+analysis+of+a+phishing+attachment/29798
[5] https://www.virustotal.com/gui/url/9cb319c6d1afc944bf4e213d0f13f4bee235e60aa1efbec1440d0a66039db3d5/details
[6] https://www.virustotal.com/gui/file/656991f4dabe0e5d989be730dac86a2cf294b6b538b08d7db7a0a72f0c6c484b
[7] https://www.virustotal.com/gui/file/1158ef7830d20d6b811df3f6e4d21d41c4242455e964bde888cd5d891e2844da
———–
Jan Kopriva
LinkedIn
Nettles Consulting
(c) SANS Internet Storm Center. https://isc.sans.edu Creative Commons Attribution-Noncommercial 3.0 United States License.