Rolling Back Packages on Ubuntu/Debian, (Tue, Apr 16th)

This post was originally published on this site

Package updates/upgrades by maintainers on the Linux platforms are always appreciated, as these updates are intended to offer new features/bug fixes. However, in rare circumstances, there is a need to downgrade the packages to a prior version due to unintended bugs or potential security issues, such as the recent xz-utils backdoor. Consistently backing up your data before significant updates is one good countermeasure against grief. However, what if one was not diligently practicing such measures and urgently needed to simply roll back to a prior version of the said package? I was recently put in this unenviable position when configuring one of my systems, and somehow, the latest version of Proton VPN (version 4.3.0) would not work and displayed the following output after I executed it:

Quick Palo Alto Networks Global Protect Vulnerablity Update (CVE-2024-3400), (Mon, Apr 15th)

This post was originally published on this site

This is a quick update to our initial diary from this weekend [CVE-2024-3400].

At this point, we are not aware of a public exploit for this vulnerability. The widely shared GitHub exploit is almost certainly fake.

As promised, Palo Alto delivered a hotfix for affected versions on Sunday (close to midnight Eastern Time). 

One of our readers, Mark, observed attacks attempting to exploit the vulnerability from two IP addresses:

%%ip:173.255.223.159%%: An Akamai/Linode IP address. We do not have any reports from this IP address. Shodan suggests that the system may have recently hosted a WordPress site.

%%ip:146.70.192.174%%: A system in Singapore that has been actively scanning various ports in March and April.

According to Mark, the countermeasure of disabling telemetry worked. The attacks where directed at various GlobalProtect installs, missing recently deployed instances. This could be due to the attacker using a slightly outdated target list.

Please let us know if you observe any additional attacks or if you come across exploits for this vulnerability. 


Johannes B. Ullrich, Ph.D. , Dean of Research, SANS.edu
Twitter|

(c) SANS Internet Storm Center. https://isc.sans.edu Creative Commons Attribution-Noncommercial 3.0 United States License.

AWS Weekly Roundup: New features on Knowledge Bases for Amazon Bedrock, OAC for Lambda function URL origins on Amazon CloudFront, and more (April 15, 2024)

This post was originally published on this site

AWS Community Days conferences are in full swing with AWS communities around the globe. The AWS Community Day Poland was hosted last week with more than 600 cloud enthusiasts in attendance. Community speakers Agnieszka Biernacka, Krzysztof Kąkol, and more, presented talks which captivated the audience and resulted in vibrant discussions throughout the day. My teammate, Wojtek Gawroński, was at the event and he’s already looking forward to attending again next year!

Last week’s launches
Here are some launches that got my attention during the previous week.

Amazon CloudFront now supports Origin Access Control (OAC) for Lambda function URL origins – Now you can protect your AWS Lambda URL origins by using Amazon CloudFront Origin Access Control (OAC) to only allow access from designated CloudFront distributions. The CloudFront Developer Guide has more details on how to get started using CloudFront OAC to authenticate access to Lambda function URLs from your designated CloudFront distributions.

AWS Client VPN and AWS Verified Access migration and interoperability patterns – If you’re using AWS Client VPN or a similar third-party VPN-based solution to provide secure access to your applications today, you’ll be pleased to know that you can now combine the use of AWS Client VPN and AWS Verified Access for your new or existing applications.

These two announcements related to Knowledge Bases for Amazon Bedrock caught my eye:

Metadata filtering to improve retrieval accuracy – With metadata filtering, you can retrieve not only semantically relevant chunks but a well-defined subset of those relevant chunks based on applied metadata filters and associated values.

Custom prompts for the RetrieveAndGenerate API and configuration of the maximum number of retrieved results – These are two new features which you can now choose as query options alongside the search type to give you control over the search results. These are retrieved from the vector store and passed to the Foundation Models for generating the answer.

For a full list of AWS announcements, be sure to keep an eye on the What’s New at AWS page.

Other AWS news
AWS open source news and updates – My colleague Ricardo writes this weekly open source newsletter in which he highlights new open source projects, tools, and demos from the AWS Community.

Upcoming AWS events
AWS Summits – These are free online and in-person events that bring the cloud computing community together to connect, collaborate, and learn about AWS. Whether you’re in the Americas, Asia Pacific & Japan, or EMEA region, learn here about future AWS Summit events happening in your area.

AWS Community Days – Join an AWS Community Day event just like the one I mentioned at the beginning of this post to participate in technical discussions, workshops, and hands-on labs led by expert AWS users and industry leaders from your area. If you’re in Kenya, or Nepal, there’s an event happening in your area this coming weekend.

You can browse all upcoming in-person and virtual events here.

That’s all for this week. Check back next Monday for another Weekly Roundup!

– Veliswa

This post is part of our Weekly Roundup series. Check back each week for a quick roundup of interesting news and announcements from AWS.

Critical Palo Alto GlobalProtect Vulnerability Exploited (CVE-2024-3400), (Sat, Apr 13th)

This post was originally published on this site

On Friday, Palo Alto Networks released an advisory warning users of Palo Alto's Global Protect product of a vulnerability that has been exploited since March [1].

Volexity discovered the vulnerability after one of its customers was compromised [2]. The vulnerability allows for arbitrary code execution. As of today, an exploit has been made public on GitHub. I have not had a chance to test if the exploit is real. I doubt it is real because I hope Palo Alto did apply a bit more due diligence to its products than let a trivial to exploit vulnerability slip in. On the other hand, we have seen similar vulnerabilities from security tool vendors before.

Assume Compromise

According to Volexity, exploit attempts for this vulnerability were observed as early as March 26th. A simple PoC is now publicly available.

Workarounds

GlobalProtect is only vulnerable if telemetry is enabled. Telemetry is enabled by default, but as a "quick fix", you may want to disable telemetry. Palo Alto Threat Prevention subscribers can enable Threat ID 95187 to block the exploit.

Patch

A patch should be available soon (it is not available as I am writing this). Check with Palo Alto for updates.

[1] https://security.paloaltonetworks.com/CVE-2024-3400
[2] https://www.volexity.com/blog/2024/04/12/zero-day-exploitation-of-unauthenticated-remote-code-execution-vulnerability-in-globalprotect-cve-2024-3400


Johannes B. Ullrich, Ph.D. , Dean of Research, SANS.edu
Twitter|

(c) SANS Internet Storm Center. https://isc.sans.edu Creative Commons Attribution-Noncommercial 3.0 United States License.

Building a Live SIFT USB with Persistence, (Fri, Apr 12th)

This post was originally published on this site

The SIFT Workstation[1] is a well-known Linux distribution oriented to forensics and incident response tasks. It is used in many SANS training as the default platform. This is also my preferred solution for my day-to-day DFIR activities. The distribution is available as a virtual machine but you can install it on top of a classic Ubuntu system. Today, everything is virtualized and most DFIR activities can be performed remotely with the provided VM but… sometimes you still need a way to perform local investigations against a physical computer. That's why I always carry a USB stick with me. Before I was using Kali which provides a standard solution. 

Evolution of Artificial Intelligence Systems and Ensuring Trustworthiness, (Thu, Apr 11th)

This post was originally published on this site

We live in a dynamic age, especially with the increasing awareness and popularity of Artificial Intelligence (AI) systems being explored by users and organizations alike. I was recently quizzed by a junior researcher on how AI systems came about and realized I could not answer that query immediately. I had a rough idea of what led to the current generative and large language models. Still, I had a very fuzzy understanding of what transpired before them, besides being confident that neural networks were involved. Unsatisfied with the lack of appreciation of how AI systems evolved, I decided to explore how AI systems were conceptualized and developed to the current state, sharing what I learnt in this diary. However, knowing only how to use them but being unable to ensure their trustworthiness (especially if organizations want to use these systems for increasingly critical business activities) could expose organizations to a much higher risk than what senior leadership could accept. As such, I will also suggest some approaches (technical, governance, and philosophical) to ensure the trustworthiness of these AI systems.

Slicing up DoNex with Binary Ninja, (Thu, Apr 4th)

This post was originally published on this site

[This is a guest diary by John Moutos]

Intro

Ever since the LockBit source code leak back in mid-June 2022 [1], it is not surprising that newer ransomware groups have chosen to adopt a large amount of the LockBit code base into their own, given the success and efficiency that LockBit is notorious for. One of the more clear-cut spinoffs from LockBit, is Darkrace, a ransomware group that popped up mid-June 2023 [2], with samples that closely resembled binaries from the leaked LockBit builder, and followed a similar deployment routine. Unfortunately, Darkrace dropped off the radar after the administrators behind the LockBit clone decided to shut down their leak site.

It is unsurprising that, 8 months after the appearance and subsequent disappearance of the Darkrace group, a new group who call themselves DoNex [3], have appeared in their place, utilizing samples that closely resemble those previously used by the Darkrace group, and LockBit by proxy.

Analysis

Dropping the DoNex sample [4] in "Detect It Easy" (DIE) [5], we can see the binary does not appear to be packed, is 32-bit, and compiled with Microsoft's Visual C/C++ compiler.

Figure 1: Binary Opened in DIE

Opening the sample in Binary Ninja [6], and switching to the "Triage Summary" view, we can standard libraries being imported, and sections with nothing special going on.

Figure 2:  Binary Ninja Triage Summary

Switching back to the disassembly view, and going to the entry point, we can follow execution to the actual main function.


Figure 3: Entry Point


Figure 4: Call to Main Function


Once the application is launched, the main function starts by getting a handle to the attached console window with "FindWindowA", and setting the visibility to hidden by calling "ShowWindow" and passing "SW_HIDE" as a parameter.

Figure 5: Main Function

Following execution into the next function called (renamed to "doInit"), we can see a mutex check to ensure only one instance of the application will run and encrypt files.

Figure 6: Mutex Check

The next notable function called (renamed to "checkPrivs"), is an attempt to fetch the access token from the current thread by using "GetCurrentThread" with "OpenThreadToken", and in cases where this operation fails, "GetCurrentProcess" is used with "OpenProcessToken" to obtain the access token from the application process, instead of the current thread.

Figure 7: Get Access Token

Using the access token handle, "GetTokenInformation" is called to identify the user account information tied to the token, most notably the SID.

Figure 8: Get Token Info

The user account info will be used to check for administrative rights, so a SID for the administrators group is allocated and initialized.

Figure 9: Admin SID Create

Now with the SID for the administrators group, "EqualSid" is called to compare the SID from derived from the token information against the newly initialized SID for the administrators group

Figure 10: Admin Context Check

Returning back to the main function, next "GetModuleHandleA" is used to open a handle to "kernel32.dll" module, and "GetProcAddress" is called using that handle to resolve the address of the "IsWow64Process" function.

Figure 11: Dynamic Address Resolution

Using the now resolved "IsWow64Process" function, the handle of the current process is passed and used to determine if "Windows on Windows 64" (WOW64 is essentially an x86 emulator) is being used to run the application. WOW64 file system redirection is then disabled if the application is either running under 32-bit Windows, or if it is running under WOW64 on 64-bit Windows. Disabling redirection allows 32-bit applications running under WOW to access 64-bit versions of system files in the System32 directory, instead of being redirected to the 32-bit directory counterpart, SysWOW64.

Figure 12: WOW FS Redirection Check

From the main function we follow another call to the function (renamed to "doCryptoSetup") responsible for acquiring the cryptographic context needed for the application to actually encrypt device files by calling, as the name implies "CryptAcquireContextA".

Figure 13: Acquire Crypot Context

With the cryptographic context setup, the following function (renamed to "setIcon") called, is used to drop an icon file named "icon.ico" to "C:ProgramData", and create keys in the device registry through use of "RegCreateKeyExA", and "RegSetValueExA", to set it as the default file icon for newly encrypted files.


Figure 14: Drop Icon File


Figure 15: Associate Icon with Extension


Figure 16: Set Default Icon in Registry


The final part of the initial setup process involves a call to "SHEmptyRecycleBinA", which as the name implies, empties the recycle bin, and since no drive was specified, it will affect all the device drives.


Figure 17: Wiping Recycle Bins


With the main pre-encryption setup complete, the encryption setup function (renamed to "mainEncryptSetup") which handles thread management, process termination, service control, drive & network share enumeration, file discovery & iteration, and encryption is called.


Figure 18: Encryption Setup Start


As part of the process termination and service control component, a connection to the service control manager on the local device is established through a call to "getServiceControl".


Figure 19: Service Control Connection


The first thread created during the encryption setup, is used to drop the process terminating batch file ("1.bat") [7] to the "ProgramData" directory. The second thread that is created, handles service manipulation, and executes if a valid handle to the service control manager is present.


Figure 20: Thread Creation


Called by the creation of the first thread, this function (renamed to "batRun") drops a looping batch file ("1.bat"), and executes it with "WinExec", which pings the localhost address, and uses "taskkill" to kill processes of common AV & EDR products and backup software.


Figure 21: Process Kill Batch


Called by the creation of the second thread, this function (renamed to "stopServices"), creates a connection to the service control manager through a call to "OpenSCManagerA", and has the capability to open handles to a service based on a service name, using "OpenServiceA", identify the service status with "QueryServiceStatusEx", identify any dependent services with "EnumDependentServicesA", and make modifications to the service, such as stopping it, with "ControlService".


Figure 22: Service Control Connection


Figure 23: Dependent Service Check


Figure 24: Control Service

After the previous two threads have finished, a list of valid storage drives connected to the device is enumerated with "GetLogicalDriveStringsW" and the drive type for each is queried using "GetDriveTypeW".


Figure 25: Storage Enumeration


The third and fourth threads will call functions "iterFiles" and "iterFilesCon", which handle discovering and iterating through the files on the previously queried drives. The fifth thread starts the actual file encryption process with a call to "startEncrypt".


Figure 26: Start Iterating Files


To start the process of iterating through files, the root path of the current targeted drive is identified using “getDriveRootPath”.


Figure 27: Get Drive Root


Files are then iterated through using “FindFirstFileW” and “FindNextFileW”, and checked against a file blacklist (“checkFileBlacklist”) to avoid encrypting critical system files, before being stored in a list to be used in the encryption process.


Figure 28: Start File Iteration


Figure 29: Compare Files to Blacklist


Figure 30: Release Handle and Finish Iteration


The encryption process starts with the execution of the “encryptJob” function, by the creation of the fifth thread


Figure 31: Start File Encryption Job


To ensure the encrypted data can be written to the target files, a Restart Manager session is created with “RmStartSession” and populated with the target files (resources) using “RmRegisterResources”, which are then collected by “RmGetList” and used to check if the target files are locked by any other processes, and if a lock exists, a handle is opened to the process, and the process is terminated, using “OpenProcess” and “TerminateProcess”. The target files are then finally encrypted.


Figure 32: Check File Locks


With the main encryption job finished, the ransom note “ReadMe” is dropped.


Figure 33: Dropping Ransom Note


Figure 34: Note Name with ID Placeholder


Figure 35: Note Written to Disk


With the main on-disk encryption job complete, available network shares are targeted next.


Figure 36: Target Network Shares


Network shares are enumerated through use of the Windows Networking API (“WNetOpenEnumW”), and connections are made to shares that are accessible by the current acting user account (“WNetEnumResourceW” and “WNetAddConnection2W”)


Figure 37: Start Network Share Enum Job


Figure 38: Continue Enum Job


Figure 39: Network Share Connection Attempt


Similar to the previous process, files on the network share(s) are then discovered and iterated through (“FindFirstFileW” and “FindNextFileW”), to be stored and used by the network share file encrypt job.


Figure 40: Network Share File Iteration


With the network share files discovered and stored, the encryption job (“encryptJobNS”) for them is started.


Figure 41: Encrypt Network Share Files


Lastly, to cleanup, the application, system, and security event logs are erased (“OpenEventLogA” and “ClearEventLogA”), and a command which pings the localhost address, before deleting the dropped “1.bat” file, and performing a hard restart on the device, is invoked with “WinExec”, before exiting.


Figure 42: Clear Event Logs


Figure 43: Cleanup Commands


Figure 44: Execute Cleanup Commands


Additional data extracted during runtime, and similar LockBit/Darkrace files for comparison.


Figure 45: DoNex Ransom Note


Figure 46: "1.bat" [50] Contents


Figure 47: Commands User to Delete Shadow Copies


Figure 48: Darkrace Rasnom Note
Figure 49: LockBit 3.0 Ransom Note


Flow Summary

  • User or threat actor executes DoNex ransomware binary
  • Binary starts and hides attached console window
  • Performs a mutex check to ensure only one instance of the binary is running
  • Obtains the access token from the current thread, or process
  • Queries user account info associated with the token
  • Checks if user account belongs to local administrators group
  • Disables WOW file system redirection if running under 32-bit Windows, or WOW64 on 64-bit Windows
  • Drops an icon file in "ProgramData"
  • Sets dropped icon as default file icon for encrypted files
  • Wipes recycle bins on all drives
  • Drops "1.bat" batch file to "ProgramData" and executes it
  • Enumerates connected drives
  • Identifies root path on each drive
  • Iterates through files on drives
  • Checks files against blacklist
  • Checks if target files are locked and if true, kill locking process(es)
  • Encrypts files on disk
  • Drops ransom note "ReadMe.txt"
  • Enumerates accessible network shares
  • Attempts to connect to any open shares
  • Iterates through files on shares
  • Encrypts files on network shares
  • Clears application, security, and system event logs
  • Deletes "1.bat" file
  • Forces a hard restart on the device

Takeaway

Unsurprisingly, the threat actors behind the DoNex group are far from innovators in the ransomware landscape, with nothing new brought to the table, outside of renaming some strings within the LockBit builder. DoNex, and the Darkrace ransomware gang are merely trying to shortcut their way to successful compromises, using the scraps left behind by LockBit and the leaked builder. The appearance of these smaller and newer groups will only become more common, as the skill ceiling for successful compromise is pushed down lower, partially due to the affiliate programs larger ransomware families have in place, and the beginner friendly builders, that are directly provided, or in the case of LockBit, leaked.

References, Appendix, & Tools Used

[1] https://www.cisa.gov/news-events/cybersecurity-advisories/aa23-165a
[2] https://cyble.com/blog/unmasking-the-darkrace-ransomware-gang
[3] https://www.watchguard.com/wgrd-security-hub/ransomware-tracker/donex
[4] https://www.virustotal.com/gui/file/6d6134adfdf16c8ed9513aba40845b15bd314e085ef1d6bd20040afd42e36e40
[5] https://github.com/horsicq/DIE-engine/releases
[6] https://binary.ninja
[7] https://www.virustotal.com/gui/file/2b15e09b98bc2835a4430c4560d3f5b25011141c9efa4331f66e9a707e2a23c0

Indicators of Compromise

SHA-256 Hashes:
6d6134adfdf16c8ed9513aba40845b15bd314e085ef1d6bd20040afd42e36e40 (doneX.exe)
2b15e09b98bc2835a4430c4560d3f5b25011141c9efa4331f66e9a707e2a23c0 (1.bat)
d3997576cb911671279f9723b1c9505a572e1c931d39fe6e579b47ed58582731 (icon.ico)

Notable File Activity:
C:UsersuserDesktopReadMe.f58A66B51.txt
C:UsersuserDownloadsReadMe.f58A66B51.txt
C:UsersuserDocumentsReadMe.f58A66B51.txt
C:ReadMe.f58A66B51.txt
C:TempReadMe.f58A66B51.txt

Notable Registry Activity:
HKEY_CLASSES_ROOT.f58A66B51
HKEY_CLASSES_ROOTf58A66B51fileDefaultIcon
HKEY_LOCAL_MACHINESOFTWAREClassesf58A66B51fileDefaultIcon
HKEY_LOCAL_MACHINESOFTWAREClasses.f58A66B51

John Moutos

(c) SANS Internet Storm Center. https://isc.sans.edu Creative Commons Attribution-Noncommercial 3.0 United States License.

Some things you can learn from SSH traffic, (Wed, Apr 3rd)

This post was originally published on this site

This week, the SSH protocol made the news due to the now infamous xz-utils backdoor. One of my favorite detection techniques is network traffic analysis. Protocols like SSH make this, first of all, more difficult. However, as I did show in the discussion of SSH identification strings earlier this year, some information is still to be gained from SSH traffic [1].

Let's look at the SSH handshake of a normal SSH client and a normal SSH server in a bit more detail to learn what is normal when it comes to SSH.

1 – Client Identification

The first payload packet sent from the client to the server should only contain the client identification string. Note that the format is standardized. The important part is in the beginning:

SSH-2.0-OpenSSH_9.6

This means we are going to use SSH-2.0.

2 – Server Identification

In reply, the server will send its identification string. As for the client, the beginning of the string identifies the SSH version.

SSH-2.0-OpenSSH_8.4p1 Debian-5+deb11u3

3 – Client Key Exchange Init

This is a bit like the "Client Hello" for TLS. It lists all the ciphers the client supports.

4 – Server Key Exchange Init

In the case of TLS, the server would pick the cipher. But for SSH, the server responds with its list of supported ciphers

5 – The client now responds with the selected cipher and its public key

6 – The server now responds to complete the key exchange.

7 – In the end, the client acknowledges the complete exchange with a "New Keys" message.

Everything beyond this point will be encrypted.

For the xz-utils backdoor, Step 5, where the client sends its public key, is the interesting spot. This is where the attacker would send the exploit. However, the key is derived for specific connections and implementations, so I doubt this will be useful for detection.

The zeek documentation dedicates a chapter to understanding SSH and suggests several ways to leverage the zeek ssh.log. The log does not log public keys.

To experiment, we luckily have Anthony Weems' implementation of the backdoor [2]. I ran his "xzbot", and got the following lines in my syslog for a regular, non-backdoored (I hope) Ubuntu 22.04 system:

Connection closed by 10.128.0.11 port 38682 [preauth]
User root from 10.128.0.11 not allowed because none of user's groups are listed in AllowGroups
error: userauth_pubkey: parse key: error in libcrypto [preauth]
Connection closed by invalid user root 10.128.0.11 port 38780 [preauth]

I highlighted the third line. It is unique in that I have not seen it before. This could indicate someone is attempting a technique like the one implemented in the backdoor to execute code. Or is it just me using the xzbot wrong? I used the default ed448 seed of 0.

The packet capture appears to be similar. 

Please let me know if you have other ideas to detect this backdoor or similar backdoors (better!) via network traffic.

[1] https://isc.sans.edu/diary/30520
[2] https://github.com/amlweems


Johannes B. Ullrich, Ph.D. , Dean of Research, SANS.edu
Twitter|

(c) SANS Internet Storm Center. https://isc.sans.edu Creative Commons Attribution-Noncommercial 3.0 United States License.

Introducing AWS Deadline Cloud: Set up a cloud-based render farm in minutes

This post was originally published on this site

Customers in industries such as architecture, engineering, & construction (AEC) and media & entertainment (M&E) generate the final frames for film, TV, games, industrial design visualizations, and other digital media with a process called rendering, which takes 2D/3D digital content data and computes an output, such as an image or video file. Rendering also requires significant compute power, especially to generate 3D graphics and visual effects (VFX) with resolutions as high as 16K for films and TV. This constrains the number of rendering projects that customers can take on at once.

To address this growing demand for rendering high-resolution content, customers often build what are called “render farms” which combine the power of hundreds or thousands of computing nodes to process their rendering jobs. Render farms can traditionally take weeks or even months to build and deploy, and they require significant planning and upfront commitments to procure hardware.

As a result, customers increasingly are transitioning to scalable, cloud-based render farms for efficient production instead of a dedicated render farm on-premises, which can require extremely high fixed costs. But, rendering in the cloud still requires customers to manage their own infrastructure, build bespoke tooling to manage costs on a project-by-project basis, and monitor software licensing costs with their preferred partners themselves.

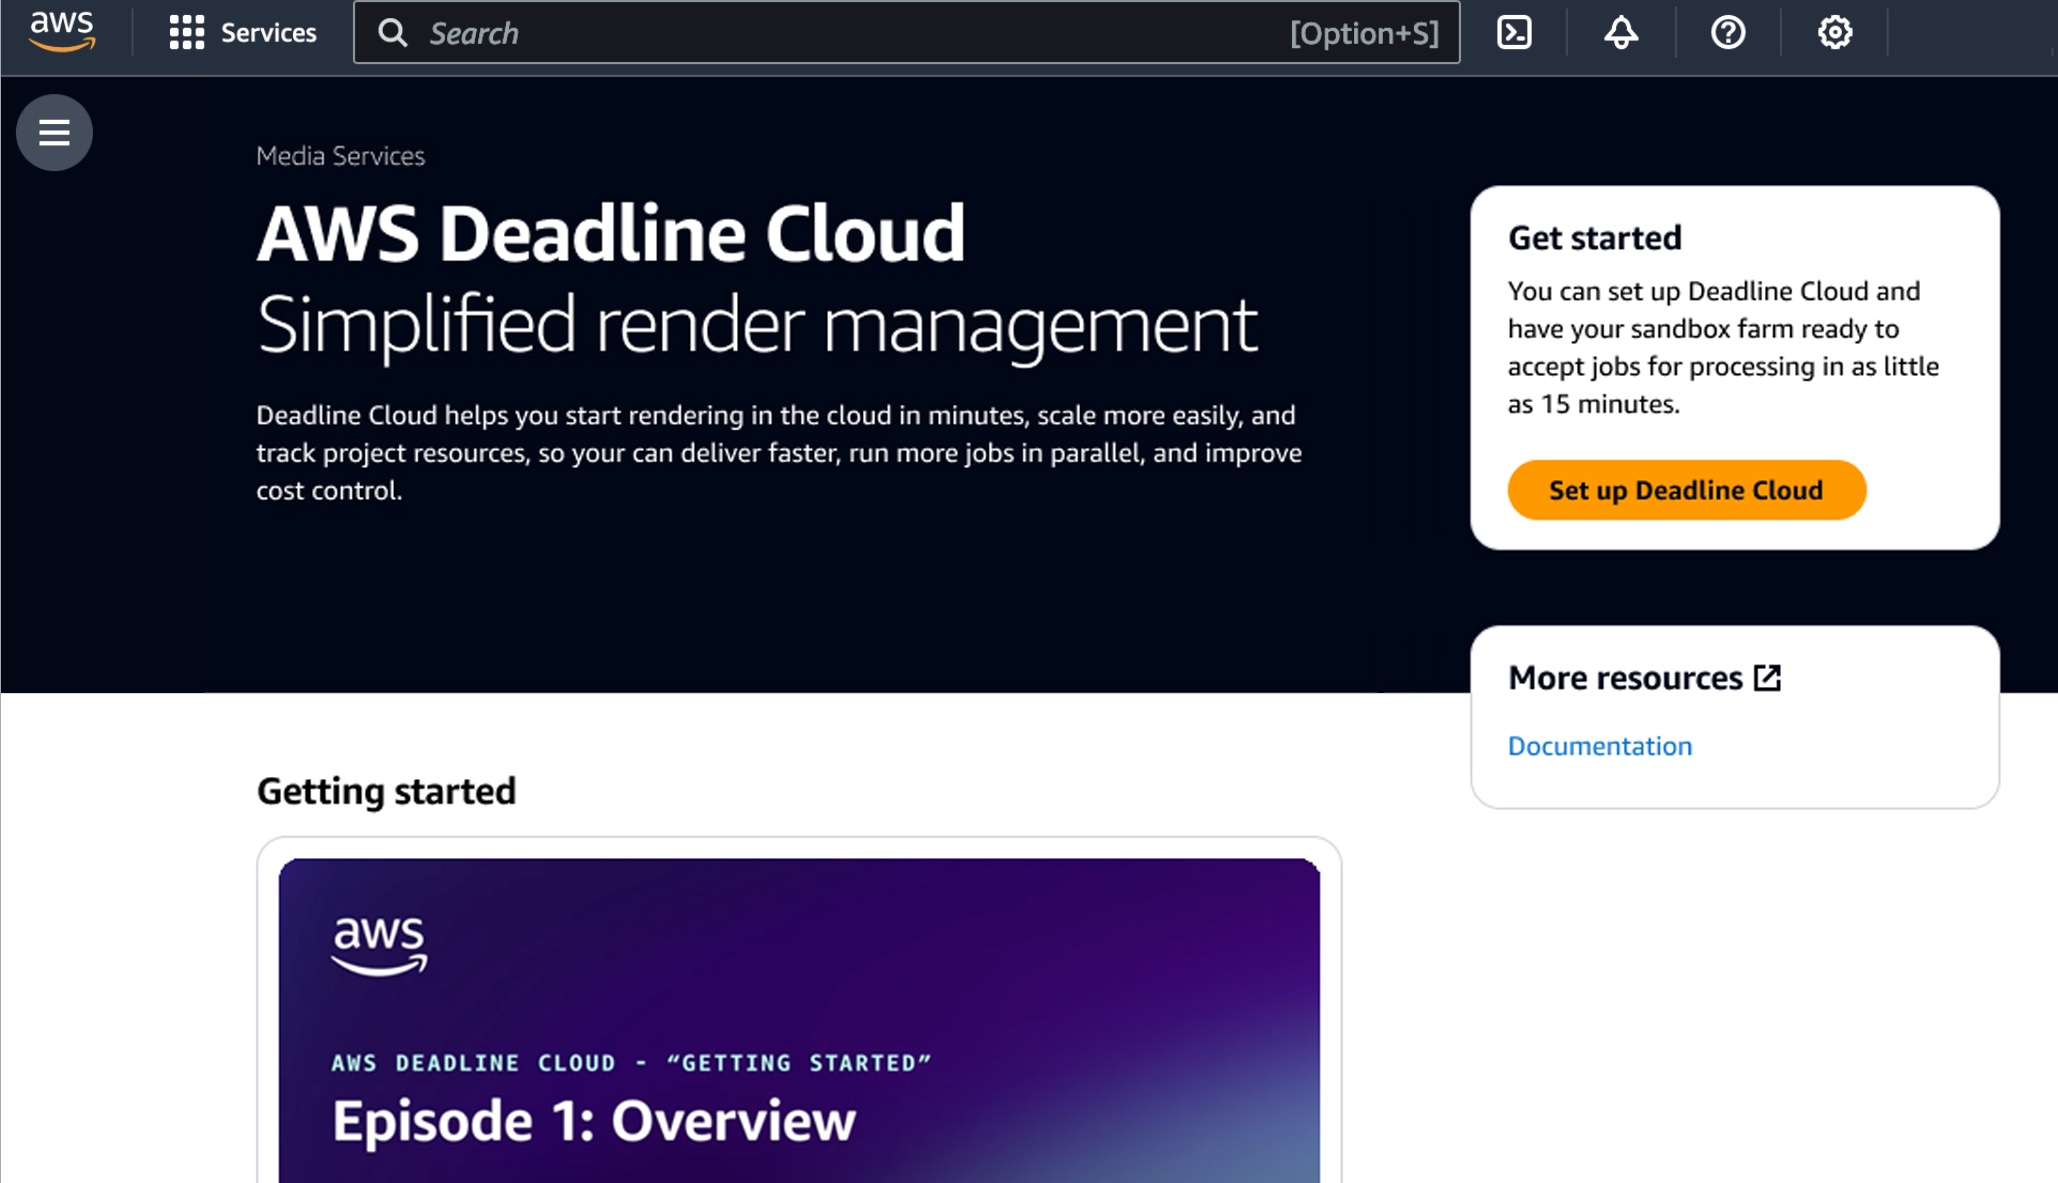
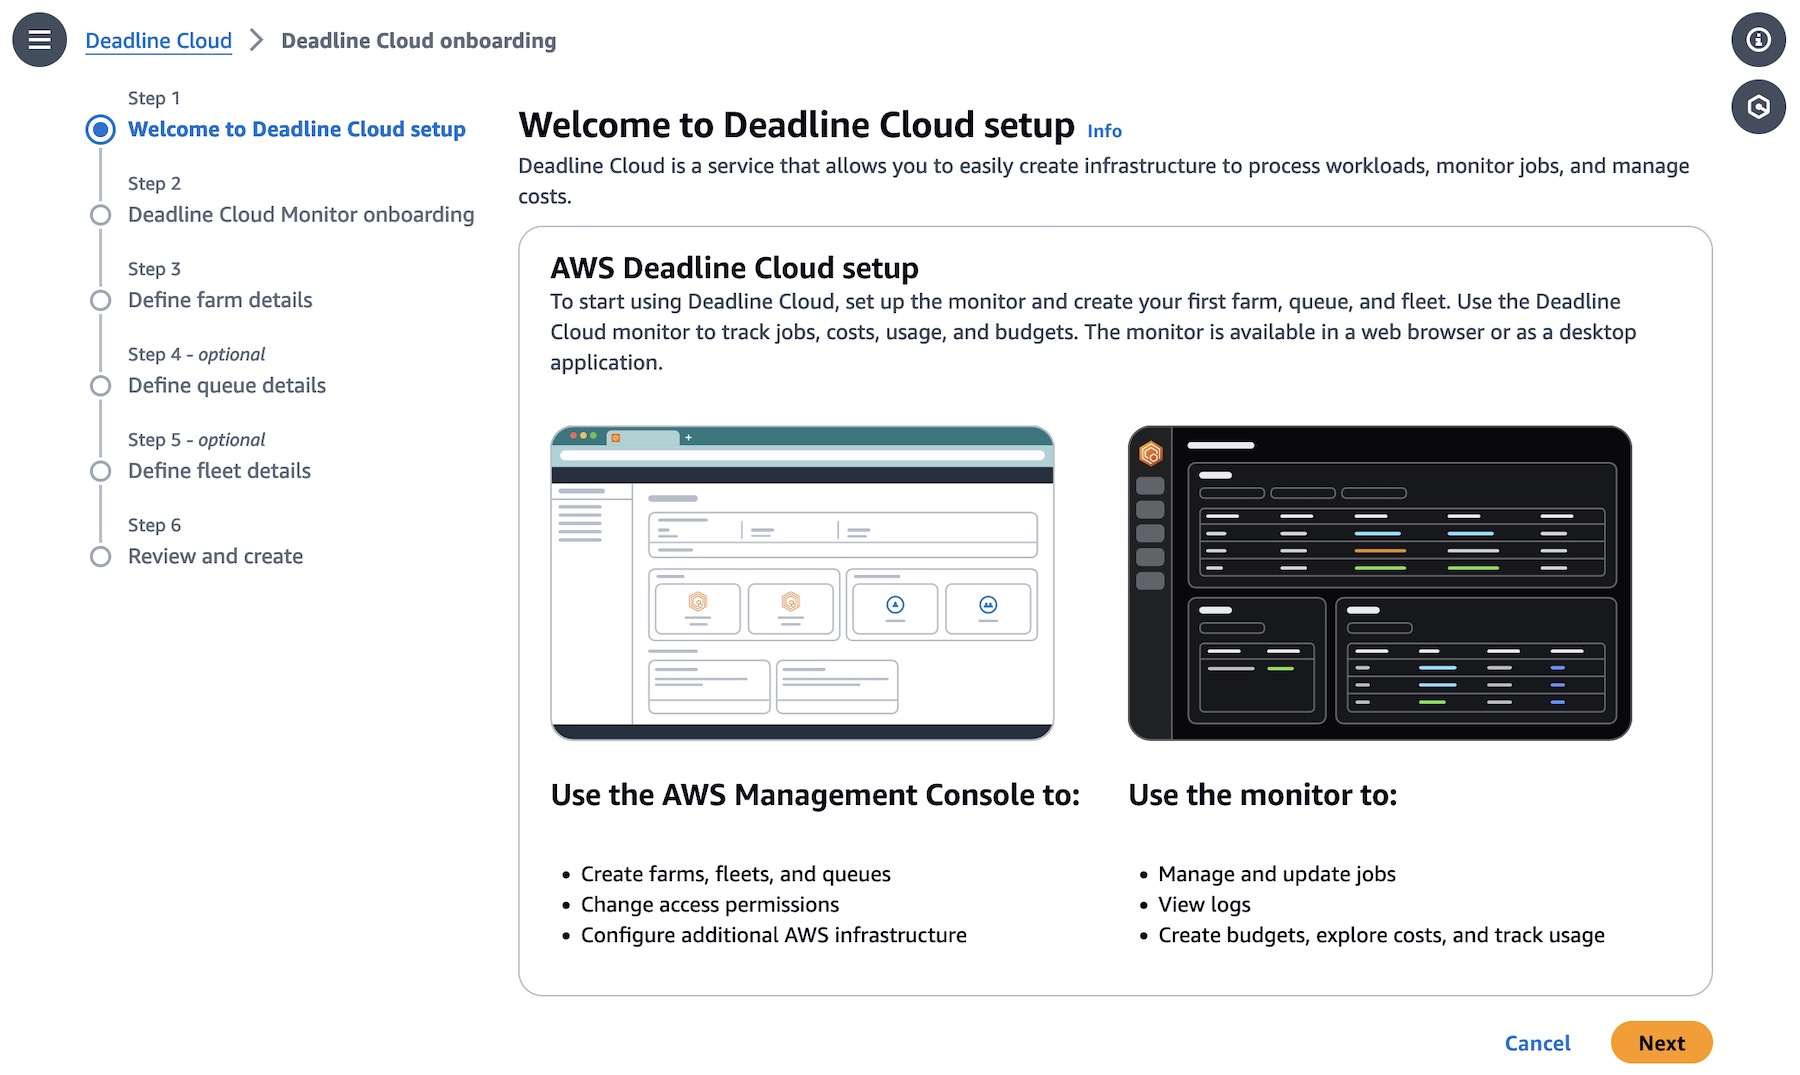
Today, we are announcing the general availability of AWS Deadline Cloud, a new fully managed service that enables creative teams to easily set up a render farm in minutes, scale to run more projects in parallel, and only pay for what resources they use. AWS Deadline Cloud provides a web-based portal with the ability to create and manage render farms, preview in-progress renders, view and analyze render logs, and easily track these costs.

With Deadline Cloud, you can go from zero to render faster with integrations of digital content creation (DCC) tools and customization tools are built-in. You can reduce the effort and development time required to tailor your rendering pipeline to the needs of each job. You also have the flexibility to use licenses you already own or they are provided by the service for third-party DCC software and renderers such as Maya, Nuke, and Houdini.

Concepts of AWS Deadline Cloud
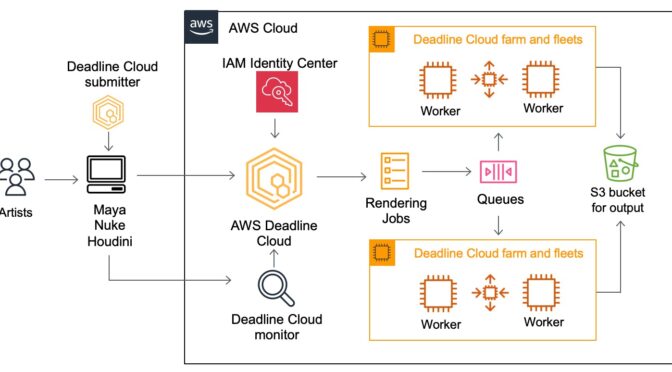
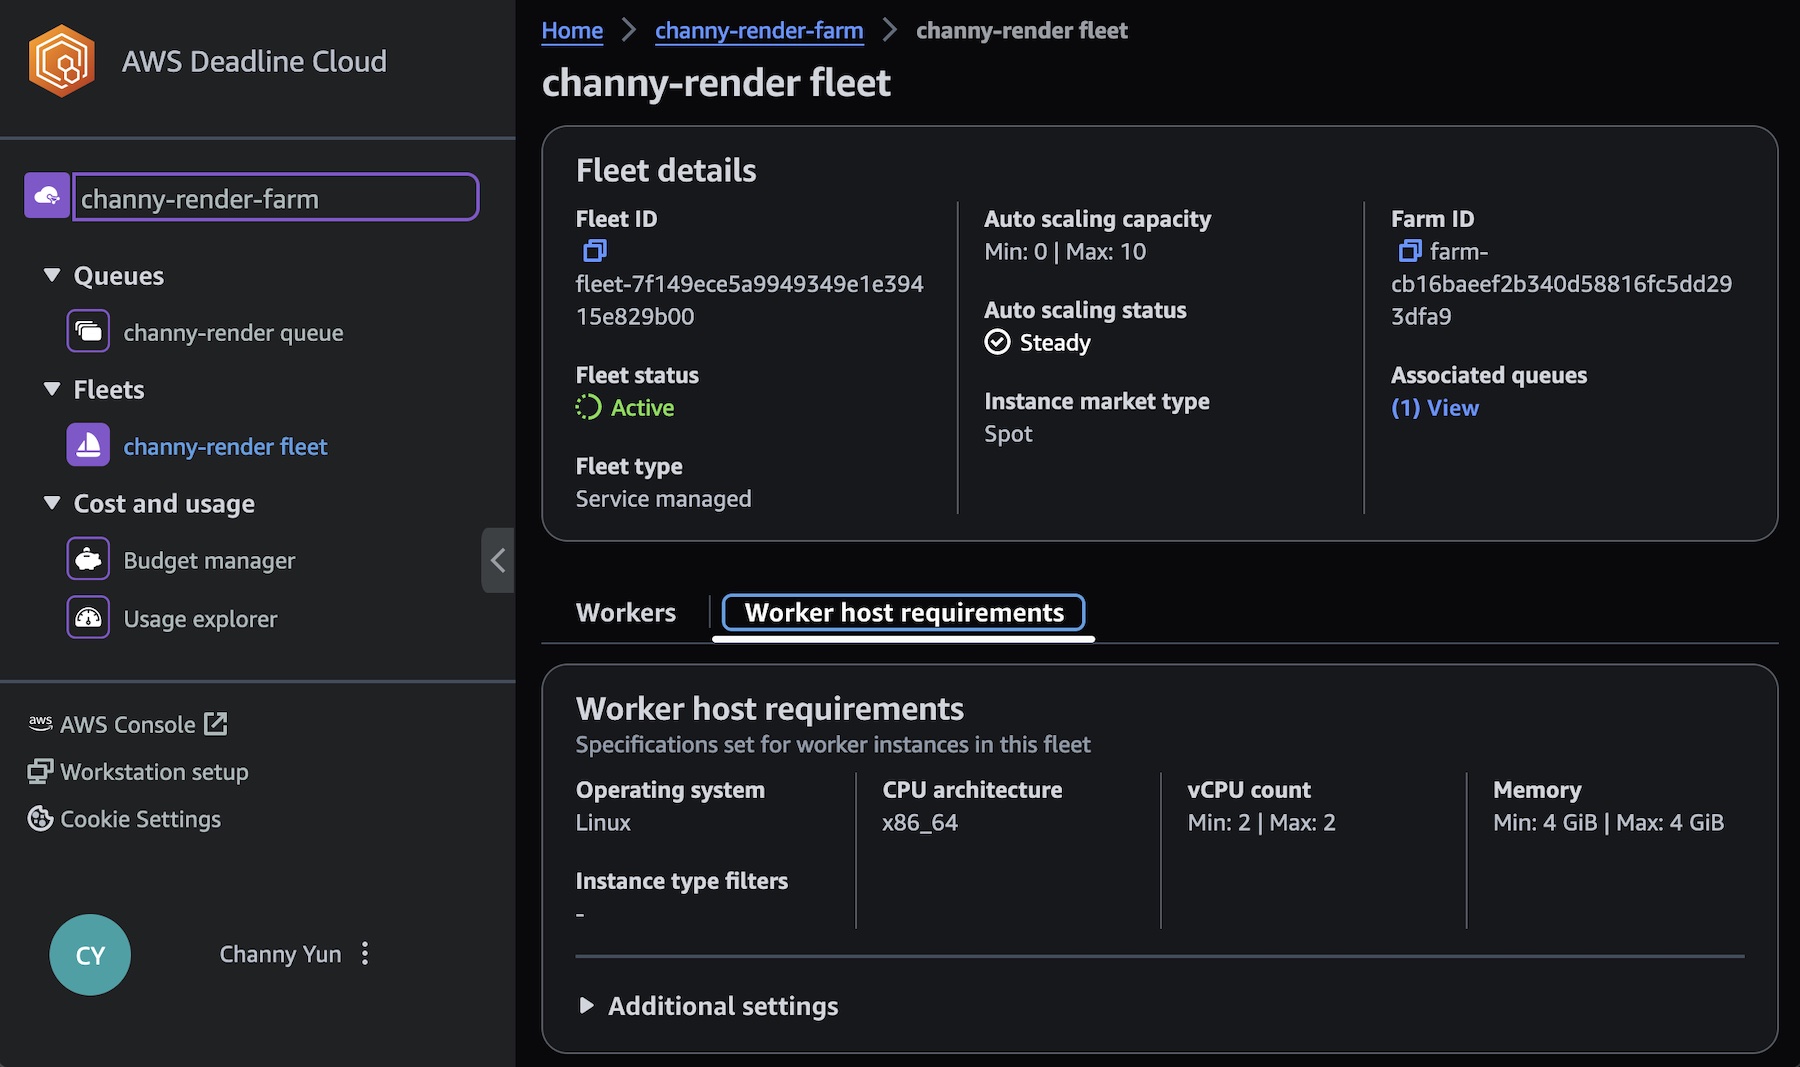
AWS Deadline Cloud allows you to create and manage rendering projects and jobs on Amazon Elastic Compute Cloud (Amazon EC2) instances directly from DCC pipelines and workstations. You can create a rendering farm, a collection of queues, and fleets. A queue is where your submitted jobs are located and scheduled to be rendered. A fleet is a group of worker nodes that can support multiple queues. A queue can be processed by multiple fleets.

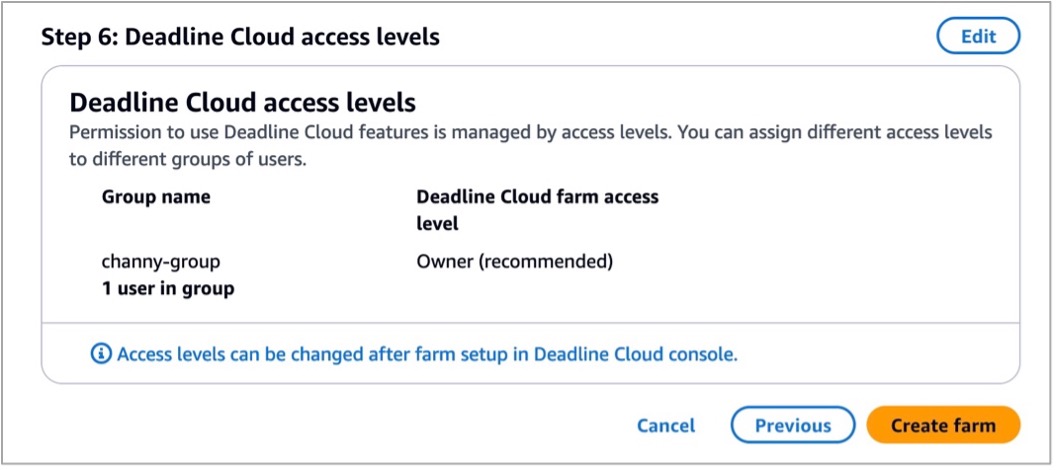
Before you can work on a project, you should have access to the required resources, and the associated farm must be integrated with AWS IAM Identity Center to manage workforce authentication and authorization. IT administrators can create and grant access permissions to users and groups at different levels, such as viewers, contributors, managers, or owners.

Here are four key components of Deadline Cloud:

  • Deadline Cloud monitor – You can access statuses, logs, and other troubleshooting metrics for jobs, steps, and tasks. The Deadline Cloud monitor provides real-time access and updates to job progress. It also provides access to logs and other troubleshooting metrics, and you can browse multiple farm, fleet, and queue listings to view system utilization.
  • Deadline Cloud submitter – You can submit a rendering job directly using AWS SDK or AWS Command Line Interface (AWS CLI). You can also submit from DCC software using a Deadline Cloud submitter, which is a DCC-integrated plugin that supports Open Job Description (OpenJD), an open source template specification. With it, artists can submit rendering jobs from a third-party DCC interface they are more familiar with, such as Maya or Nuke, to Deadline Cloud, where project resources are managed and jobs are monitored in one location.
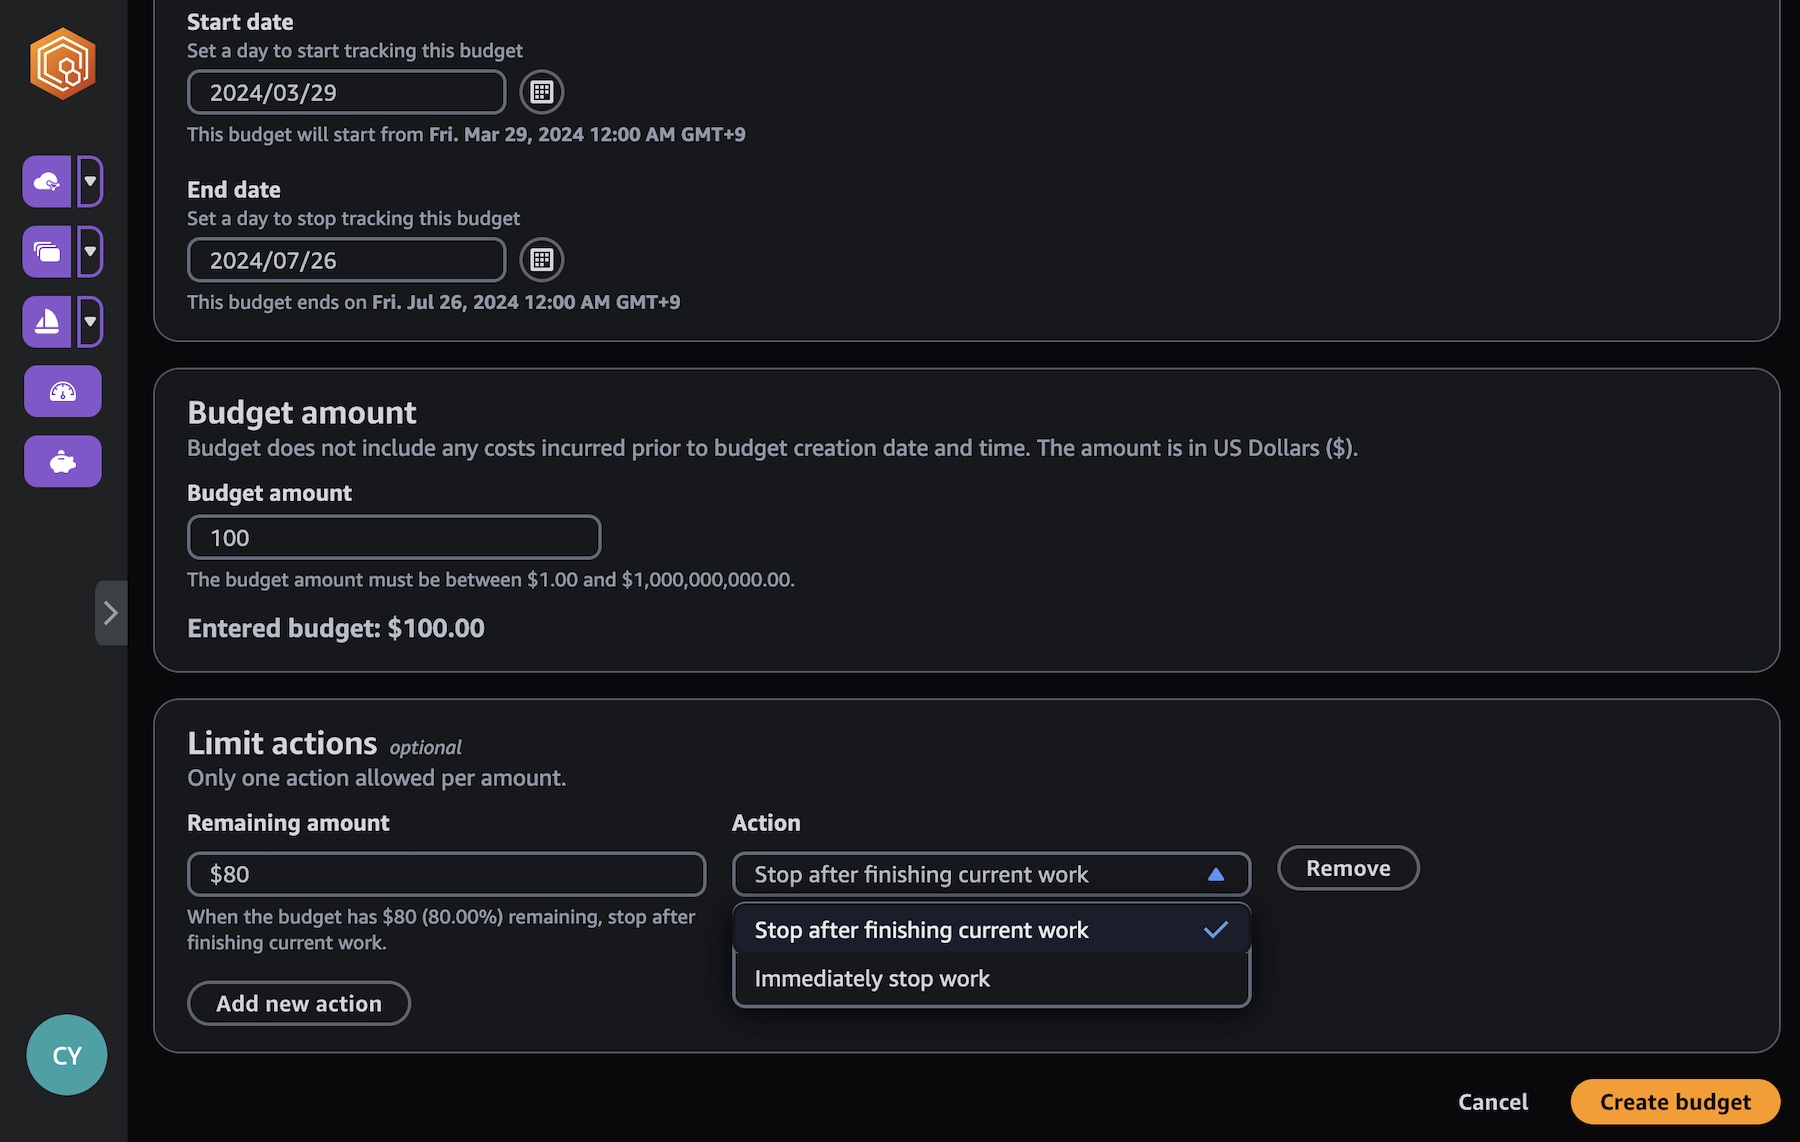
  • Deadline Cloud budget manager – You can create and edit budgets to help manage project costs and view how many AWS resources are used and the estimated costs for those resources.
  • Deadline Cloud usage explorer – You can use the usage explorer to track approximate compute and licensing costs based on public pricing rates in Amazon EC2 and Usage-Based Licensing (UBL).

Get started with AWS Deadline Cloud
To get started with AWS Deadline Cloud, define and create a farm with Deadline Cloud monitor, download the Deadline Cloud submitter, and install plugins for your favorite DCC applications with just a few clicks. You can define your rendering jobs in your DCC application and submit them to your created farm within the plugin’s user interfaces.

The DCC plugins detect the necessary input scene data and build a job bundle that uploads to the Amazon Simple Storage Service (Amazon S3) bucket in your account, transfer to Deadline Cloud for rendering the job, and provide completed frames to the S3 bucket for your customers to access.

1. Define a farm with Deadline Cloud monitor
Let’s create your Deadline Cloud monitor infrastructure and define your farm first. In the Deadline Cloud console, choose Set up Deadline Cloud to define a farm with a guided experience, including queues and fleets, adding groups and users, choosing a service role, and adding tags to your resources.

In this step, to choose all the default settings for your Deadline Cloud resources, choose Skip to Review in Step 3 after monitor setup. Otherwise choose Next and customize your Deadline Cloud resources.

Set up your monitor’s infrastructure and enter your Monitor display name. This name makes the Monitor URL, a web portal to manage your farms, queues, fleets, and usages. You can’t change the monitor URL after you finish setting up. The AWS Region is the physical location of your rendering farm, so you should choose the closest Region from your studio to reduce the latency and improve data transfer speeds.

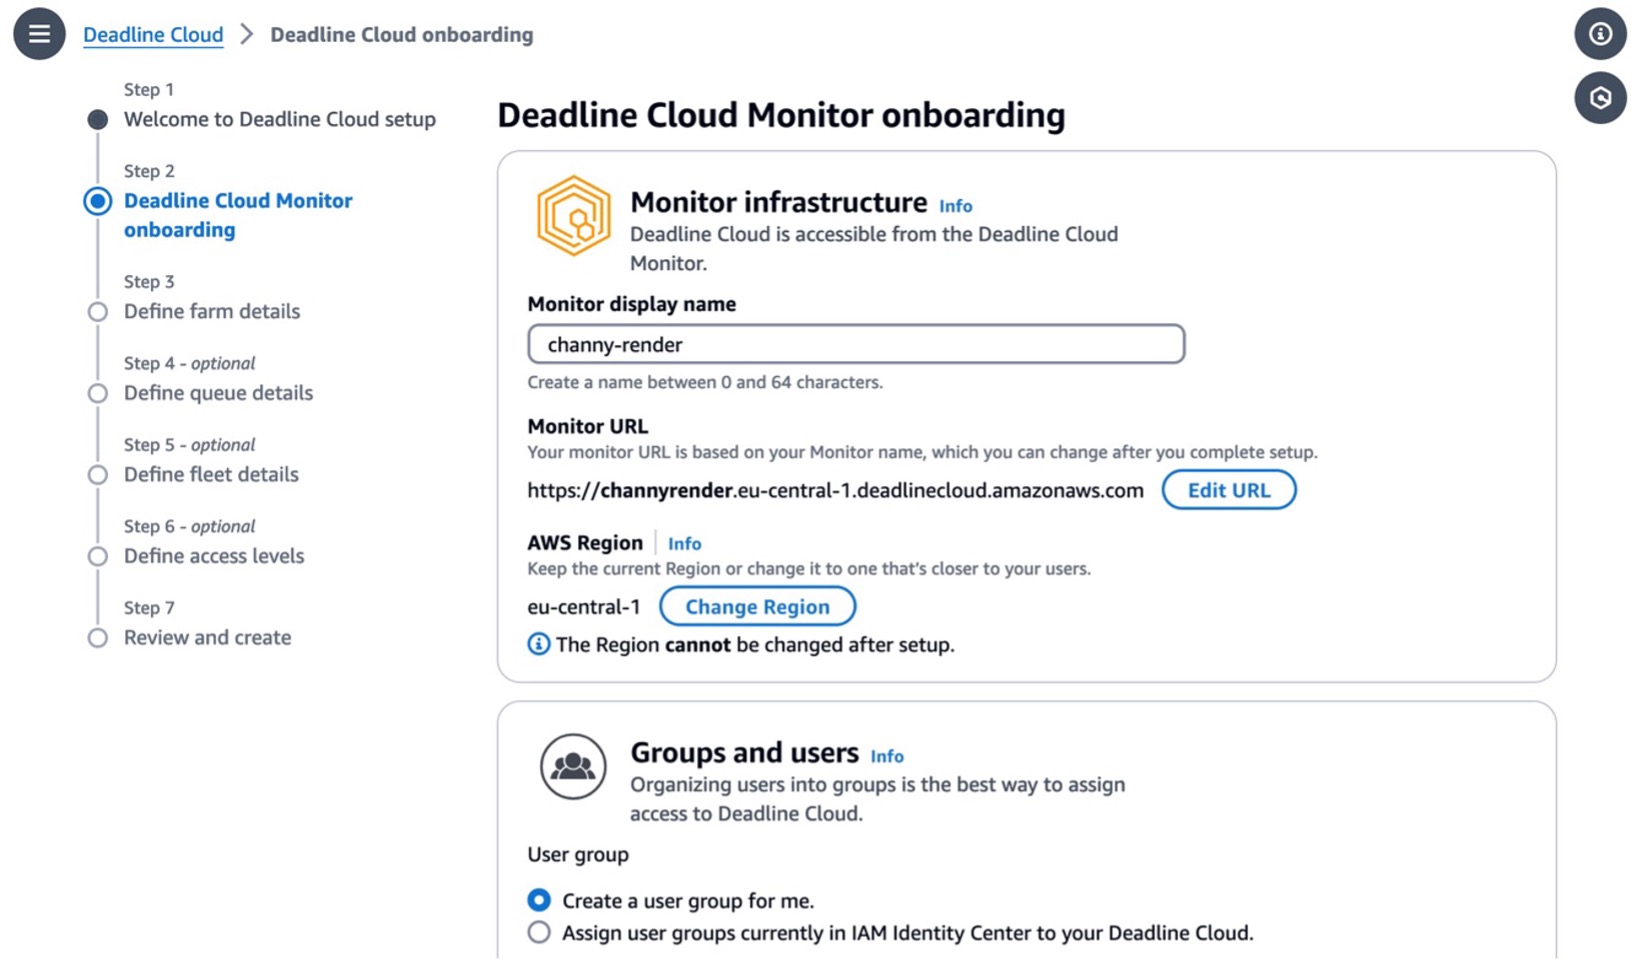
To access the monitor, you can create new users and groups and manage users (such as by assigning them groups, permissions, and applications) or delete users from your monitor. Users, groups, and permissions can also be managed in the IAM Identity Center. So, if you don’t set up the IAM Identity Center in your Region, you should enable it first. To learn more, visit Managing users in Deadline Cloud in the AWS documentation.

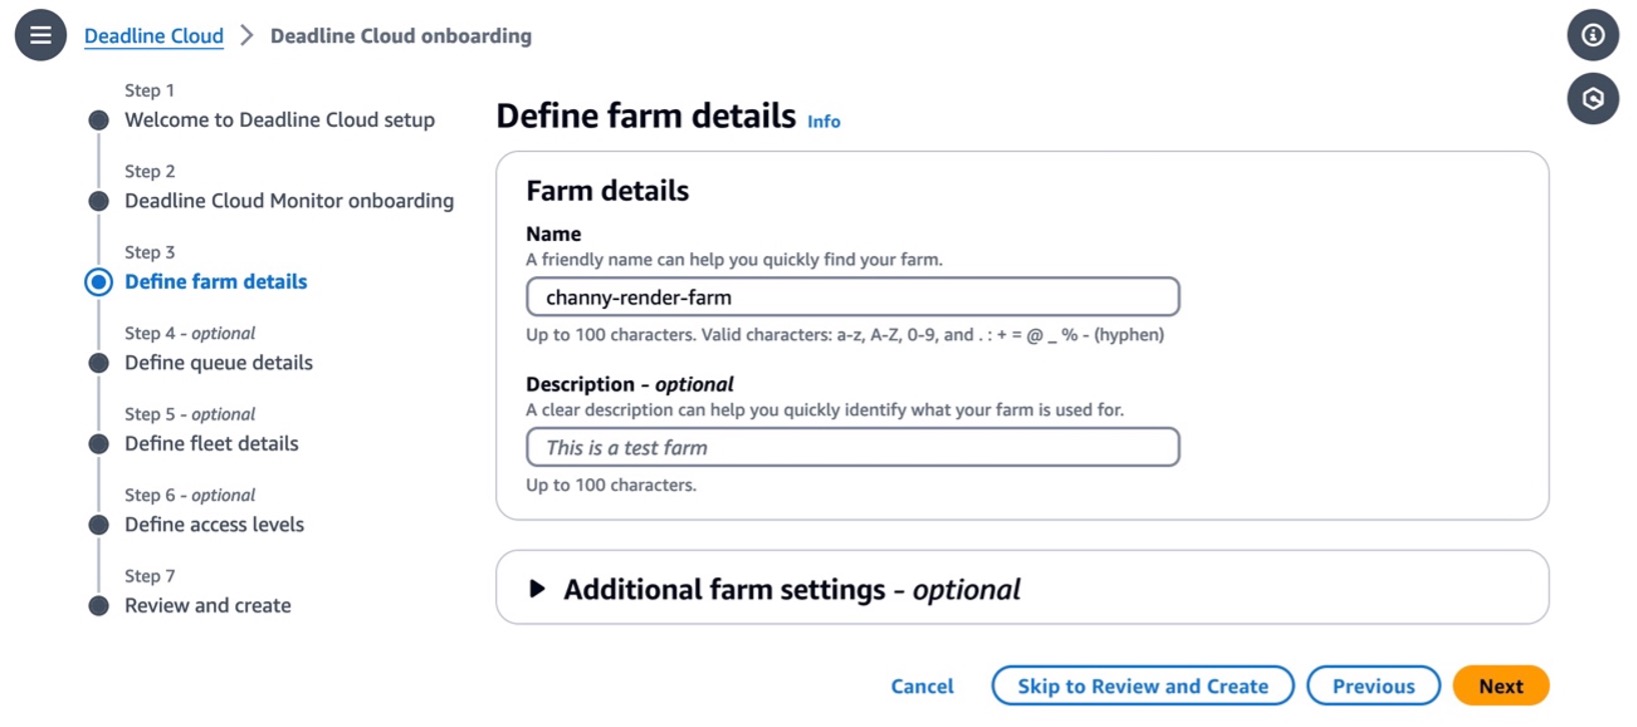
In Step 2, you can define farm details such as the name and description of your farm. In Additional farm settings, you can set an AWS Key Management Service (AWS KMS) key to encrypt your data and tags to assign AWS resources for filtering your resources or tracking your AWS costs. Your data is encrypted by default with a key that AWS owns and manages for you. To choose a different key, customize your encryption settings.

You can choose Skip to Review and Create to finish the quick setup process with the default settings.

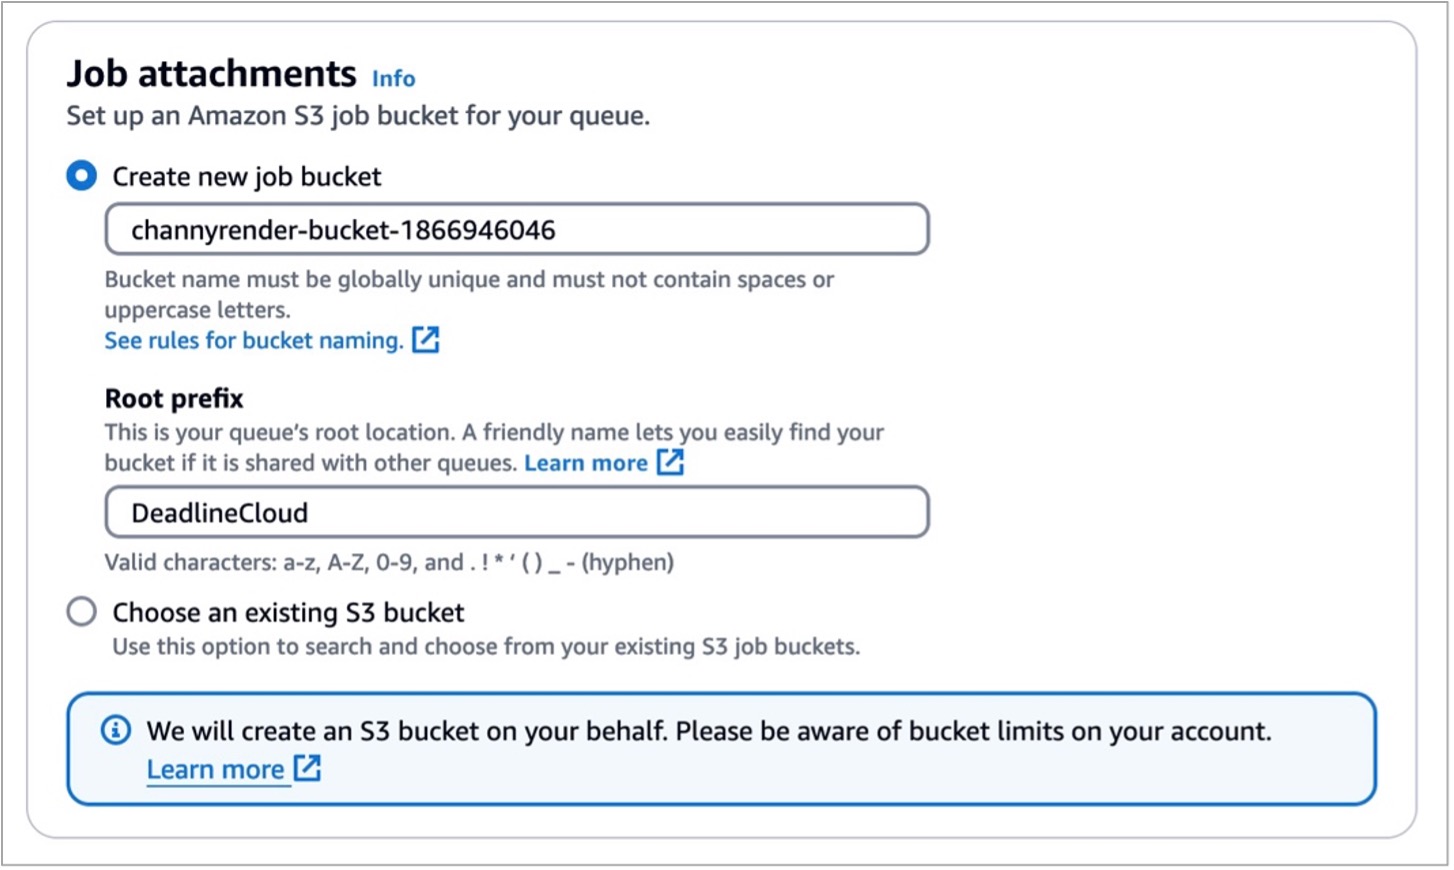
Let’s look at more optional configurations! In the step for defining queue details, you can set up an S3 bucket for your queue. Job assets are uploaded as job attachments during the rendering process. Job attachments are stored in your defined S3 bucket. Additionally, you can set up the default budget action, service access roles, and environment variables for your queue.

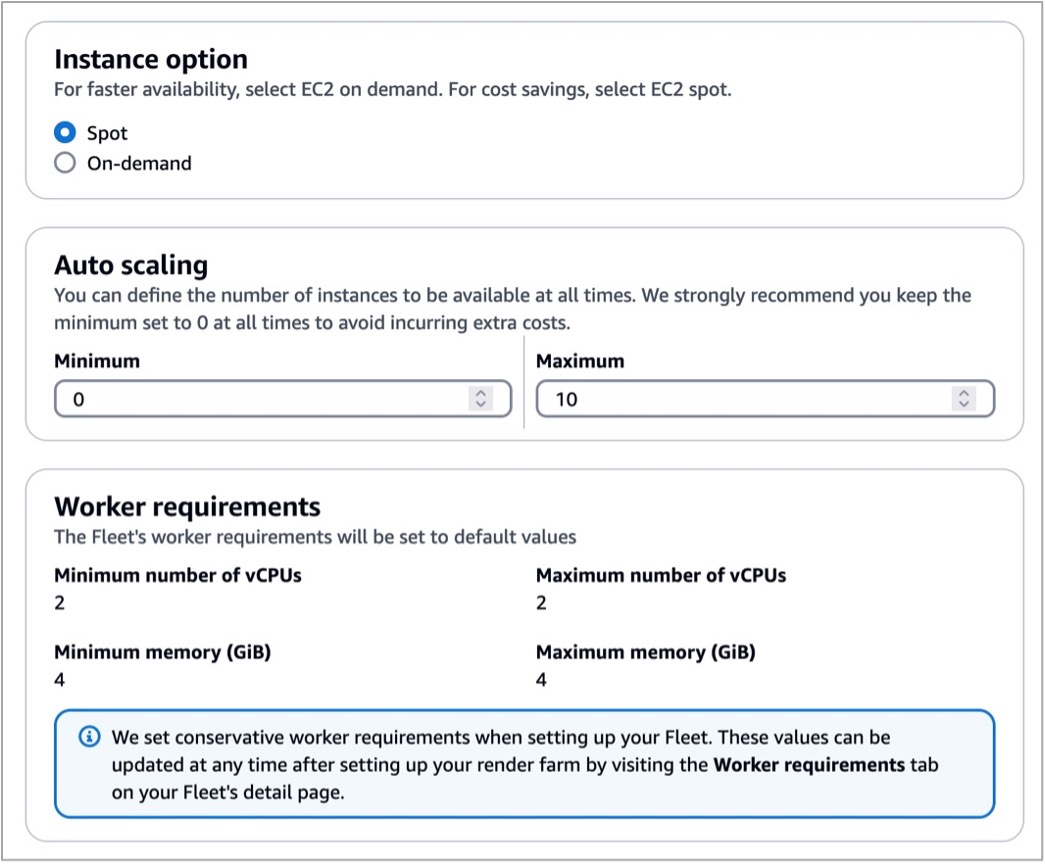
In the step for defining fleet details, set the fleet name, description, Instance option (either Spot or On-Demand Instance), and Auto scaling configuration to define the number of instances and the fleet’s worker requirements. We set conservative worker requirements by default. These values can be updated at any time after setting up your render farm. To learn more, visit Manage Deadline Cloud fleets in the AWS documentation.

Worker instances define EC2 instance types with vCPUs and memory size, for example, c5.large, c5a.large, and c6i.large. You can filter up to 100 EC2 instance types by either allowing or excluding types of worker instances.

Review all of the information entered to create your farm and choose Create farm.

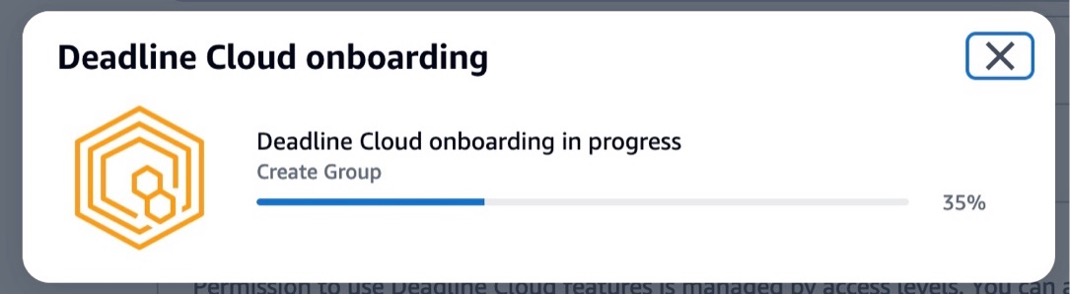
The progress of your Deadline Cloud onboarding is displayed, and a success message displays when your monitor and farm are ready for use. To learn more details about the process, visit Set up a Deadline Cloud monitor in the AWS documentation.

In the Dashboard in the left pane, you can visit the overview of the monitor, farms, users, and groups that you created.

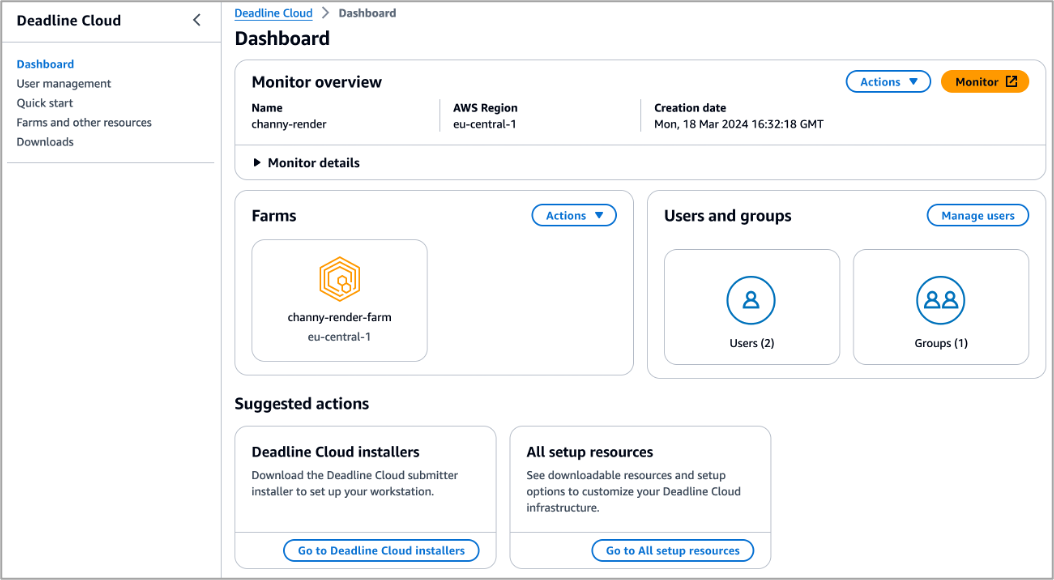
Choose Monitor to visit a web portal to manage your farms, queues, fleets, usages, and budgets. After signing in to your user account, you can enter a web portal and explore the Deadline Cloud resources you created. You can also download a Deadline Cloud monitor desktop application with the same user experiences from the Downloads page.

To learn more about using the monitor, visit Using the Deadline Cloud monitor in the AWS documentation.

2. Set up a workstation and submit your render job to Deadline Cloud
Let’s set up a workstation for artists on their desktops by installing the Deadline Cloud submitter application so they can easily submit render jobs from within Maya, Nuke, and Houdini. Choose Downloads in the left menu pane and download the proper submitter installer for your operating system to test your render farm.

This program installs the latest integrated plugin for Deadline Cloud submitter for Maya, Nuke, and Houdini.

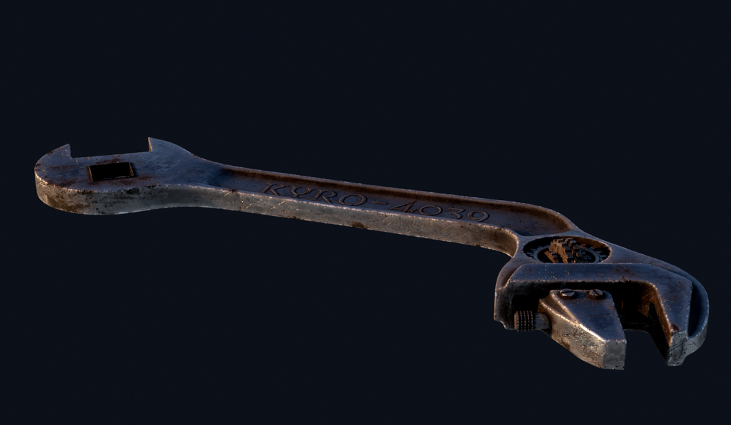
For example, open a Maya on your desktop and your asset. I have an example of a wrench file I’m going to test with. Choose Windows in the menu bar and Settings/Preferences in the sub menu. In the Plugin Manager, search for DeadlineCloudSubmitter. Select Loaded to load the Deadline Cloud submitter plugin.

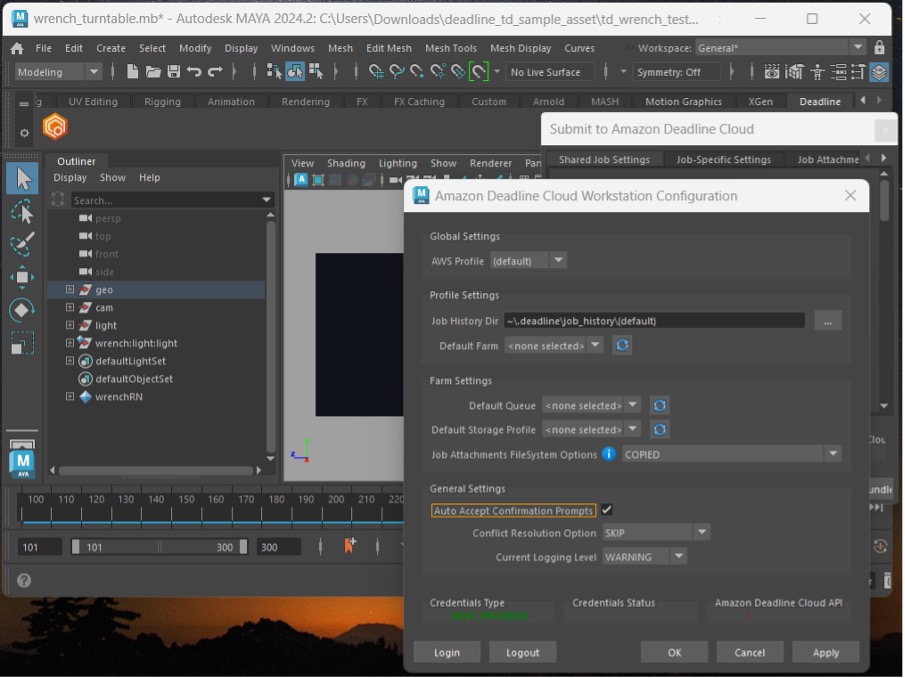
If you are not already authenticated in the Deadline Cloud submitter, the Deadline Cloud Status tab will display. Choose Login and sign in with your user credentials in a browser sign-in window.

Now, select the Deadline Cloud shelf, then choose the orange deadline cloud logo on the ‘Deadline’ shelf to launch the submitter. From the submitter window, choose the farm and queue you want your render submitted to. If desired, in the Scene Settings tab, you can override the frame range, change the Output Path, or both.

If you choose Submit, the wrench turntable Maya file, along with all of the necessary textures and alembic caches, will be uploaded to Deadline Cloud and rendered on the farm. You can monitor rendering jobs in your Deadline Cloud monitor.

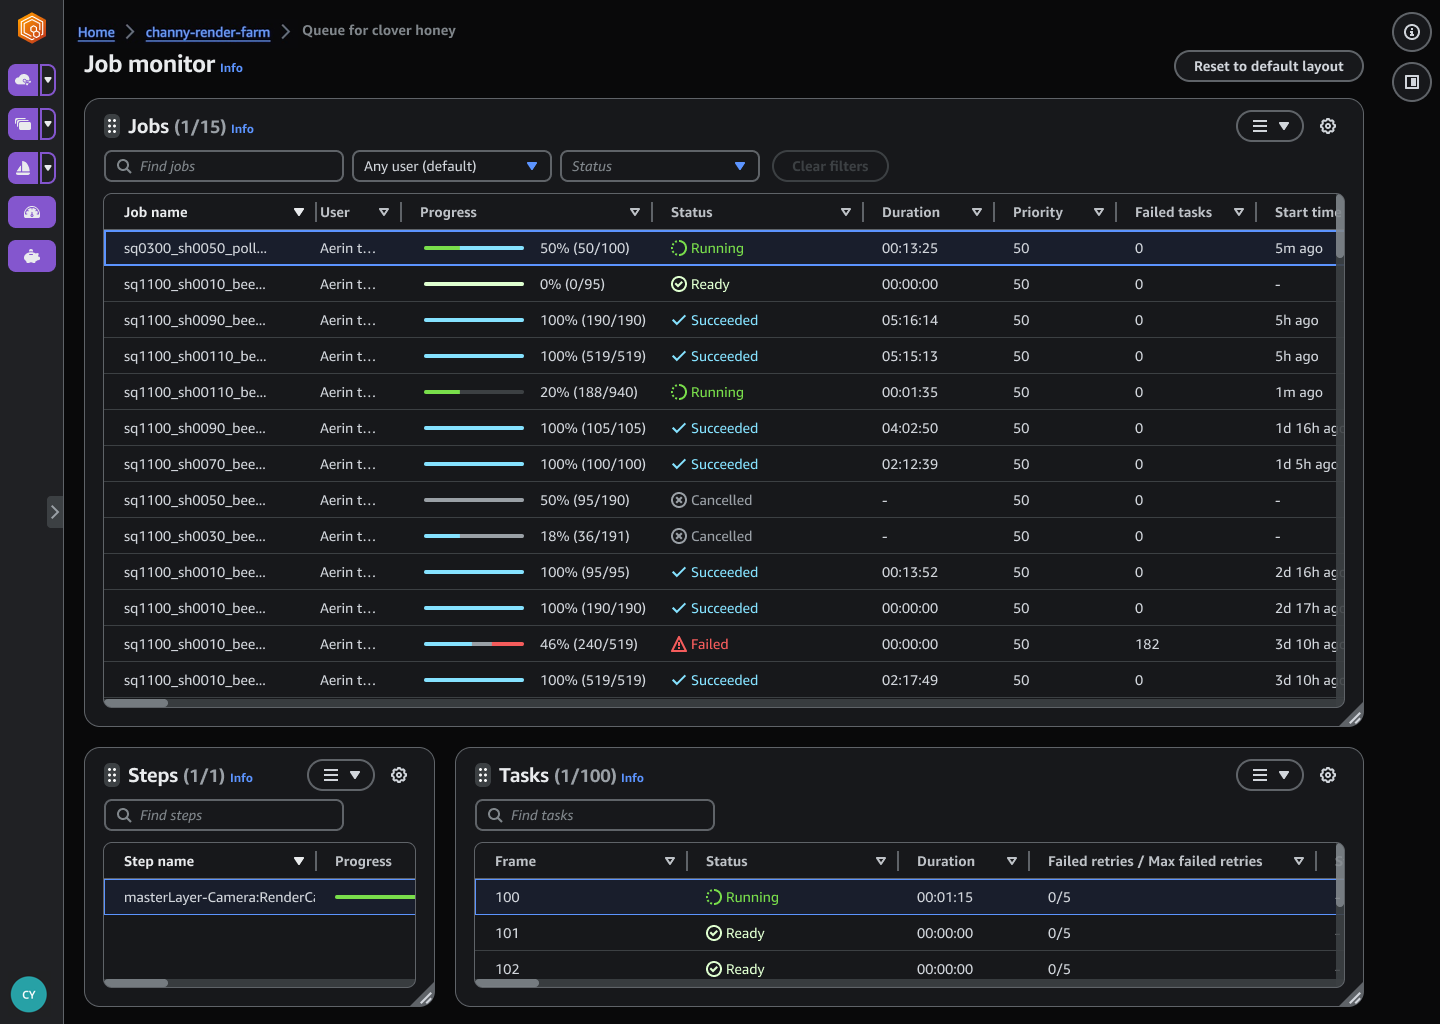
When your render is finished, as indicated by the Succeeded status in the job monitor, choose the job, Job Actions, and Download Output. To learn more about scheduling and monitoring jobs, visit Deadline Cloud jobs in the AWS documentation.

View your rendered image with an image viewing application such as DJView. The image will look like this:

To learn more in detail about the developer-side setup process using the command line, visit Setting up a developer workstation for Deadline Cloud in the AWS documentation.

3. Managing budgets and usage for Deadline Cloud
To help you manage costs for Deadline Cloud, you can use a budget manager to create and edit budgets. You can also use a usage explorer to view how many AWS resources are used and the estimated costs for those resources.

Choose Budgets on the Deadline Cloud monitor page to create your budget for your farm.

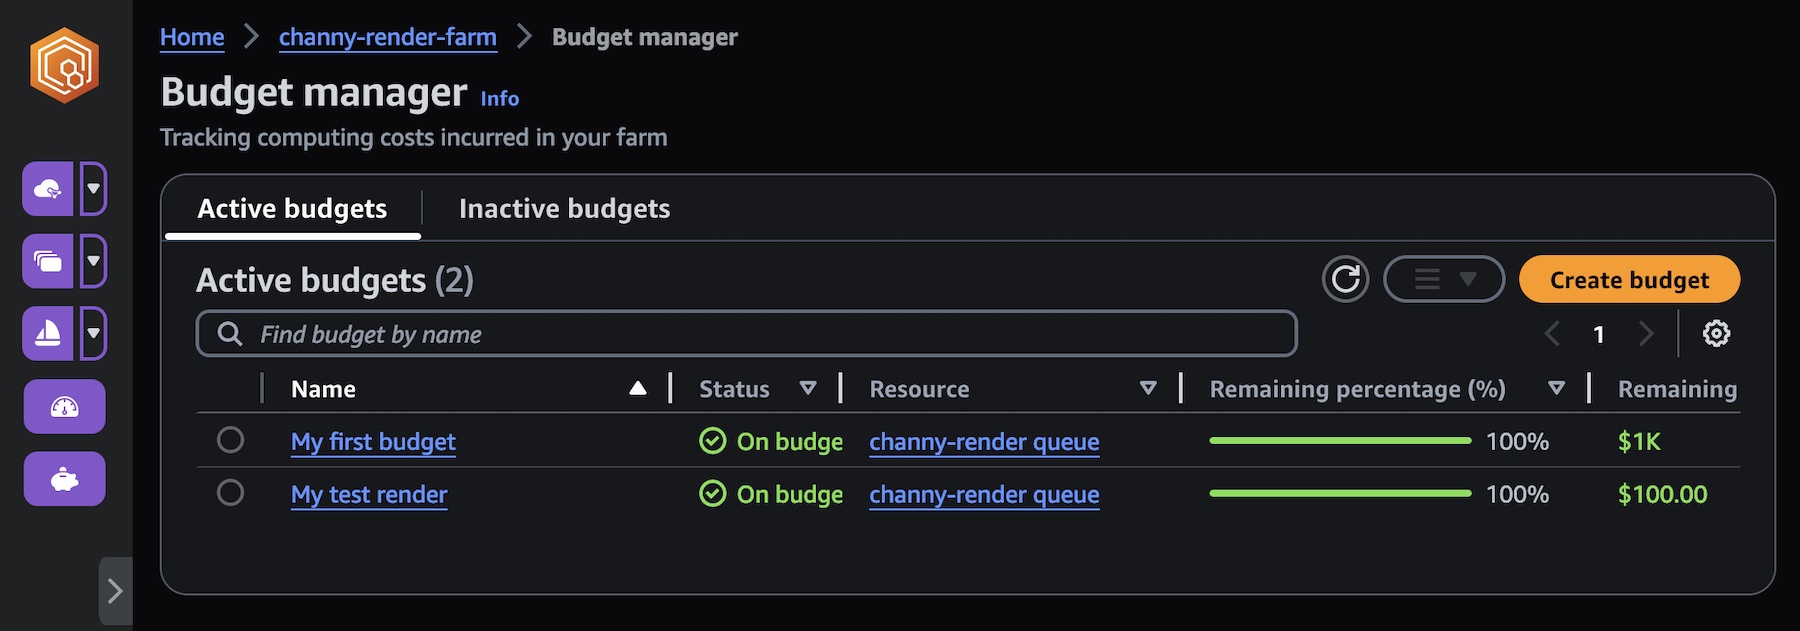
You can create budget amounts and limits and set automated actions to help reduce or stop additional spend against the budget.

Choose Usage in the Deadline Cloud monitor page to find real-time metrics on the activity happening on each farm. You can look at the farm’s costs by different variables, such as queue, job, or user. Choose various time frames to find usage during a specific period and look at usage trends over time.

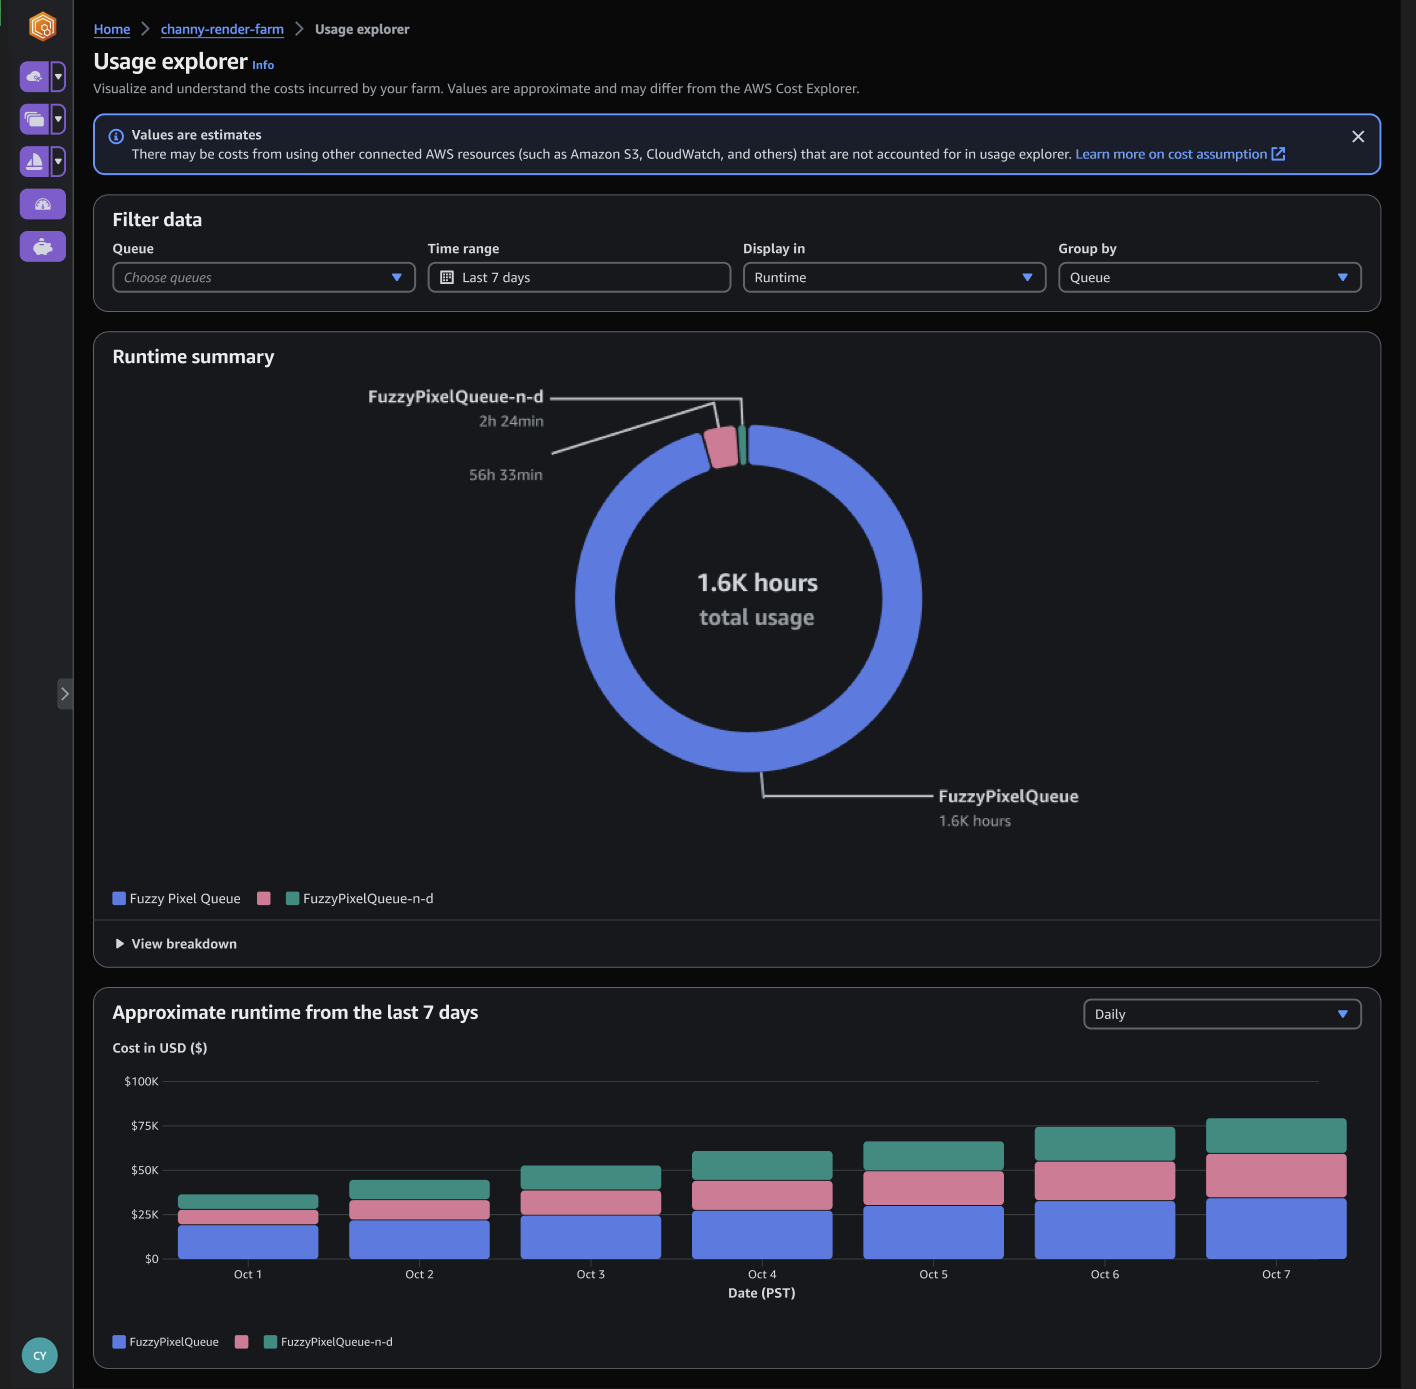
The costs displayed in the usage explorer are approximate. Use them as a guide for managing your resources. There may be other costs from using other connected AWS resources, such as Amazon S3, Amazon CloudWatch, and other services that are not accounted for in the usage explorer.

To learn more, visit Managing budgets and usage for Deadline Cloud in the AWS documentation.

Now available
AWS Deadline Cloud is now available in US East (Ohio), US East (N. Virginia), US West (Oregon), Asia Pacific (Singapore), Asia Pacific (Sydney), Asia Pacific (Tokyo), Europe (Frankfurt), and Europe (Ireland) Regions.

Give AWS Deadline Cloud a try in the Deadline Cloud console. For more information, visit the Deadline Cloud product page, Deadline Cloud User Guide in the AWS documentation, and send feedback to AWS re:Post for AWS Deadline Cloud or through your usual AWS support contacts.

Channy